Want to know how to rotate videos in Movavi Video Editor? In this article, we will introduce the features of this video editor in detail and provide a step-by-step guide on how to rotate videos using it for your learning and reference. Additionally, some common troubleshooting problems that may occur during the video rotation process will also be covered. If you are interested in this topic, then you have come to the right place—this article is ideal for you! Just keep reading below.
Movavi Video Editor is a video editing software compatible with Windows 7, 8, 10, and 11, as well as Mac OS X 10.13.6 or later. It is designed for beginners, ordinary users, and content creators, helping them easily rotate and flip video clips without the complexity and effort required by professional software. It is renowned for its intuitive interface and excellent balance of basic and intermediate features. With this rotation program, you can flip upside-down videos to right-side up, rotate videos sideways, reverse video orientation just with a click, switch from portrait to landscape, and more.
In this section, we will provide detailed steps on how to rotate videos in Movavi Video Editor.
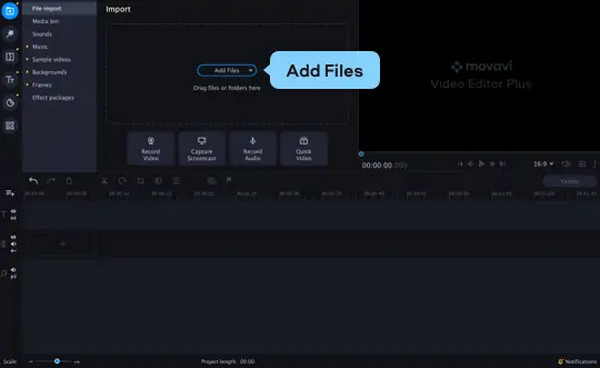
1. Open Movavi Video Editor and click Add Files to import the videos you want to rotate. You can also simply drag and drop files from other windows onto the program.
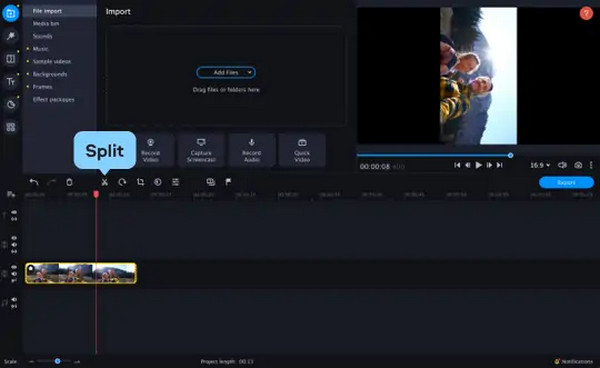
2. Drag and drop your videos to the Timeline. If you want to rotate a specific segment of the video, you can select the video on the timeline and click the Split button to cut out the section you want to rotate.
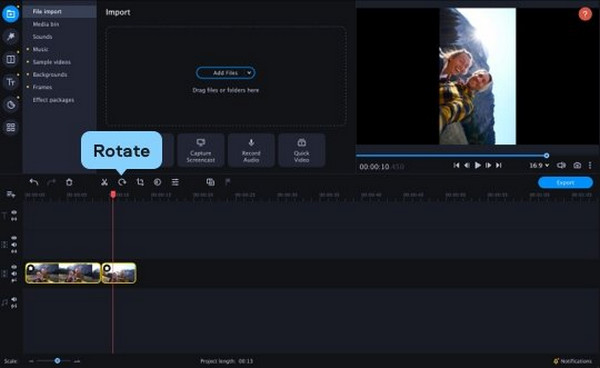
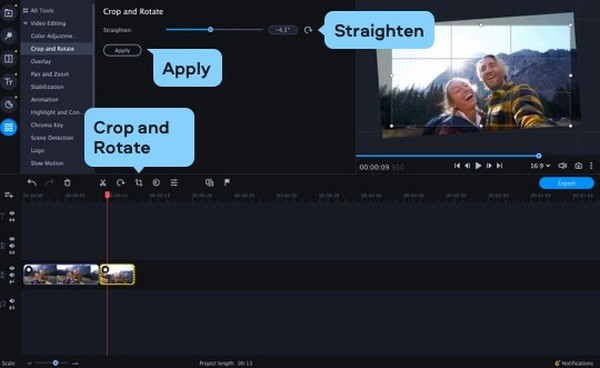
3. Click the rotate button to rotate the video 90 degrees clockwise. Repeat this operation as needed to rotate the video until it is oriented in the desired direction.

In addition to rotating videos at fixed angles, you can also click the Crop and Rotate button, then drag the Angle slider for more flexible and precise rotation.
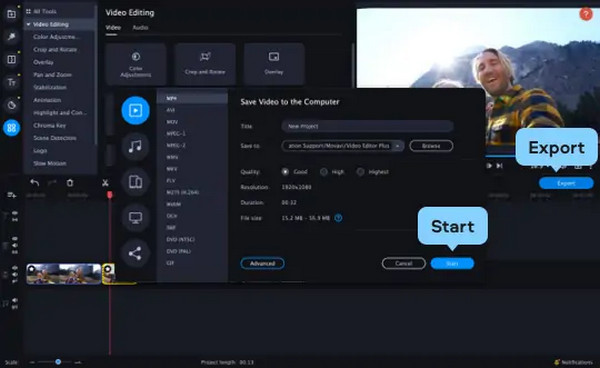
4. After rotating the video to your desired angle, click the Export > Start button to begin exporting the edited video. It will then be automatically saved to your device.
Overall, Movavi Video Editor is a simple and beginner-friendly video rotation tool. The steps to rotate a video using it are straightforward, though it may lack some advanced features for users with higher video editing demands. Moreover, its free trial version has some limitations, including watermarks on exported videos, limited video length, etc.
In this section, we will list some of the most common causes of issues when rotating videos and provide solutions to help you troubleshoot.
When you rotate a video by 90 or 270 degrees, its dimensions and aspect ratio will change. If the overall size is still set to the original aspect ratio, black bars will appear on both sides of the video.
Solutions:
1. The most effective solution is to adjust the aspect ratio of the project in the video editor to match the rotated aspect ratio.
2. If you do not want to alter the original aspect ratio, another method is to scale the video to fill the screen. However, this will crop the top and bottom of the video, resulting in the loss of some image.
The primary reason rotated videos appear blurry or pixelated after being exported is usually due to incorrect export settings or mismatched resolutions.
Solutions:
1. Ensure that the export settings (resolution, frame rate, and bitrate) match the quality of the original video file and the settings in the editor.
2. Try restarting the computer or updating the video editing software and the drivers.
AnyMP4 Video Converter Ultimate is a multi-functional video editing software compatible with both Windows and Mac. It has a built-in editing tool that allows you to quickly edit videos, including the ability to rotate any video to the desired orientation. With it, you can rotate videos 90 degrees clockwise or counterclockwise, or change/convert them from horizontal to vertical. You can also preview the rotated video effects in real-time within the preview window. Furthermore, this video editor includes tools such as a video compressor, enhancer, and watermark remover, among others, for various video editing tasks.
The following are the specific steps to rotate videos using it:
1. Download and install it on your computer. After installation, launch it.
Secure Download
Secure Download
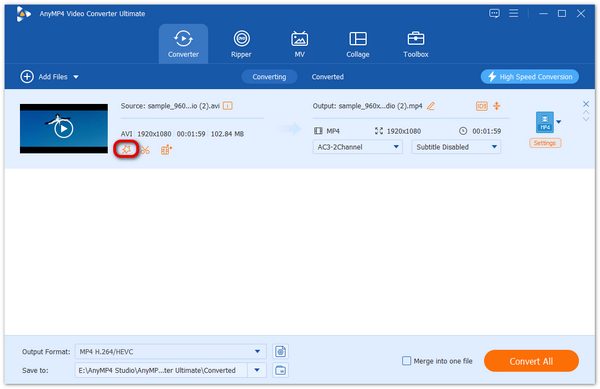
2. Click Add Files or drag the video file directly to import it into this program. Then, click the Edit button.
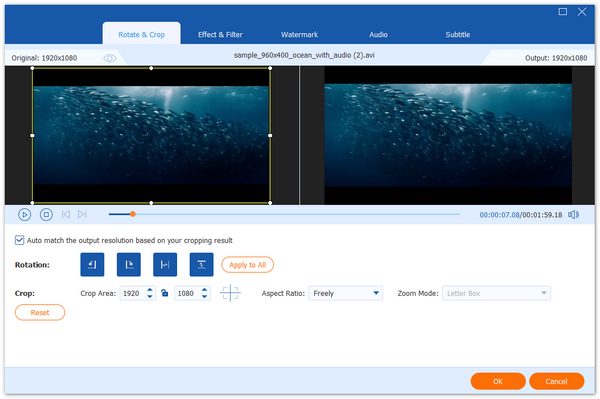
3. Rotate the video by clicking the four buttons under the Rotate & Crop tab > the Rotation option. Here, you can flip the video vertically and horizontally, rotate it 90 degrees, 180 degrees, or 270 degrees. Finally, click OK to save the changes.
What are the limitations of Movavi Video Editor?
Movavi Video Editor has some limitations, including restricted functionality in the free trial version, a lack of professional and advanced features, and occasional performance issues such as slowness and lag.
Why do I see black bars on the sides of my rotated video?
You see black bars on the sides of your rotated video because of the mismatch between the aspect ratio of your original video and the screen on which you are watching it.
What if the video looks fine in the preview but appears wrong after I export it?
A good way to prevent these issues is to always match your export settings to your source footage settings as closely as possible and to check your exported file on multiple devices and media players.
This article mainly introduces how to rotate videos in Movavi Video Editor, a video editing software. It also provides solutions to common troubleshooting issues. Through this article, we are sure you have understood that Movavi is generally a good video rotation tool. But it may not be enough for users with more advanced and professional editing needs. Not to mention the limitations of its free trial version. Therefore, we also provide you with its best alternative, AnyMP4 Video Converter Ultimate, for your consideration. Hope this article is helpful to you!
Secure Download
Secure Download
 Updated by Mark Cristobal to Edit Video
Related Articles
 Rotate MOV File - How to Rotate a MOV File 90 Degrees
How do I rotate a MOV file in Windows Media Player? This post shares 3 simple ways to help you rotate MOV 90 degrees on Mac and Windows computer.
 How to Rotate MP4 Video on Windows & Mac - 3 Easy Ways
Learn how to easily rotate your MP4 videos on Windows 11/10, and Mac computers. Our step-by-step guide helps you fix video orientation without quality loss.
 VLC Rotate Video Temporarily and Permanently
Are you wondering how to rotate a video in VLC Media Player? Is it possible? Everything you need to know is here. Check it out!
 How to Rotate a Video in Windows Media Player to Right Orientation
This tutorial tells you how to efficiently rotate a video in Windows Media Player and the best alternatives to get right orientation and angle of the video.