FFmpeg is a pro-level, industry-standard tool for video processing. Many developers and editors use it for tasks such as converting, editing, compressing, and filtering media files. While it operates through a command-line interface, it offers unmatched flexibility and precision compared to most traditional video editors. In this guide, you'll learn how to use the FFmpeg crop video command to remove unwanted areas or adjust framing. Even if you are new to command-line tools, the instructions are designed to be clear and easy to follow.
Installing FFmpeg used to require steps that were confusing for many beginners. Today, the process is much simpler thanks to modern package managers that automate everything with a single command.
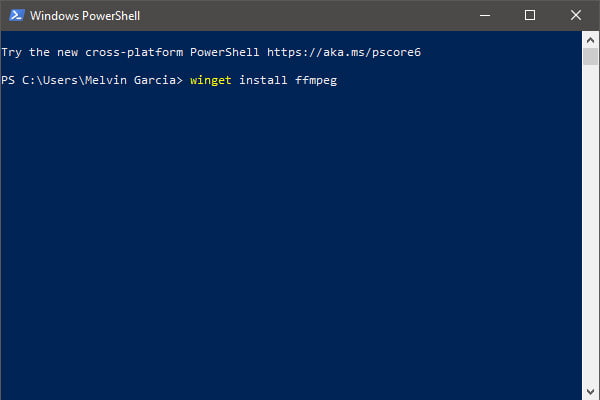
For Windows: Open PowerShell and type winget install ffmpeg.
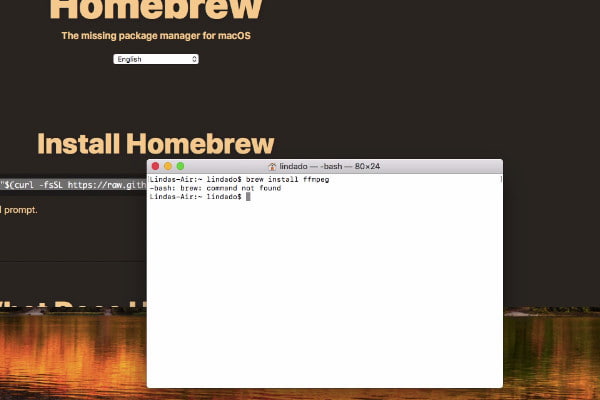
For Mac: Open Terminal and use Homebrew: brew install ffmpeg.
After installation, type ffmpeg -version in your terminal. You should see version 6.x or 7.x to ensure compatibility with modern filters.
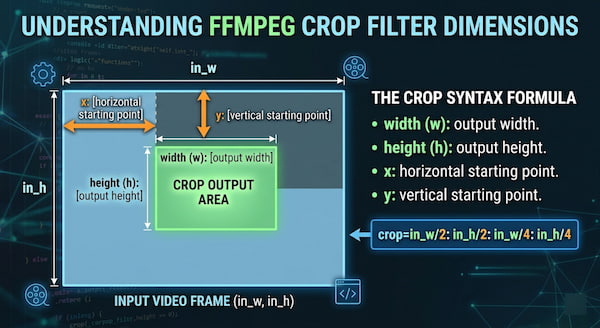
Before running commands, you must understand the ffmpeg crop filter syntax. The basic formula is crop=width:height:x:y (e.g., crop=in_w/2:in_h/2:in_w/4:in_h/4). This formula crops the center portion of the video.
Technical Note:
Cropping almost always triggers a re-encoding because the underlying pixel map changes. To preserve original audio quality without wasting CPU power, always include -c:a copy in your command. Furthermore, if you are using H.264 or H.265 codecs, ensure your width and height are even numbers, as odd dimensions will result in a width that is not divisible by 2. In addition to video cropping, you can also compress video in FFmpeg.
Using the FFmpeg crop video center logic is one of the most requested tasks. Here is a quick reference table for common workflows:
| Use Case | Command |
|---|---|
| Center crop | crop=iw/2:ih/2:iw/4:ih/4 |
| Crop left half | crop=iw/2:ih:0:0 |
| Crop to 16:9 | crop=ih*16/9:ih |
| Remove 100px top | crop=iw:ih-100:0:100 |
While Winget or Brew are faster, understanding manual installation and command-line syntax is essential for power users who want full control over their environment. Follow these updated steps to master the FFmpeg crop video process.
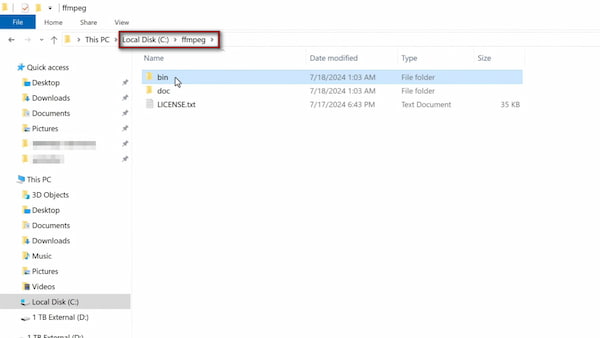
1. Navigate to the FFmpeg website and download a package that matches your OS. Extract the folder to the root of your primary system drive (C: drive). To keep your command lines clean, rename the extracted folder to just FFmpeg.
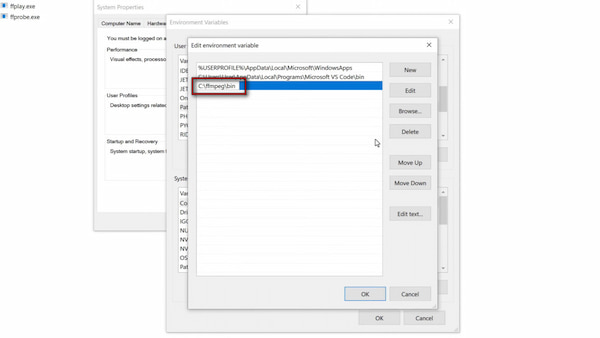
2. Search for Edit the system environment variables in your Start menu. Under the Advanced tab, click Environment Variables. Find Path in the System Variables list, click Edit, then New, and paste C:\ffmpeg\bin\. Click OK to save.
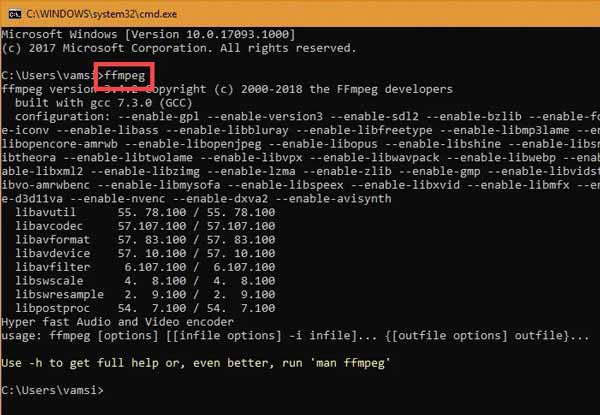
3. Open a new Command Prompt or PowerShell window. Type ffmpeg and press Enter. The terminal will display a wall of text showing the version number (look for v6.0 or v7.0 for 2026 compatibility) and the configuration details.
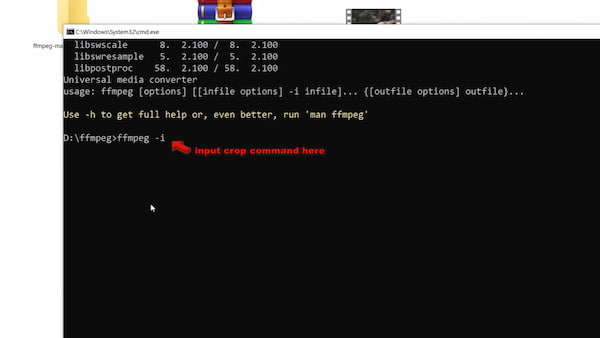
4. To crop video files manually, you need to define the specific area you want to keep. Open your terminal as an administrator and use ffmpeg -i input.mp4 -filter:v "crop=w:h:x:y" -c:a copy output.mp4.
Example: To crop a 500×500 square from the very center of a 1080p video, you would calculate the start points or use the shorthand: ffmpeg -i input.mp4 -vf "crop=500:500" output.mp4. If you're planning to cut down video length, check the FFmpeg trim video command here.
Editor's Note: FFmpeg supports internal variables like iw (input width) and ih (input height). If you want to crop an MP4 by removing exactly 100 pixels from the sides, you can use crop=iw-100:ih. It is much faster than doing the math yourself for every different video size.
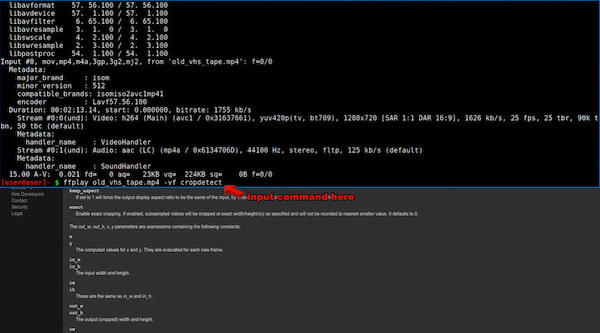
One of the most powerful features is the FFmpeg auto-crop of black bars function. If you have a letterboxed movie, you don't need to guess the coordinates. Use the cropdetect filter first:
ffmpeg -i input.mp4 -vf cropdetect -f null -
It will output the exact coordinates (e.g., crop=1920:800:0:140). You can then run the final command using those values to get a clean, borderless video.
FFmpeg is extremely powerful, but it relies entirely on command-line input. It can be challenging for beginners and time-consuming even for experienced users when handling multiple files. Tasks such as adjusting crop coordinates, testing outputs, and fixing errors often require multiple attempts. That's why using a GUI-based tool is the better choice.
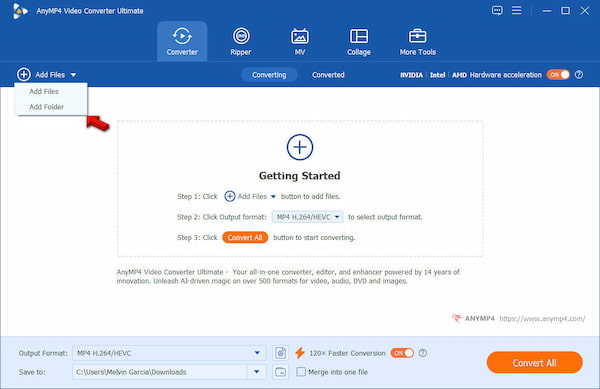
AnyMP4 Video Converter Ultimate simplifies the entire process by replacing manual commands with visual controls. Instead of calculating coordinates, you can crop videos directly on-screen and preview results instantly. Additionally, it lets you process up to 50+ videos simultaneously. It also introduces modern AI-powered video upscaling features, making it more aligned with today's video editing needs. What makes this tool stand out is its flexibility. You can switch between manual cropping and pixel-precise adjustments as needed.
| FFmpeg (CLI) | VS | AnyMP4 (GUI) |
| Steep | Learning Curve | Beginner-friendly |
| Fast but manual | Speed | Fast with automation |
| Script-based | Batch Processing | One-click batch |
| Not available | Preview | Real-time preview |
| No | AI Features | Yes |
Here's how to crop MP4 without re-encoding in FFmpeg alternative:
Secure Download
Secure Download
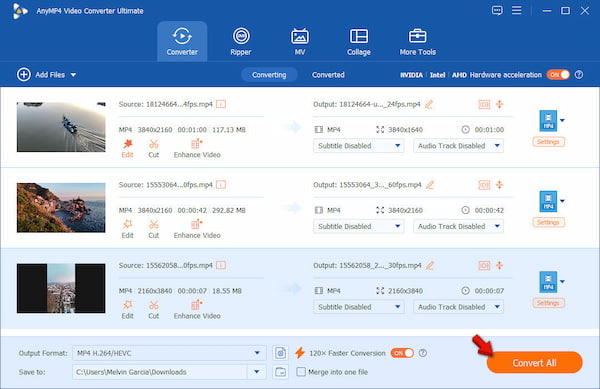
1. After you launch AnyMP4 Video Converter Ultimate, click + Add Files. Choose Add Files to import a single video or select Add Folder for batch processing. Once added, your videos will appear in the main interface.
2. Click the Edit (Magic Wand) next to your video thumbnail. The Editor window opens to the Rotate & Crop tab by default. You can crop using:
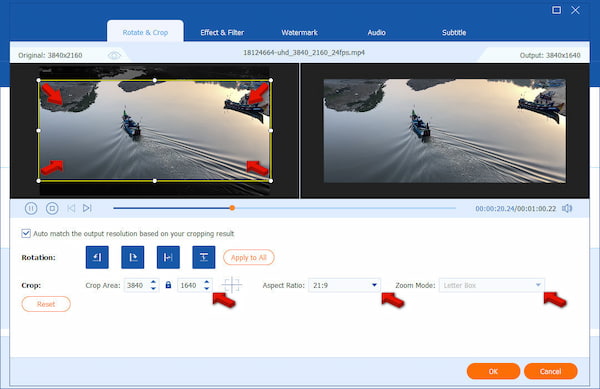
Crop Frame: Drag and resize the frame directly in the preview window to select the desired area.
Crop Area Values: Enter exact width and height for precise cropping.
Aspect Ratio: Choose ratios like 9:16, 4:3, or 1:1, perfect for platforms like TikTok or Instagram.
Zoom Mode: Select how your video fits within the frame (Letterbox, Pan & Scan, or Full).
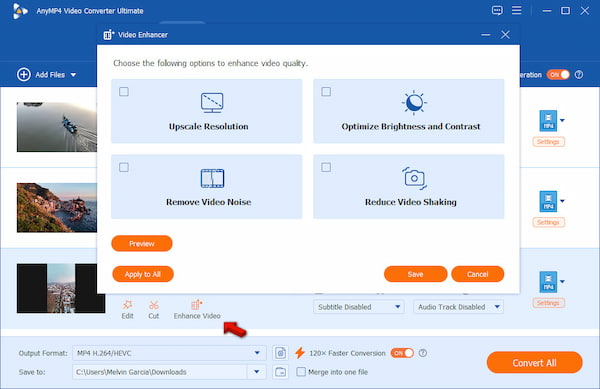
Bonus: Enhance Video with AI:
Before exporting, click Enhance Video to access the AI Video Enhancer. Here, you can upscale video resolution, reduce noise, stabilize shaky footage, and optimize brightness and contrast.
3. Preview your video and confirm the crop area. If needed, make adjustments until you get the desired crop area. Once done, click OK to apply changes. Switch back to the main interface and click Convert All to export.
Using FFmpeg gives you full technical control, but it requires time, precision, and command-line knowledge. If you want a faster, easier, and more efficient workflow, a GUI tool is the smarter choice. AnyMP4 Video Converter Ultimate is highly recommended for visual editing, batch processing, and AI-powered enhancements in one place. It transforms complex tasks, such as cropping, into a simple, streamlined process.
Secure Download
Secure Download
Q: Is there a GUI for FFmpeg?
A: Yes. In addition to tools like QWinFF and FFQueue, GUI-based alternatives exist that go beyond FFmpeg front-ends. For example, AnyMP4 Video Converter Ultimate provides a fully visual editing experience with drag-and-drop cropping. Additionally, it offers preset aspect ratios, batch processing, and even AI-powered enhancements.
Q: Can I crop a video in VLC?
A: Yes, you can crop a video in VLC, but the process isn't straightforward. It allows temporary cropping via its video effects settings, while permanent cropping requires advanced settings and a conversion afterward.
Q: How to resize a video in HandBrake?
A: To resize a video in HandBrake, open your video file and go to the Dimensions tab. From there, you can adjust width, height, and cropping settings manually or use preset aspect ratios. HandBrake also automatically maintains proportions to avoid distortion.
Q: How do I use FFmpeg to crop a video to a 9:16 aspect ratio for TikTok?
A: Use ffmpeg -i input.mp4 -vf "crop=ih*9/16:ih" -c:a copy output.mp4. This command sets the width relative to the height, producing a vertical 9:16 video suitable for TikTok. You may need to adjust positioning (x value) if your subject is not centered.
Q: What is the FFmpeg command to automatically detect and remove black bars?
A: First, detect black bars using ffmpeg -i input.mp4 -vf cropdetect -f null -. FFmpeg will output recommended crop values in the console. Then apply them like this: ffmpeg -i input.mp4 -vf "crop=width:height:x:y" output.mp4.
Q: Can I crop a video with FFmpeg without losing quality?
A: Not entirely. Cropping with FFmpeg usually requires re-encoding the video, which can lead to slight quality loss. However, you can minimize this by using high-quality encoding settings and copying the audio stream with the -c:a copy option.
Q: How do I crop the top 100 pixels from a video using FFmpeg?
A: Use ffmpeg -i input.mp4 -vf "crop=iw:ih-100:0:100" -c:a copy output.mp4. It removes 100 pixels from the top while keeping the full width. The y=100 parameter shifts the crop area downward, effectively cutting off the top portion of the video.
Using FFmpeg to crop video gives you exact results, making it perfect for technical workflows. However, the command-line interface can be challenging and time-consuming for beginners or anyone handling multiple files. If you prefer a simpler and more efficient approach, AnyMP4 Video Converter Ultimate is highly recommended. It provides visual cropping, batch processing, real-time preview, and AI-powered video upscaling. This tool lets you crop videos efficiently without complex commands. With this tool, you get flexibility, speed, and high-quality output, making it the best alternative to FFmpeg for everyday video editing tasks.
Secure Download
Secure Download
 Updated by Mark Cristobal to Edit Video
More readings
 Top 10 Video Resizer Apps You Really Need
Here are top 10 best video resizer apps for Windows PC, Mac, Android and iOS device.
 Full Review of 5 Best GIF Resizer Tools
What is the best GIF resizer? How to resize a GIF? How to make GIF dimension resize? Get 5 best GIF resizers including free online ones to resize animated GIF.
 Ultimate Guide to Resize Video for Instagram Feed, Story and IGTV
How to resize a video for Instagram? How to crop video for Instagram free? Why does Instagram crop my videos? Get detailed guide to crop or resize video for IG.
 Review of Kapwing Resizer and 3 Best Kapwing Alternatives
What is Kapwing resizer? How to use Kapwing to crop video? How do I resize with Kapwing? Get a full review of Kapwing video resizer and its best alternatives.