As a professional video editor program, Adobe Premiere Pro can crop a video in a couple of minutes if you are familiar with the software. However, for most beginners and ordinary people, editing video in Premiere is still a tough job. In this step-by-step tutorial, you will learn how to efficiently use Adobe Premiere Pro to crop a video in various situations. So that you won't encounter any problems during the process.

| Method | Best For | Ease of Use | Processing Speed | Handles Motion | Output Use Case | Limitations |
|---|---|---|---|---|---|---|
| Crop Effect | Precise trimming of specific areas | Moderate | Medium | No (manual keyframing) | Cleaning edges | Time-consuming for moving subjects |
| Auto Reframe | Social media resizing with motion tracking | Easy | Fast | Yes (automatic) | TikTok, Reels, Shorts | Needs tweaking in complex scenes |
| Sequence Settings | Changing aspect ratio for entire video | Easy | Fast | No | Platform resizing | Requires manual repositioning and scaling |
Before cropping a video in Premiere, you have to purchase and install it on your machine. The single app costs $20.99 per month. Of course, the Adobe packages are more expensive with bonus features, like cloud storage.
Here's how to crop in Premiere Pro:
1. Start the professional video editor, then go to the File menu and choose New to create a new project. You can also open an existing project.
2. Next, choose the Import option in the File menu and add the video that you wish to crop. Then, place the video onto the timeline from the Project panel.
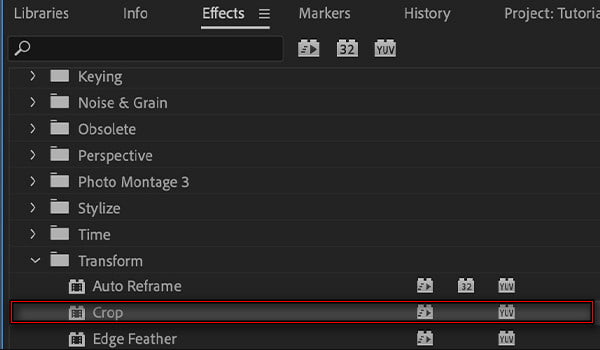
3. Make sure to select the video on the timeline. Then go to the Effects tab in the Project pane, select Video Effects, then Transform, and finally Crop.
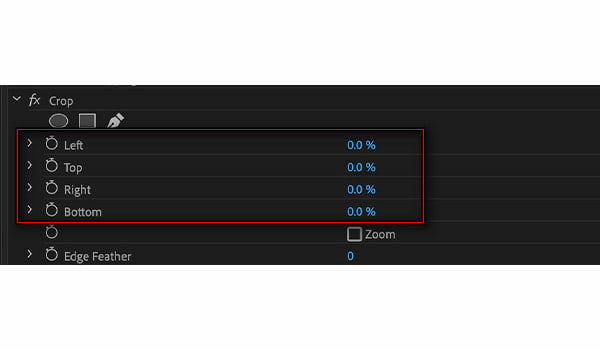
4. Double-click the Crop option to open the four parameters: Left, Top, Right, and Bottom. Once you add the crop effect, adjust it in the Effect Controls pane.
There are three ways to crop a video in Premiere now:
Enter the percentage to crop in each of the four parameters.
Click and expand each parameter to reveal a slider. You can move and adjust it to crop the video as you wish.
Once you click the Crop effect, the cropping box will appear on the composition pane. You can drag and adjust the edges to manually crop the video.
5. If you intend to keep the original video size and crop and zoom it, go to the Video Effects under the Effect Control tab, and select Motion and Position or Scale. Then adjust the values accordingly.
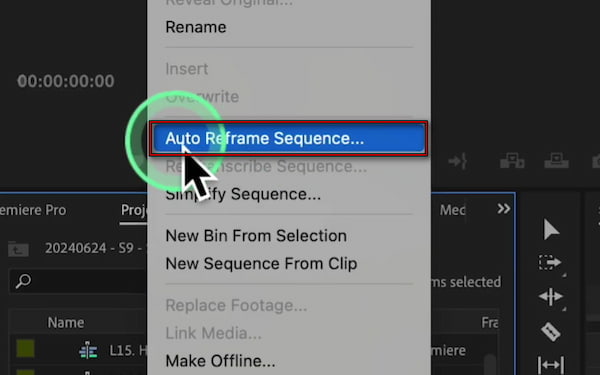
Here's how to crop vertical video in Premiere Pro using the auto-reframe feature:
1. Open your sequence and select the clip you want to reframe. Navigate to the Graphics menu and select the Auto Reframe Sequence option to open a dialog box.
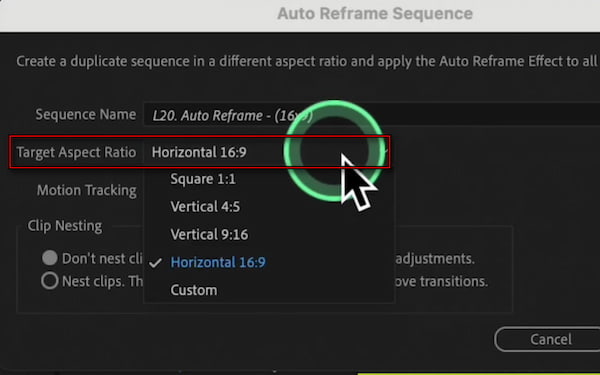
2. In the Auto Reframe Sequence dialog box, click the Target Aspect Ratio selector. Choose the format you need, such as crop video to Square 1:1, Horizontal 16:9, or Custom.
Here's how to use sequence settings to crop video in Premiere:
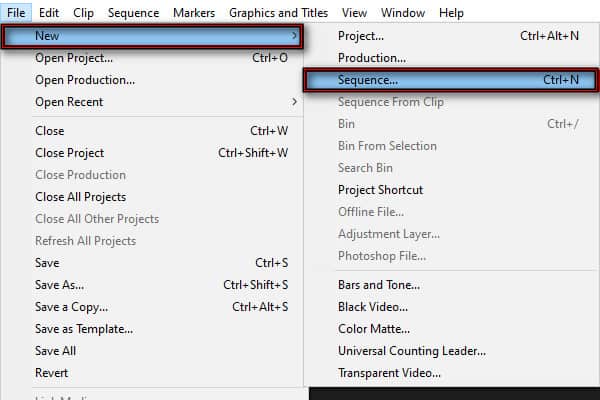
1. Open your project and be sure your clip is already in a sequence. If not, go to File, click New, and select Sequence to control the resolution and overall frame size of your video.
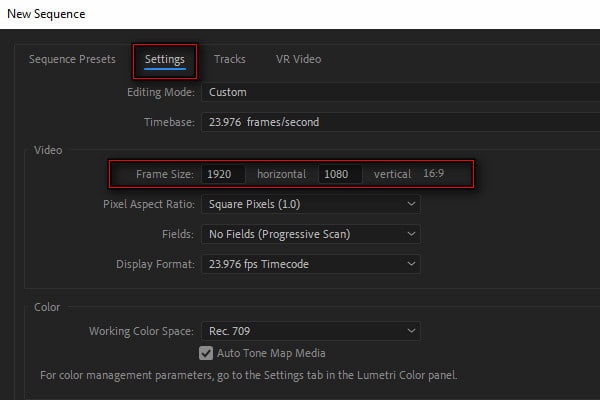
2. In the New Sequence dialog, switch to the Settings tab. Under the Video section, look for Frame Size and adjust it depending on your goal. By changing this, you're deciding what part of the video will remain visible.
Cropping in Premiere Pro isn't a one-size-fits-all task. It really depends on what you're trying to achieve. If you need precise control, the Premiere Pro Crop effect is the most straightforward. For fast, automated results, Auto Reframe does most of the heavy lifting. And if your goal is resizing for different platforms, adjusting the sequence settings is the smartest approach.
If black bars appear around your video after cropping, it means the frame no longer fills the sequence. It happens because cropping removes pixels while the sequence's resolution remains the same. Here's how to fix black bars after cropping in Premiere:
Method A: Open the Effect Controls panel, navigate to Motion, and increase the Scale value until it fills the frame.
Method B: Right-click the clip in the timeline and choose Set to Frame Size.
Pro Tip: If you're creating content for TikTok/Reels, set your sequence to 1080×1920 (9:16) instead of 16:9.
When the Crop effect won't apply or doesn't show any changes, it's because another effect is interfering or the order is incorrect. It happens if Warp Stabilizer is already applied. To fix the Premiere Pro crop effect not working, right-click the clip and choose Nest. Apply the Crop effect to the nested sequence, making sure it follows any other spatial effects in the Effect Controls panel.
If your video looks blurry or jagged after cropping and scaling, it's because you're zooming into fewer pixels, which reduces overall quality. For example, cutting half of a 1080p frame and scaling it back up significantly lowers its clarity. To minimize this, use higher-resolution footage, such as 4K, when possible, and enable Use Maximum Render Quality during export.
If you don't see the blue crop handles in the Program Monitor, the effect may not be active, or the view may be limiting visibility. To bring them back, click directly on the word Crop in the Effect Controls panel to activate on-screen controls. Then, adjust the Program Monitor zoom to 25% or 50%, as needed, so the handles become visible.
For many users, Adobe Premiere Pro offers unmatched precision and advanced tools. However, it can also feel heavy and complex, especially for beginners or those with low-spec PCs. AnyMP4 Video Converter Ultimate is an excellent alternative to crop video in Premiere Pro without losing quality. More than just a media converter, it is a one-stop multimedia software with a built-in video editor. It's designed to make cropping easy and flexible. You can choose from several methods. You can crop freely with an interactive frame, enter precise crop values, quickly change the aspect ratio, or select a zoom mode to control how your video fits the frame.
Key Features of the Best Alternative to Premiere
Secure Download
Secure Download
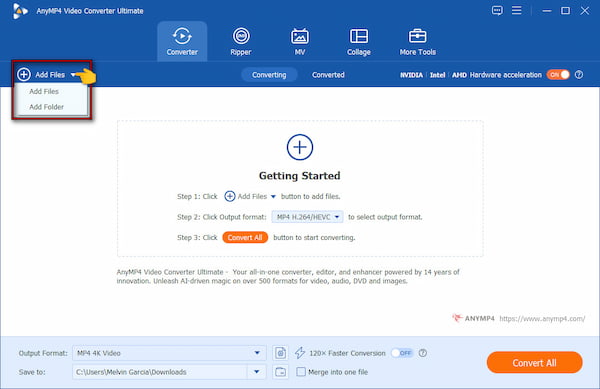
1. Add Your Video
As soon as AnyMP4 Video Converter Ultimate launches, click the + Add Files button. Choose Add Files or Add Folder to import the video(s) you want to crop. Your clips will appear in the library pane, ready for editing.
2. Crop the Video
Click the Edit button, represented by the Magic Wand, under the video title. Upon opening the Editor, it defaults to the Rotate & Crop tab. You can crop your video using any of the following methods:
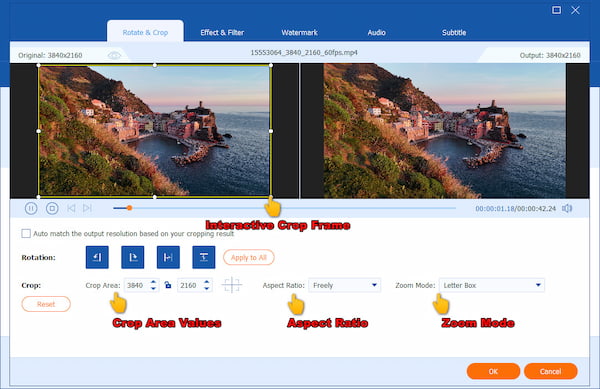
Interactive Crop Frame: Freely drag the edges to adjust the visible area.
Crop Area Values: Enter precise numbers for exact cropping.
Aspect Ratio: Resize using ratios such as 16:9, 4:3, 21:9, 16:10, or 5:4. 1:1, etc.
Zoom Mode: Control how the cropped video fits the frame with Letterbox, Pan & Scan, or Full.
You can use a single method or combine multiple for the best result.
3. Export the Cropped Video
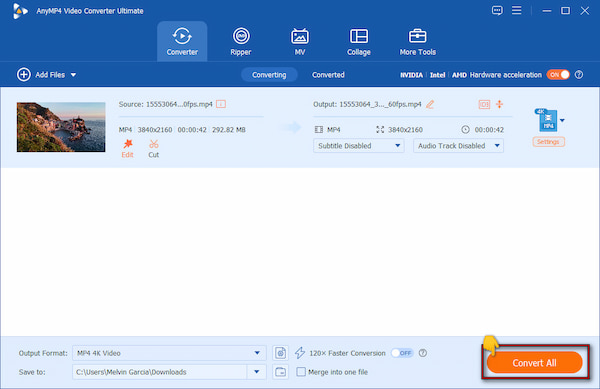
Once satisfied with the outcome, click OK to confirm the cropping. In the main interface, proceed to the Save To selector to specify the destination folder. If needed, change the format in the Output Format selector. Finally, click Convert All to export your cropped video.
Using AnyMP4 Video Converter Ultimate to crop videos is an efficient choice, especially for beginners or users who prefer a lightweight tool. With its built-in video crop editor, you can freely adjust the crop frame, set exact crop area values, change the aspect ratio, or select a zoom mode. These options make cropping fast, flexible, and precise without the complexity of professional software like Premiere Pro.
Q: How do I resize a video in Premiere?
A: You can resize a video in Adobe Premiere by changing the aspect ratio or cropping. The workflow has been shared in detail above.
Q: Can I crop a video frame in Premiere?
A: No, Premiere is a video editor, and it can only process video content. A video frame is a still image, so that you can crop it in Photoshop or another photo editor, then insert it into the video in Premiere.
Q: How to use Premiere for free?
A: Go to the official Adobe Premiere Pro website and click the Free Trial button. The free 7-day trial version has no restrictions apart from the fact that it works only for a week. Otherwise, it's fully functional and works perfectly fine.
Q: What is the fastest way to crop a video for TikTok in Premiere Pro?
A: The fastest approach is to use Auto Reframe or adjust the sequence to a vertical aspect ratio. These methods automatically focus on the subject and resize the frame for TikTok. It eliminates the need for manual keyframing or repeated adjustments, making the process much quicker.
Q: Why is the Crop effect in Premiere Pro not working on my clip?
A: The Crop effect may not work if your clip is affected by other effects or not applied in the correct order. For example, if you've used Warp Stabilizer or similar effects, Premiere may block direct modifications. The fix is to nest the clip by right-clicking it and selecting Nest, then apply the Crop effect to the nested sequence.
Q: How do I crop a video in Premiere without getting black bars on the sides?
A: Black bars appear when you crop a clip, but the sequence resolution stays the same. To avoid them, scale the clip until the frame fills the sequence. Alternatively, right-click the clip and select Set to Frame Size.
Q: What's the difference between cropping and changing Sequence Settings in Premiere Pro?
A: Cropping trims specific edges of a video using the Crop effect. It lets you control exactly which parts of the frame are visible. Changing Sequence Settings, on the other hand, adjusts the overall canvas size or aspect ratio. It effectively reframes the entire video to fit a new resolution.
This guide showed how to crop a video in Premiere Pro using built-in tools such as the Crop effect, Auto Reframe, and sequence settings. Premiere is ideal when you need precise control, advanced keyframing, or professional-level edits. However, it can feel complex and time-consuming for simple tasks. If you're a beginner or want to crop videos quickly for social media, AnyMP4 Video Converter Ultimate is a faster, more user-friendly alternative. With its intuitive interface and built-in editor, you can crop, resize, and export videos efficiently without having to navigate Premiere's learning curve.
Secure Download
Secure Download
 Updated by Mark Cristobal to Edit Video
More readings
 Split Screen Video Editor – 5 Best Programs to Make Side by Side Videos on Windows and Mac
When you want to make a side-by-side video with stunning effect, you can learn more about the 5 best split-screen video editors for Windows and Mac from the article.
 3 Free Ways to Crop a Video on iPhone
How do you crop on iPhone? Is there any free way to directly crop a video on iPhone like a picture? This post shows 3 simple ways to crop a video on iPhone.
 Top 3 Ways to Easily Crop a Video
How do I crop a video in my gallery? How to crop a video on iMovie? This post tells 3 methods to crop a video on iMovie, in Premiere, and online free.
 Review of Kapwing Resizer and 3 Best Kapwing Alternatives
What is Kapwing resizer? How to use Kapwing to crop video? How do I resize with Kapwing? Get a full review of Kapwing video resizer and its best alternatives.