Screenshots are now essential tools for saving important information or sharing content quickly. Many users rely on screenshots to capture what’s on their screens. For Windows users, the Snipping Tool serves as the built-in utility designed specifically for this purpose. It has been available on Windows systems for years. However, many users still lack a comprehensive understanding of its full potential and features. That’s why this Snipping Tool review aims to provide an in-depth look at what it can do. We will cover its strengths, shortcomings, notable features, and determine whether it remains the right solution for your screenshot needs. This way, we can help you better understand the tool, enabling you to make the most of it. Or, consider whether an alternative would serve you better.

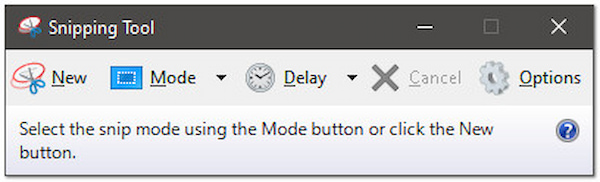
Windows Snipping Tool is a pre-installed utility in Microsoft Windows for capturing and editing screenshots. In its recent updates, even short screen recordings are now supported. The tool offers several modes for capturing specific areas of the screen, including Free-form, Rectangular, Window, and Full-screen snips. Once you take a snip, it opens in the editor, where you can annotate it. You can use drawing tools like pens, highlighters, and erasers, then save it in standard formats, copy it to the clipboard, or share it via email.
Overall Ratings :
Performance:
Efficiency:
Features:
Functionality:
Usability:
What You’ll Like:
What to Consider:
The Microsoft Snipping Tool is a native utility included in all modern versions of Windows. On Windows 11, it merges the classic Snipping and Snip & Sketch tools into a unified interface. I appreciate this continuity and integration, noting that there's no need to install additional software, and that is why I also like another screenshot tool, Snagit.
Want to know more differences between Snagit and Snipping Tool? Check it here.
The utility provides clean, immediate access to capturing and editing functions. As Microsoft states, you can capture anything on your screen with this tool. The new version retains this straightforward design while consolidating useful features, which I value.
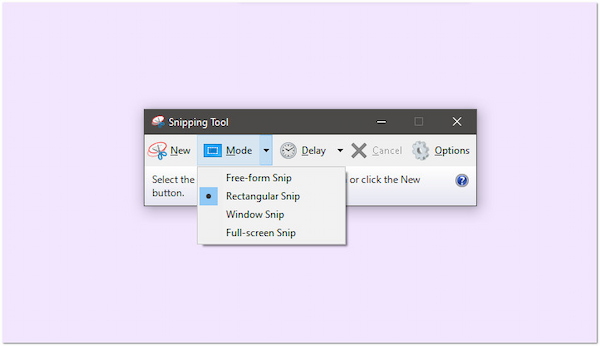
The tool offers multiple capture modes: Free-form, Rectangular, Window, and Full-screen snips. In addition to still captures, it supports Video Snip, allowing you to record a designated screen area as a clip. Here's how each one works:
| Capture Mode | Function |
| Freeform Snip | Draw a custom shape around what you want to capture. |
| Rectangular Snip | Drag to create a rectangle selection. |
| Window Snip | Click to capture a specific application window. |
| Full-screen Snip | Capture the entire display immediately. |
The utility’s video capture is functional and integrated, with basic video snip support present. You can launch video snips via Win + Shift + R or by selecting the Record option. Videos are saved in MP4 format at 1080p resolution, while audio quality may be inconsistent on the Windows version.
Power users will appreciate Snipping Tool shortcuts. These shortcuts make the tool productive and reduce reliance on menus.
| Keyboard Shortcuts | Function |
| Alt + M | Choose a snip mode. |
| Alt + N | Create a new snip in the last-used mode. |
| Shift + arrow keys | Navigate between snip types. |
| Alt + D | Delay capture by 1 to 5 seconds. |
| Ctrl + C | Copy snip to clipboard. |
| Ctrl + S | Save the snip. |
The tool supports capture delays, allowing for a 3-, 5-, or 10-second countdown before the screenshot is taken. It is useful when you need to open a menu or set up your screen. This functionality helps capture UI elements, such as dropdowns, that might otherwise disappear.
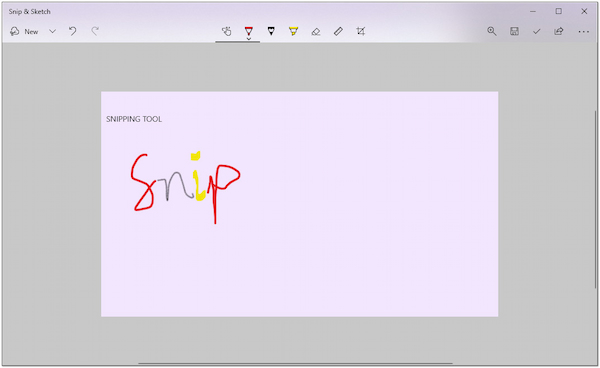
Once a snip is captured, you’re immediately taken to the editing interface. Here, you can use a Pen or Highlighter for marking, insert shapes or emojis, or use an Eraser to remove annotations. You can also crop the image via the Image Crop tool and activate Text actions.
The Snipping Tool is a built-in utility in Windows that enables quick and simple screenshot capture. It is commonly referred to as the Windows screenshot shortcut tool. Unlike the old Print Screen button, it offers flexible capture modes and basic editing. You can easily access it by pressing hotkeys for instant snipping or by searching it in the Start menu.
1. Search for the tool in the Start menu, open it, and click New to begin. Alternatively, press the Windows key + Shift + S to open the snipping overlay directly. When capturing an image, you can choose from four modes:
Rectangular Snip: Drag a box to capture a precise rectangular section.
Window Snip: Click to capture a single application window.
Full-Screen Snip: Capture everything on your screen at once.
Freeform Snip: Draw an irregular shape to capture custom areas.
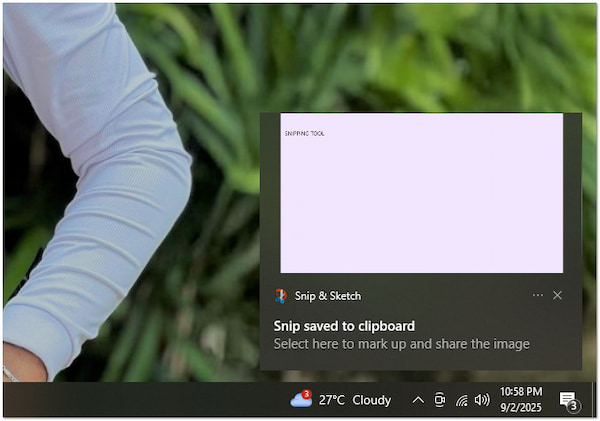
2. Once you’ve taken a snip, it appears in your notification with options to open in the editor. Click the Screenshot Notification to mark up the image. In the editor, you can:
• Take a new snip with added timer options.
• Draw on the image using pens and highlighters with multiple colors.
• Erase annotations with the eraser tool.
• Crop to refine the captured area.
• Save or copy to use the snip in documents, chats, or emails.
3. After you finish making edits in the editor, save your changes by pressing the Ctrl + S. This will open the Save As dialog box, allowing you to choose where to save it. You can select a location such as Desktop, Documents, or any custom folder.
That’s how to use the Snipping Tool! In Windows 10, the steps for using it are relatively simple, but in Windows 11, the process is slightly different. However, Windows 11 offers far more extensive features and enhanced capabilities.
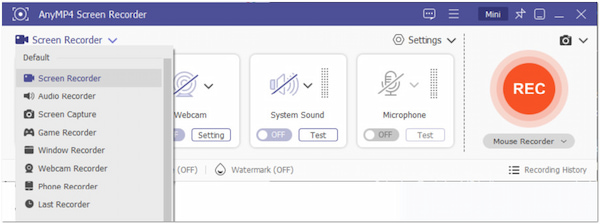
The Snipping Tool has long been praised as a handy built-in screenshot utility on Windows. However, it's limited to static screenshots, meaning it doesn’t support advanced recording modes. AnyMP4 Screen Recorder is a powerful tool that offers both screen recording and snapshot capabilities. It is fully accessible with Windows 7/8/10/11 and macOS 10.12 and later. The software provides seven recording modes: Screen Recorder, Audio Recorder, Screen Capture, Game Recorder, Window Recorder, Webcam Recorder, and Phone Recorder. It allows you to record with or without system sound, microphone input, or even your webcam.
Secure Download
Secure Download
For images, it offers various capture methods: Custom Capture, Scrolling Screenshot, Popup Menu Capture, and Full-Window Capture. It supports output formats such as PNG, JPG, BMP, GIF, and TIFF. Additionally, it comes with built-in editing tools like an advanced trimmer, video compressor, and annotation options. These features make AnyMP4 Screen Recorder a far more capable alternative for users who find Windows Snipping Tool’s basic functions too limiting.
What to Expect With AnyMP4 Screen Recorder:
• Seven Recording modes to meet different needs.
• Supports multiple video recording formats and image formats.
• Choose to record with/without system sound, microphone, or webcam.
• Customizable recording area and size: Fullscreen, specific window, custom region.
• Exports video recordings, audio recordings, and static screenshots in various formats.
| Snipping Tool | VS | AnyMP4 Screen recorder |
| Windows | Compatibility | Windows and Mac |
| Freeform Snip, Rectangular Snip, Window Snip, and Full-screen Snip | Capture Types | Custom Capture, Scrolling Screenshot, Popup Menu Capture, and Full-Window Capture |
| Full Screen and custom-defined Rectangle region | Recording Types | Screen Recording, Audio Recording, Game Recording, Window Recording, Webcam Recording, and Phone Recording |
| PNG, GIF, JPEG, BMP, TIF, and MP4 | Output Formats | MP4, MOV, WMV, MKV, F4V, WebM, MPEG-TS, GIF, PNG, JPG/JPEG, BMP, TIFF, MP3, M4A, WMA, AAC, OPUS, FLAC, and WAV |
| Annotations & Editing Tools | ||
| No limit | Recording Time | No limit |
| Hotkeys | ||
| 3 seconds and 10 seconds | Delay | Scheduled Recording feature (custom date and time) |
| Easy | Ease of Use | Basic |
This is where our Snipping Tool review ends! Snipping Tool is a reliable and straightforward solution for capturing screenshots on Windows. Its built-in availability, simple interface, and multiple capture modes make it a handy choice for everyone. However, if you require more flexibility, higher efficiency, and professional-grade tools, an alternative is worth considering. This is where AnyMP4 Screen Recorder stands out. It offers versatile recording modes, customizable capture settings, and supports multiple output formats.
 Posted by Alice Thorne to Recorder
More readings
 Comprehensive XRecorder Review to Record Mobile Gameplays
XRecorder screen recorder is a free app for Android devices that captures high-quality videos at 60 FPS. Learn more about this app in this review.
 Screencastify Review and Best Alternatives Explored
This post will highlight Screencastify review and discover the best alternatives for screen recording needs. Find the perfect tool to elevate your recordings.
 Complete Review of Descript: Is It A Good Screen Recorder
Looking for a review to know more about Descript screen recording performance and features? Read this article to learn its main features, pros, cons, and more.
 Snagit Review : Capture Your Computer Screen Like a Pro
Check our in-depth Snagit review to uncover its strengths and weaknesses. Discover if it fits your needs and explore advanced screen recording alternatives!