
Key Takeaways:
Need to convert MOV to MP4 on Mac? Pick your method based on what you are working on:
Have you ever double-click a video from your iPhone, only to watch your Mac pops up an error message or refuse to play it properly? It is super frustrating. Even worse is trying to share a QuickTime clip with a friend on Windows, or uploading a file to a web form, only to watch it fail completely.
.mov is Apple's go-to format and works great inside editing apps, but it is a real pain for compatibility. High-bitrate files eat up massive amounts of storage space on your hard drive, and a lot of messaging apps, older web players, and non-Apple platforms flat-out refuse to open them.
That is why you need to convert MOV to MP4 on Mac. By changing your video in a standard MPEG-4 container using codecs like H.264, you can get smooth web streaming, smaller file sizes, and zero playback errors. Let's look at the best ways to get this done.

| Platform | Transcoding Velocity (2GB File) | M-Series Efficiency | Metadata Integrity | Compression Ratio | |
|---|---|---|---|---|---|
| AnyMP4 Video Converter Ultimate | macOS / Windows | ~12 Seconds (High-Speed mode) | Full Apple Silicon Optimization | 100% Retained | Excellent (Customizable) |
| QuickTime Player | macOS Native | ~4 Minutes (Software render) | Low | Partial | Moderate |
| HandBrake | Open-Source | ~2 Minutes 30 Seconds | Moderate | Varies | High (Advanced tuning) |
| CloudConvert | Web Browser | Depends on internet speed | None | Low | Low to Moderate |
If you have a massive pile of vacation or work clips to process, doing them one by one will drive you nuts. AnyMP4 Video Converter Ultimate solves this with its proprietary Ultra-fast Conversion engine. It leverages Mac's M1/M2/M3 silicon and Intel Quick Sync for 70x faster batch processing with zero-loss High-Speed re-muxing. Whether you work with H.264, HEVC/H.265, or massive Apple ProRes clips, this tool handles it.
1. Free download and open AnyMP4 Video Converter Ultimate on your Mac desktop.
Secure Download
Secure Download
Drag your entire folder of MOV video clips and drop them right into the main program window. You can load dozens of files at once for true batch processing.
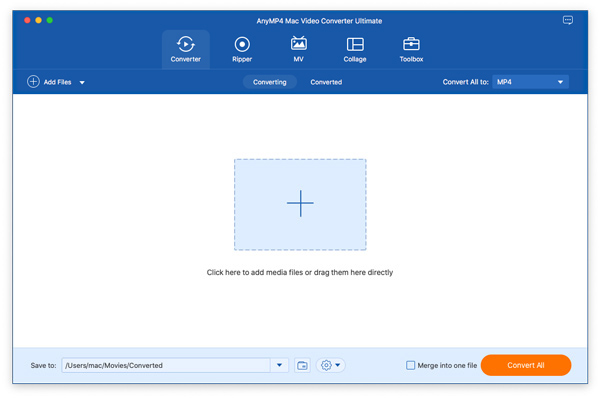
2. Head down to the Output Format menu, click the Video tab, and pick MP4 as your target file extension.
The Profile custom option next to the output MP4 file enables you to adjust the output MP4 codec, frame rate, resolution, and more settings.
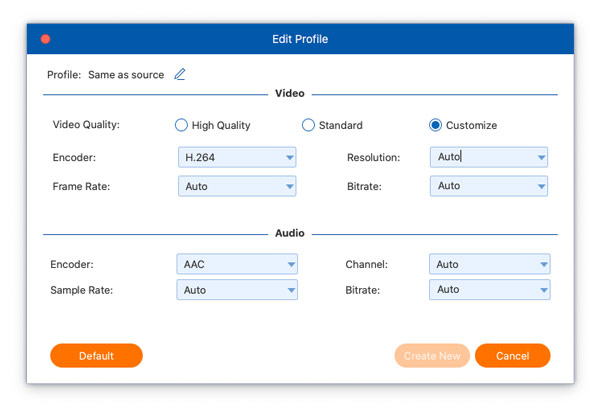
3. Hit the big Convert All button in the bottom right corner to convert MOV to MP4 on Mac in seconds. Once the conversion task is completed, you can find the new MP4 files in the Converted tab.
Do not forget to enable the GPU acceleration toggle on the top-right corner to speed the conversion process before clicking the Convert All button.
We tested it out on an M3 MacBook Pro and watched AnyMP4 Video Converter Ultimate tap right into the Apple Silicon hardware, churning through a 10-file batch in 84 seconds flat. Quick tip: double-check that your profile settings are locked to "Same as Source" before you hit start. If you skip that, the app might sneakily lower the bitrate and mess up your quality. And if you need a good media player to check out your new files once they're done, we recommend MOV player.
QuickTime comes built right into your Mac. You don't have to download anything extra. But it comes with a major catch: QuickTime doesn't actually export true MP4 files by default, and it exports an .mov file with compatible H.264 video. Plus, it has zero batch processing support; users must manually open and export every single file, which often results in forced downscaling to 1080p for older 4K MOV assets.
1. Right-click your stubborn video file, hover over Open With, and select QuickTime Player.
2. Move your mouse up to the top menu bar, then click on File option, after that, select the Export As option (choose 1080p or 4K).
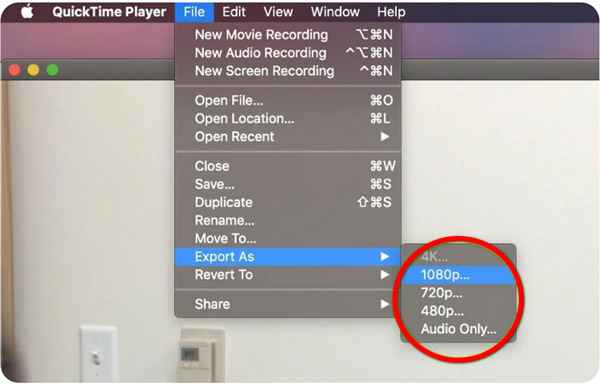
3. Save the file to your hard drive. Because QuickTime keeps the .mov wrapper, just click on the saved file's name and manually change the file extension from .mov to .mp4 to change MOV to MP4 Mac without quality loss.
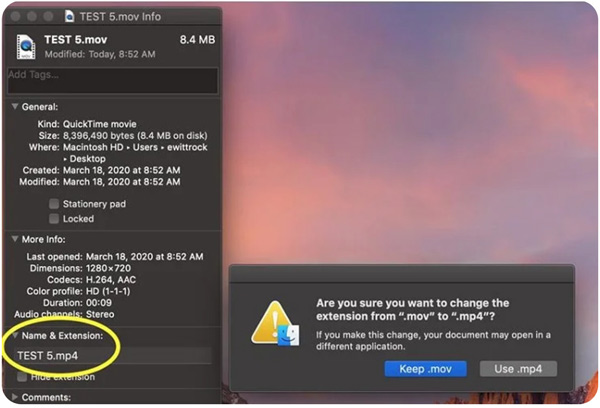
4. Hit Enter, and your Mac will ask if you are sure you want to change the extension. Confirm it, and you are good to go.
If you just exported a family video from Apple's editor, you might find this guide on how to export iMovie to MP4 super helpful.
While QuickTime is free and right there, it is a total bottleneck. We found that QuickTime often forces a re-encode of the audio stream to AAC even if the source is already compatible, which adds unnecessary processing time. Furthermore, if your MOV contains an Alpha Channel (transparency), QuickTime's export will flatten it into a black background without warning.
HandBrake is a free, open-source tool that tech nerds have loved for years. It gives you total control over video transcoding. But let's be real: the UI is notoriously hostile for non-technical users; selecting the wrong Variable Framerate (VFR) setting during transcoding often leads to permanent audio/video desync.
1. Launch HandBrake and drag your source MOV video file straight into the main drop zone.
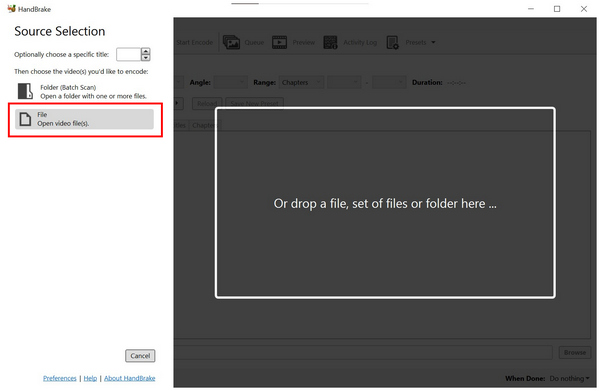
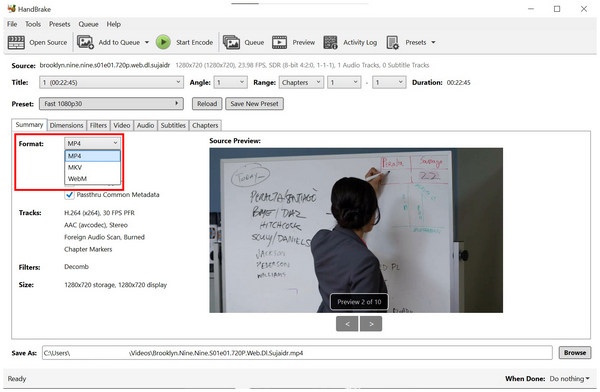
2. Look at the Summary tab and make sure the output format container is explicitly set to MP4.
3. Click over to the Video tab, adjust your bitrate, and slide the Constant Quality (RF) bar to around 20 or 22 for a great balance of size and clarity.
4. Hit the Start Encode button at the very top of the app window to kick off the conversion.
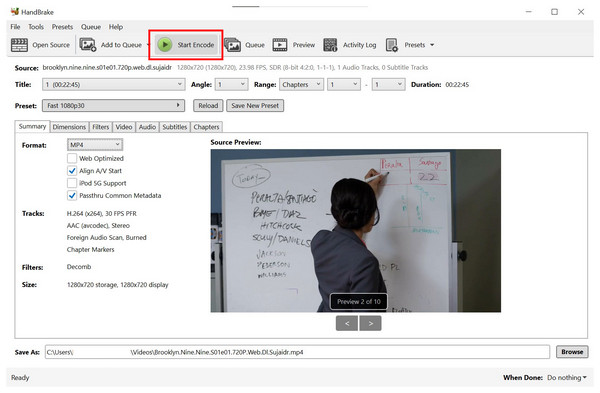
A hardcore technical tip for HandBrake: Always set your Framerate to Peak Framerate rather than Constant. If you convert iPhone MOV files (which use Variable Framerate) to a Constant Framerate in HandBrake, you will likely encounter a 200ms audio drift by the end of a 10-minute video. If you want another free open-source approach, you can also read up on this VLC convert MOV to MP4 walkthrough.
Sometimes you are away from your main computer and just need a quick fix. CloudConvert lets you convert QuickTime video to MP4 on MacBook Pro using only your web browser. But watch out for its friction: serious privacy vulnerability for personal files and a hard 250MB upload limit that renders it useless for high-bitrate ProRes MOV files. If you want to check out other browser tools, browse through this convert MOV to MP4 online summary.
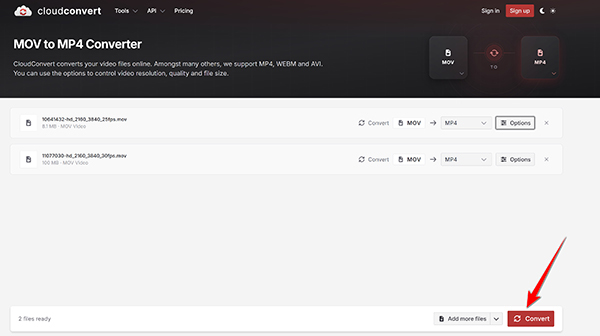
1. Open Safari or Chrome and navigate to the CloudConvert MOV to MP4 Converter website (https://cloudconvert.com/mov-to-mp4).
Click the Select File button to upload your MOV videos from your local folders.
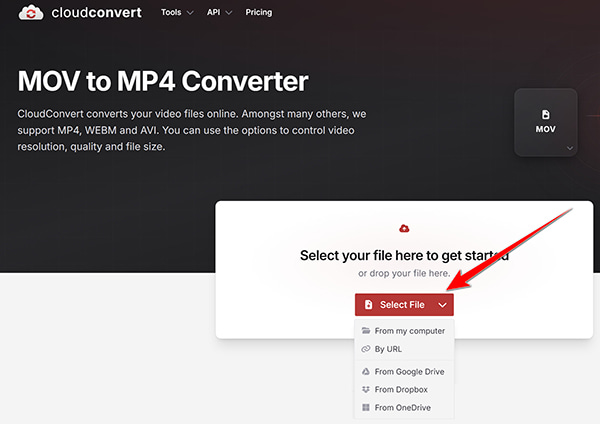
2. Set your input dropdown to MOV and your output target dropdown to MPEG-4. This step is often be done by default.
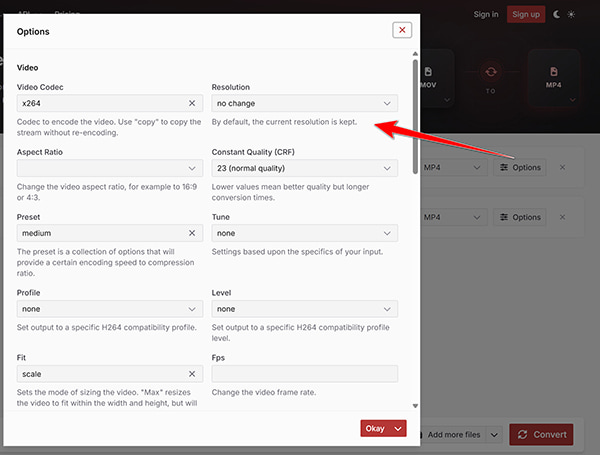
But you can change the output MP4 parameter settings by clicking the Options button. Then you can change MP4 resolution, codec, CRF, FPS, etc.
3. Hit Convert and wait for the remote server to finish processing your MOV clip, then download the finished MP4 file.
We tried throwing a 300MB 4K clip at it and immediately hit a "File Too Large" error. Even with smaller files, the upload dragged at barely 2MB/s on a Gigabit connection. Plus, if you are converting sensitive work meetings or private family videos, uploading them to web servers without end-to-end encryption is a major privacy risk.
Q: Why does my MOV file look washed out after converting to MP4 on Mac?
A: That usually comes down to HDR-to-SDR color mapping bugs. QuickTime and basic online converters often drop the metadata, leaving your video looking flat and gray. Using a modern app with proper color management fixes it right up. If you want to dive deeper into how these containers work, check out this guide on MOV vs MP4.
Q: Can I convert MOV to MP4 on Mac using Terminal/FFmpeg?
A: Definitely. If you prefer the command line, install FFmpeg via Homebrew and run ffmpeg -i input.mov -c:v copy -c:a copy output.mp4. It finishes in seconds since it just copies the streams without re-encoding.
Q: Why is my converted MP4 file larger than the original MOV?
A: Blame your bitrate settings. If you manually crank up the target bitrate higher than your source file, your file size will balloon out of control.
Q: How do I batch convert MOV to MP4 on Mac for free without a watermark?
A: HandBrake supports batch MOV to MP4 conversion for free, though the interface takes some getting used to. If you want something smoother with no watermarks for bulk files, look into dedicated free MOV to MP4 converters for Mac.
Picking the right way to convert MOV to MP4 on Mac really comes down to what you are trying to do today:
Secure Download
Secure Download
 Posted by Alice Thorne to Convert Video
More readings
 Adobe Express MOV to MP4 Converter Review
Explore Adobe Express MOV to MP4 Converter, its features, conversion process, quality output, limitations, and best alternative in this complete 2026 guide.
 How to Convert MOV to MP4 on Zamzar: A Step-by-Step Tutorial
Do you want to learn why the Zamzar Online Converter is a good choice for converting MOV to MP4? Read this review to learn more about the web-based software.
 Convert MOV to MP4 on iPhone (4 Methods That Actually Work)
Struggling with iPhone video compatibility? Master how to convert MOV to MP4 on iPhone using native apps, third-party apps, web tools, and desktop software.
 2026 Convert MOV to MP4 Using HandBrake in 4 Easy Steps
Looking for the fastest way to convert MOV to MP4 with HandBrake? Follow our expert guide to process 4K videos with zero loss of quality in 4 easy steps.
 Add your comments to join the discussion here