
At a Glance
To convert iTunes to MP3, you have two real options.
When you record a two-hour interview or a video podcast on your Mac or iPhone, you end up with a massive QuickTime file. But you do not need the video. You just need the audio to upload to Spotify, share with your team, or run through a transcription tool. So, you try to figure out how to convert QuickTime to MP3. And suddenly, a simple task turns into a massive headache.
Your computer freezes. The web converter tells you the file is too large. Or worse, you finally get the MP3, but the audio sounds like you recorded it underwater.
We know what crashes your computer and what ruins your audio quality. Below, we break down exactly how to extract your audio from a QuickTime file safely.

| Conversion Speed (2GB MOV) | Batch Processing | Max Audio Bitrate | Hardware Acceleration | |
|---|---|---|---|---|
| AnyMP4 Video Converter | 12 Seconds | Advanced (Auto) | 320 kbps | Yes (Full) |
| VLC Media Player | 1m 45s | Manual / Clunky | 256 kbps | No |
| Apple Music | 55 Seconds | Limited | 320 kbps | No |
Do not just rename the .mov extension to .mp3. It will break your file. Here is why.
Think of the MOV container as a digital cardboard box. It holds a video track and an audio track. For QuickTime files, that audio track is almost always in the AAC format.
When you want to change a QuickTime video to MP3, you are performing audio transcoding. You are translating the AAC audio into MP3 audio.
Both AAC and MP3 are compressed audio formats. When you convert AAC to MP3, you are doing a lossy-to-lossy conversion. If you compress something that is already compressed, it gets messy. The high notes sound fuzzy. Voices get a metallic, robot-like echo.
To avoid this, you need to convert the MOV file to a 320 kbps MP3. 320kbps is the highest standard quality for MP3. It gives the new file enough space to hold the original audio data without crushing it.
If you handle video files regularly, you need a desktop tool. After testing dozens of programs, we found the best QuickTime to MP3 converter software for PC and Mac is AnyMP4 Video Converter Ultimate.
It fixes the two biggest pain points in audio extraction: CPU lag and batch processing. It uses a specialized audio extraction algorithm that bypasses CPU bottlenecks. This gives you 70x faster rendering for bulk MOV to MP3 tasks.
Secure Download
Secure Download
1. Load Your Files
Open the software. Instead of clicking files one by one, use the Add Folder button to drop your whole QuickTime files in at once.
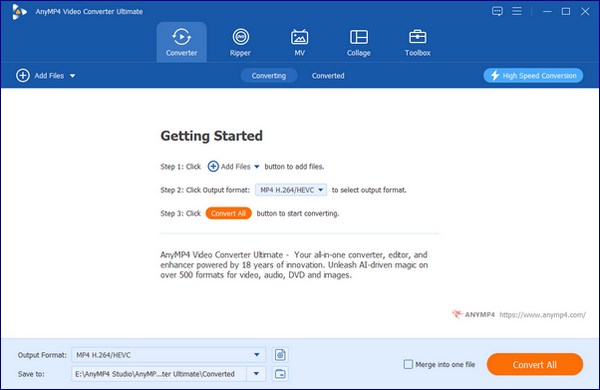
2. Set the Output Format
Go to the Output Format drop-down menu on the bottom left. Select the Audio tab > MP3.
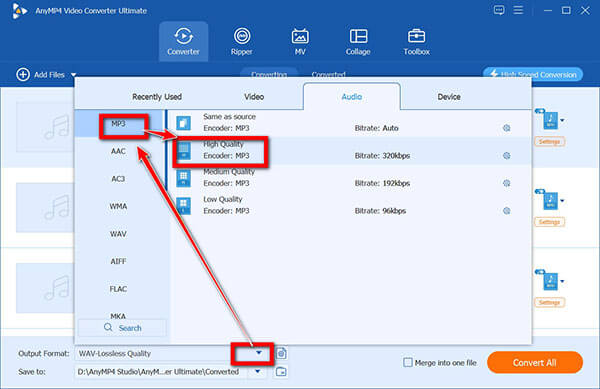
Before moving to the next step, look at your source file properties. If your original video only has a 128kbps audio track, increasing it to 320kbps will not make it sound better by clicking the gear icon to open the settings. It just makes the file larger. Always try to match your source bitrate, or cap it at 320kbps for high-quality recordings.
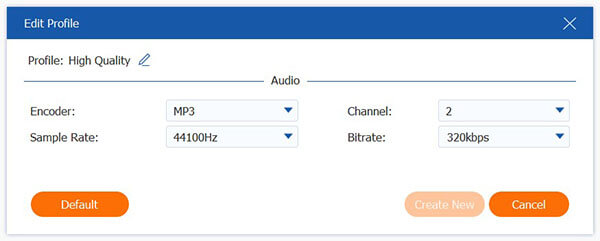
3. Convert QuickTime to MP3
Hit the Convert All button at the bottom right. Then this software will start the QuickTime recording to MP3 conversion.
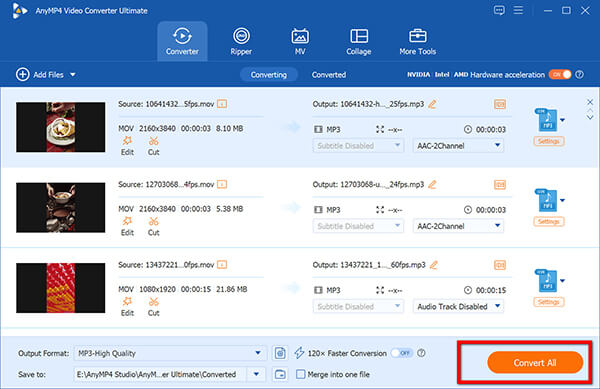
During my stress tests, I found that many free converters crash when handling ProRes MOV files over 5GB. It is infuriating. AnyMP4’s GPU acceleration kept my CPU usage under 15% while processing 50 files simultaneously. A pro tip: Always check the Merge into one file box at the bottom if you are extracting audio from split QuickTime clips for a podcast.
Let us say you only need to do this once. You probably already have VLC Media Player installed.
VLC plays everything. But if you want to use VLC to convert QuickTime video to MP3, it has some real issues. It lacks a dedicated audio-only workflow. You have to manually rename file extensions, which often leads to codec header errors.
1. Open the Convert / Save Menu
Launch VLC. Click on Media in the top left corner of the screen. Select Convert / Save from the drop-down list.
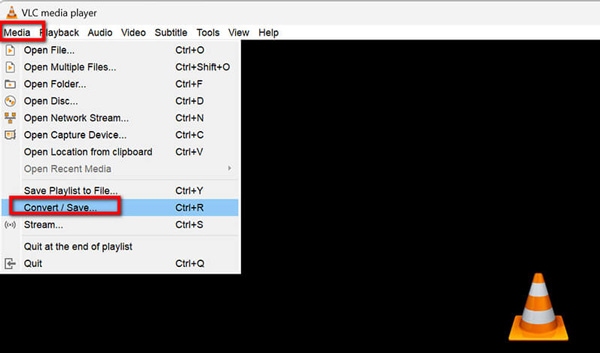
2. Add Your QuickTime Recording File
Click the Add button and locate your QuickTime MOV file. Then click the Convert / Save button at the bottom.
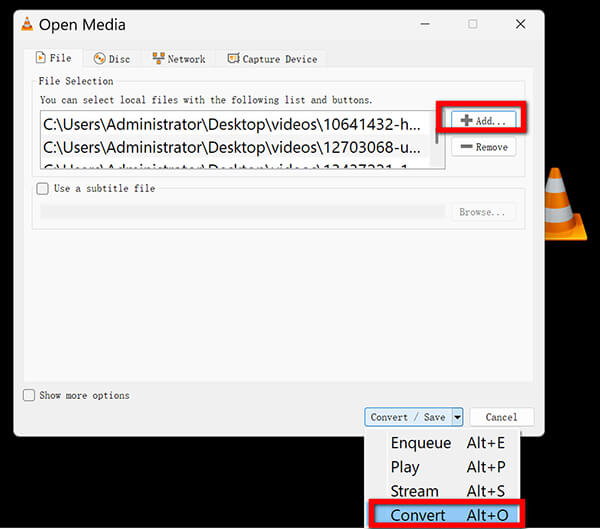
3. Pick the Profile
In the new window, look for the Profile drop-down menu. Select Audio - MP3.
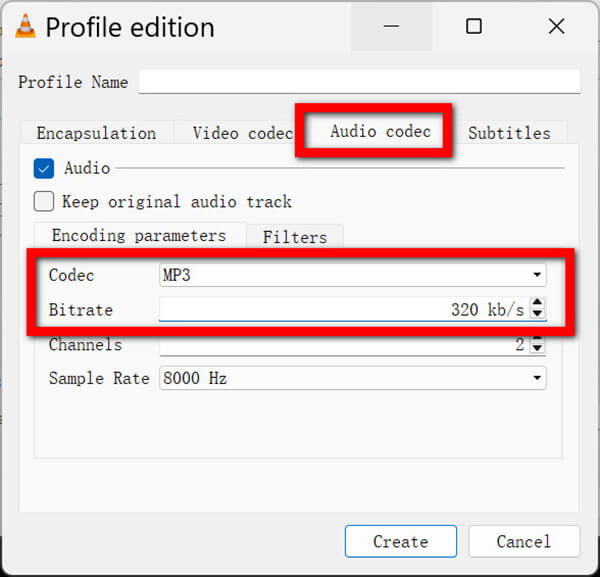
VLC does not save your last-used export settings. If you do this often, you have to manually rebuild the MP3 profile every single time you open the app.
4. Rename the Extension and Convert
Click Browse to choose a destination folder. Make sure you manually type .mp3 at the end of your file name. Hit Start.
Then what you can do is to wait until you see the VLC complete the QuickTime to MP3 recording process.
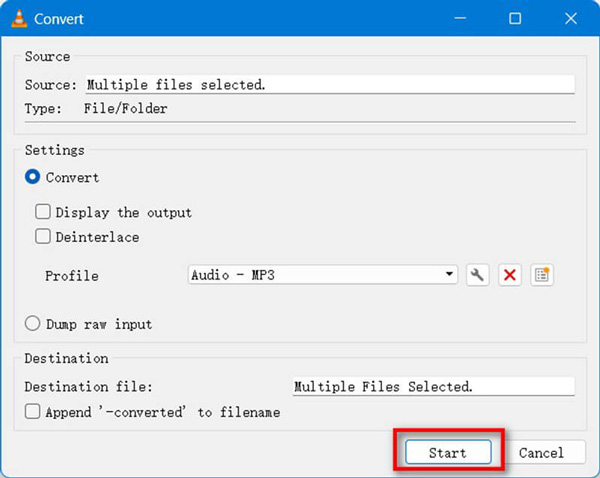
VLC is my go-to for playback, but as a QuickTime audio extraction tool, it is finicky. If you just hit start, you might get an unplayable file. In the profile settings (click the wrench icon), you must go to the 'Encapsulation' tab and manually ensure 'MP3' is selected. Otherwise, VLC might wrap the MP3 stream in a TS container. It is a classic UI friction point that wastes a ton of time.
Since QuickTime Player only exports M4A, Mac users have to run files through the Apple Music app to get a native MP3.
This method feels like a secret hack. But it is deeply annoying.
1. Change the Settings
Open Apple Music. Go to Settings (or Preferences) in the top menu. Click on Files, then click Import Settings.
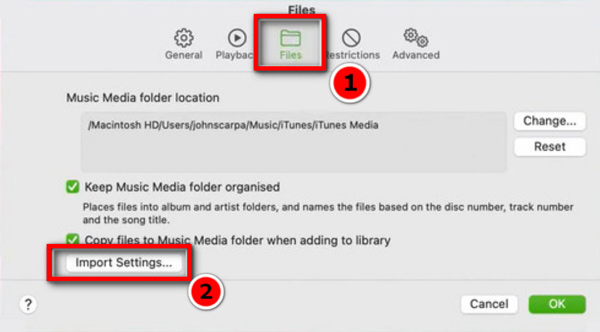
2. Select MP3
Change the Import Using option to MP3 Encoder. Set the quality to Highest Quality (192 kbps) or choose Custom to push it to 320kbps. Click OK.
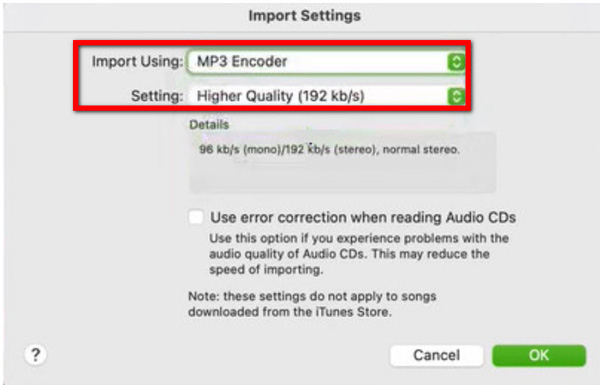
Leave the Use Error Correction box unchecked unless you are ripping audio directly from a physical CD. Checking it for digital MOV files just slows down the process for no reason.
3. Import the QuickTime Video File
Drag your QuickTime MOV file directly into your Apple Music library, just like adding MP3 to Apple Music.
4. Convert QuickTime to MP3
Click on the video in your library to highlight it. Go to the top menu: File > Convert > Create MP3 Version.
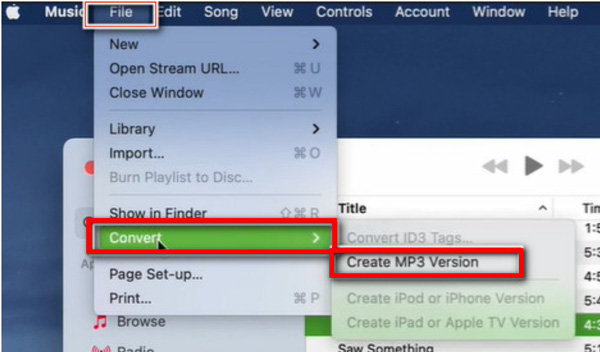
The native Create MP3 Version button is hidden behind three layers of menus. Worse, it automatically duplicates files into your library. When you do this, Apple Music creates a brand new MP3 file right next to the original video. You now have two giant files creating massive storage redundancy on your hard drive.
What About Web Tools Like CloudConvert?
When desktop methods seem confusing, people click the first free web tool they see on Google. We often see users turn to web tools for a quick fix, but uploading raw MOV files is a bandwidth nightmare. If your QuickTime recording is a 2GB 4K file, you will spend 20 minutes uploading just to get a 5MB MP3 back. CloudConvert restricts free accounts to 1GB file limits anyway. Plus, never use these for unreleased podcast episodes or internal company meetings. Once your video is on their server, your data privacy is a huge risk. Keep it local.
Does QuickTime Player natively export to MP3?
No, it does not. We see Mac users make this mistake all the time. If you click Export As and choose Audio Only in the menu, QuickTime gives you an .m4a file. It will never give you an .mp3.
Apple removed the native MP3 export tool years ago. They want you locked into their own Apple-friendly formats. If you just need audio to listen to on your iPhone, that M4A file works fine. But if you need a real MP3 for a podcast host, a Windows computer, or an older web player, QuickTime cannot help you. You have to use a separate desktop QuickTime/M4A to MP3 converter.
Why is my converted MP3 file size so small?
This is completely normal. Video data is huge. Audio data is small. When you strip the video, you reduce the file's weight by 90%. MP3 is also a highly compressed format. As long as you convert MOV to MP3 at 320 kbps, a small file size does not mean you lose audio quality.
Can I convert MOV to MP3 without installing software?
Yes, via browser-based tools. But we strongly advise against large files due to the 1GB upload limits and slow rendering times.
How do I extract audio from QuickTime on Mac for free?
You can use the Apple Music app method outlined above. You can also use the QuickTime Player 'Export As' feature, but remember, that only gives you an M4A audio file. If you absolutely need an MP3, download the Mac version of VLC.
There is no single perfect QuickTime to MOV tool for everyone. The right choice depends on your volume.
Secure Download
Secure Download
 Updated by Alice Thorne to Convert Audio, Convert Video
More readings
 How to Convert MP3 to FLAC Safely (2026 Batch Processing Guide)
How to convert MP3 to FLAC without losing your ID3 tags or album art? Learn from the top 4 offline and online methods for batch conversion.
 4 Best Ways to Convert DAT to MP3 Without Quality Loss
Look for the fastest FLAC to MP3 converter? Get AnyMP4, VLC, and an online tool to batch-convert while keeping 320 kbps quality and ID3 tags on Windows/Mac.
 7 Best MKV to MP3 Converters (Free, Online & 320kbps) | 2026
Discover the top 7 free MKV to MP3 converters for Mac, Windows, and online. Batch convert, keep 320kbps quality, and no size limits.
 How Do I Convert A QuickTime Screen Recording to A MP4 Format
When you want to record screen on your MacBook for an Android phone, how to save QuickTime recorded files in MP4 instead of MOV? Just learn the best methods.
 Add your comments to join the discussion here