Quick Summary:
While QuickTime (.MOV) is Apple’s native format, it frequently triggers compatibility issues or 'black screen' errors on Windows, older Smart TVs, and certain social media platforms. In 2026, the most effective solution is to convert QuickTime video to the MP4 format (H.264/HEVC). Based on our latest tests for speed, quality retention, and ease of use, here are the 5 best verified methods across different platforms.
Real World Test Environment:
Comparison Table:
| Tool | Conversion Speed | Preserve Video Quality | Max File Size | Best Uses |
|---|---|---|---|---|
| AnyMP4 Video Converter Ultimate | Very Fast | Lossless Quality | None | Converting video formats without quality loss. |
| QuickTime Player | Moderate | Minimal quality reduction | None | Built-in format conversion. |
| iMovie | Moderate | Minimal quality reduction | None | Applying editing adjustments during conversion. |
| Zamzar | Slow to Fast | Noticeable quality reduction. | 50MB | Quick conversion of small MOV files. |
If you are sensitive about image quality, you will need a powerful video converter program that supports lossless conversion. From this point, we will recommend AnyMP4 Video Converter Ultimate.
For users planning to use videos as editing assets, MP4 files converted with AnyMP4 Video Converter Ultimate feature lossless remuxing technology, preserving their quality for video editing software. This is a game-changer for Premiere Pro or DaVinci Resolve editors who encounter audio-video out-of-sync issues or decoding failures when importing MOV files on Windows.
Its key features include:
Recommendation
In a word, this video converter is worth using.
Secure Download
Secure Download
Before proceeding to our tutorial, make sure to read our testing results first when using AnyMP4 Video Converter Ultimate:
1. Import QuickTime videos for conversion
AnyMP4 Video Converter Ultimate is compatible with both Windows and Mac. You can download and install the correct version for your operating system. Run the program, then click the Add Files menu to import QuickTime videos.
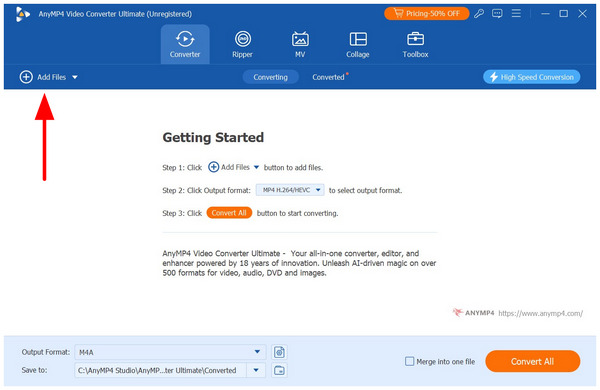
2. Set MP4 as the output format
After videos are imported, locate the bottom area and choose MP4 from the Output Format dropdown list. Drop a path to save the results in the destination field.

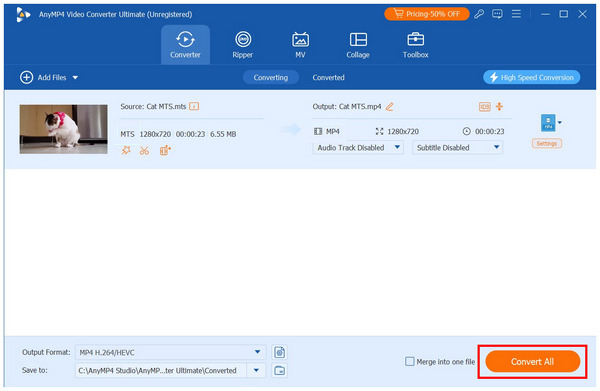
3. Convert QuickTime to MP4
If you want to edit QuickTime videos, the Cut and Edit options on the top ribbon are available. And you can find more custom options in the Settings window. Finally, click on the Convert All button to start converting.
Though QuickTime 7 Pro is not available for sale, it is a simple way to convert QuickTime to MP4. With this desktop program, you can easily use the export feature or rename a QuickTime video to an MP4 file. Of course, it will not damage the video quality.
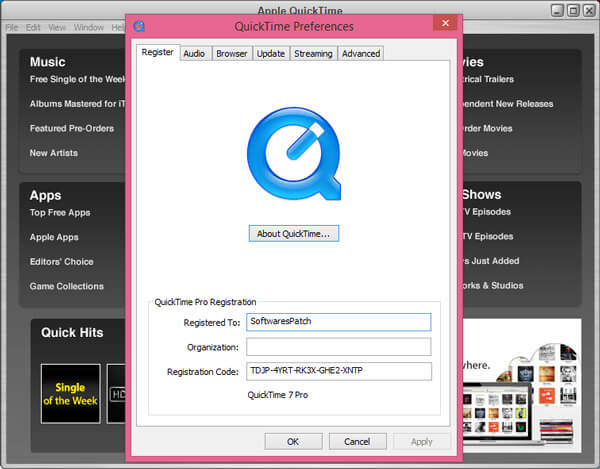
1. Install QuickTime Pro 7 on your computer
Download QuickTime 7 from Apple's website and install it on your computer. Launch the program, click the QuickTime Player 7 menu, choose Registration, and enter your Pro registration key to unlock the Pro version.
2. Load QuickTime videos
Go to File->Open File to load the QuickTime video you want to convert into the software. Play the video to confirm it is the right video.
3. Export QuickTime to MP4
Unfold the File menu and choose the Export option. When the export window prompts, click the Export menu and choose Movie to MPEG-4. Finally, press the Save button to confirm it and convert QuickTime to MP4.
Hidden Export Limitations You Should Know
If you need smaller file sizes with better compression, use a third-party tool that supports HEVC/H.265. Unfortunately, QuickTime can only export video files saved using the H.264 codec. However, H.264 is still not bad, as this codec option offers much better compatibility than the advanced H.265 codec.
It is well-known that iMovie is a video editor for Mac developed by Apple. One feature of iMovie is to convert QuickTime to MP4. If you already have iMovie on your computer, you can use it directly.
When using iMovie as a format converter, make sure to use the “Medium/High” quality option to save the video in MP4 format. Selecting the “ProRes” option will save your video in MOV format. With these settings now discussed, remember that iMovie is inefficient for batch conversions and often strips original metadata.
1. Create a project for conversion
Launch iMovie in the Applications folder and go to File->New Movie to create a new project. Choose No Theme when prompted to select a theme for the project.
2. Import QuickTime videos
Click the Import Media button and import the MOV files you want to convert. iMovie also supports drag-and-drop commands. Once done, the video will be opened in the new project.
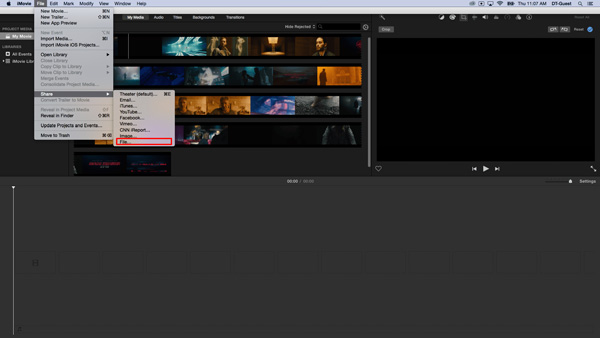
3. Save QuickTime as MP4
Go to File->Share, then choose File from the list to open the preference window. Here you can convert QuickTime to MP4 by resetting the Format option. Then click on the Save button and follow the onscreen instructions to complete the process.
When looking for an online solution to convert QuickTime files to MP4, we recommend using FreeConvert. Among the other online options, such as Zamzar, this web-based solution has a much larger file size limit of 1GB. This makes the program more appropriate for handling larger video files, such as QuickTime MOV.
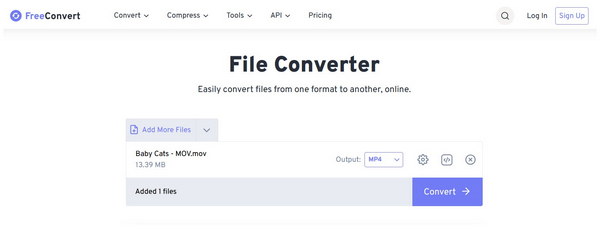
1. Go to FreeConvert and select Choose Files to upload the MOV video you want to convert.
2. Once the file has been uploaded, set the Output option to MP4.
3. Finally, click the Convert button to convert your QuickTime MOV video to the widely compatible MP4 format.
Before using online tools, make sure to keep in mind that they are usually extremely slow when uploading for QuickTime files over 50MB. Web-based solutions also pose privacy risks, which makes it only recommendable for minor, short, and especially non-sensitive clips.
What is the QuickTime video format?
QuickTime is an extensible multimedia framework developed by Apple. It can handle various video, audio, and image formats. The native file format for QuickTime video is the QuickTime File Format, and other files natively supported by QuickTime are AIFF, DV-DIF, MP3, and MPEG.
Can iMovie convert MOV to MP4?
Yes. When exporting MOV files as MP4 in iMovie, you should set the quality to Low, Medium, or Custom. Then the exported MOVI files will be changed into MP4. Otherwise, the file will be saved as MOV if you select Best (ProRes) quality. Learn here to export iMovie as MP4.
Are MP4 files smaller than MOV?
Generally speaking, MP4 is typically more compressed and smaller, while MOV is often higher-quality and larger. You can see the differences in detail here by visiting MOV VS MP4.
How to convert QuickTime to MP4 on Windows 11 for free?
There are numerous options on Windows computers. A safe option is to use dedicated tools such as AnyMP4 Video Converter Ultimate. You can also use online tools or open-source software as alternatives.
Will converting MOV to MP4 lose quality in 2026?
No, it will not. Format conversion can be done without quality reduction. However, you need the right files and software, such as AnyMP4 Video Converter Ultimate, with lossless remuxing to maintain your video’s quality.
Can I batch-convert QuickTime files to MP4 on a Mac?
Yes, you can. There are numerous multimedia editors on Mac that can function as format converters. AnyMP4 Video Converter Ultimate is a good example.
Why is my QuickTime file not playing on Windows Media Player?
Windows Media Player does not support MOV files by default. This makes opening such videos fail in Windows Media Player. Fortunately, there are third-party options, such as VLC Media Player, that can open MOV files without issue.
Based on the tutorial above, you might understand how to convert QuickTime to MP4 on Windows, Mac, and online. If the QuickTime video you want to convert is very large, we suggest transcoding it with a desktop program, such as AnyMP4 Video Converter Ultimate. It can convert QuickTime to MP4 without quality loss. Of course, you can try QuickTime Pro 7 or iMovie. Both programs require purchase or registration. Free MP4 Converter allows you to do the task for free. On the other hand, we also shared a method for converting MOV to MP4 online. You can choose the most appropriate approach based on your situation.
Secure Download
Secure Download
 Updated by Alice Thorne to Convert Video
More readings
 4 Best Ways on How to Export iMovie to MP4
Read on and learn, this article will introduce 4 best methods to export iMovie to MP4.
 How to Turn MP4 into GIF With Top 5 Methods
Ever wonder how to turn your MP4 videos into GIF images? Don't worry. Read on and learn, this article will introduce 5 methods for you to achieve it.
 6 Best Audio Joiner software to Combine Audios
Learn more details about the 6 best Audio Joiner software to combine them.
 Convert QuickTime to MP4 for Playing on More Platforms
Wish to extract the audio from an MKV video? We’ll share with you some easy-to-use audio extractors to make you remove the audio track from the MKV file with no fuss.