With so many messages and conversions gathered on your iPhone Messages app, how do you search iMessage and quickly locate the chats you need? You can easily find the messages you want to check by sliding up and down if you often manage the conversions on your iPhone. Or the Messages app will get really messy, considering you are more likely receive lots of spam text messages and ads.

Now we back to the question, how to search messages on iPhone?
Many iOS users also complain that they can't find old messages on iPhone after updating. Here in this post, we like to share 3 simple methods to help you search messages including iMessages, text messages, old messages and even deleted messages on your iPhone, iPad and iPod.
First part, we will show you the common way to search iMessage on iPhone. If you are using a relatively new iOS version, you are allowed to search the specific message using the search bar. Just enter the key words and you can quickly find the related messages. The following guide will show you detailed steps.
Step 1. Unlock iPhone and open the "Messages" app.
Step 2. When you enter the main interface of Messages, swipe down with your finger to arise the search box.
Step 3. Now you can enter keywords, phone number or other key information in the search box. After that, tap "search" key on keyboard and the results list will automatically update. You can check all related conversations.
Besides the built-in search feature in Messages app, you can also rely on the Spotlight Search to find messages/iMessages on iPhone. Before you search messages on iPhone with Spotlight Search, you need to make sure the iPhone messages can be searched by this function. You need to turn on Spotlight Search for messages.
Step 1. Unlock your iPhone and go to "Settings" app. Tap "General" > "Spotlight Search" and then turn "Messages" on.
Step 2. Back to the home screen, swipe from left to the right to bring up "Spotlight Search" menu.
Step 3. Tap the search bar and then enter the keywords related to the message you want to check. Tap "search" key on the keyboard to update the results.
Compared with the first method, Spotlight Search will show you more related results from different apps. Here you can scroll down to the MESSAGES part to find useful results.
With the 2 regular methods above, you can handily locate the conversions you want to find. The chats may be deleted if you can't find them. As it mentioned above, many iOS users complain about the old messages can't be found issue after the iOS 27 beta/26/18/17/16/15/14/13 updating. So how to find these old or even deleted iMessages/messages on iPhone?
To help you quickly find old messages on iPhone, here we strongly recommend a powerful iPhone data recovering tool, iPhone Data Recovery to search and locate these iPhone messages.
Secure Download
Secure Download
Step 1: Double click on the download button above and follow the instructions to quickly install and run this iPhone Data Recovery on your computer. Here you need to ensure you download the right version.
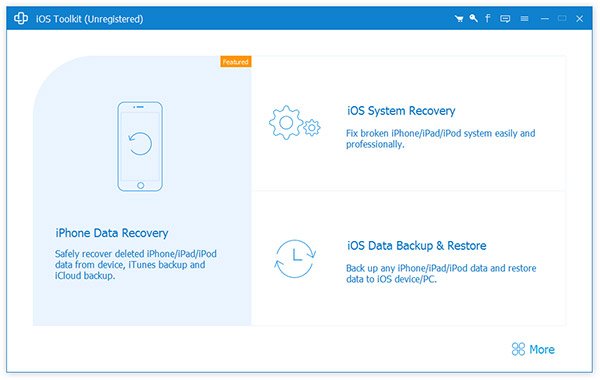
Connect your iPhone to it with a lightning USB cable. To help your computer quickly recognize your iOS device, here you need to tap "Trust this computer" on iPhone screen. When you enter the main interface, choose the "iPhone Data Recovery" feature.
Step 2: After connecting successfully, click the "Start Scan" button to scan all existing messages on your iPhone.
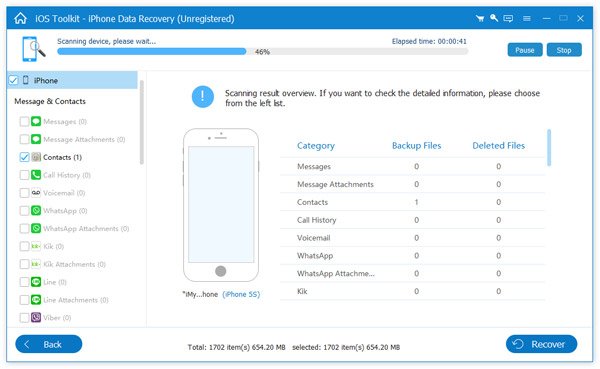
Step 3: When the scanning is finished, all iOS files on iPhone will be displayed in categories clearly on the left part. Click "Messages" on the left and you are allowed to check detailed information of each iMessage/text message on the right preview window.
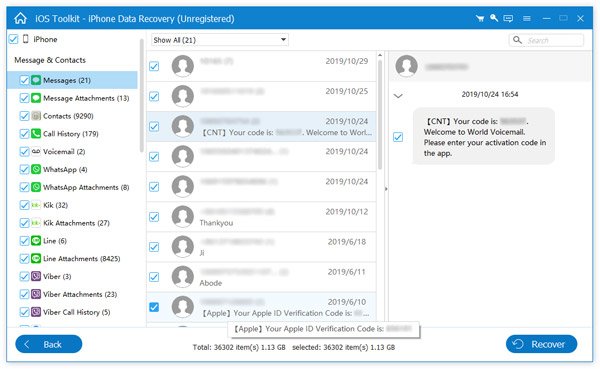
Step 4. There is a quick search function offered on the top-right corner, you can rely on it to quickly locate the message you want to check. As you can see, you are allowed to view both existing old/new messages and deleted ones. For the deleted iPhone messages, you can click "Recover" button to easily get them back.
iPhone Data Recovery provides you with a simple way to search and check both existing and lost messages on iPhone. If you lose any frequently-used iOS files like messages, contacts, call logs, pictures, videos and music and so on, you can rely on it to get them back with ease.
Whether you want to search iMessages or find old messages on iPhone, you can easily do it these 3 methods shared above. Leave us a message if you still have any questions.
 Posted by Ted Klarso to iOS Recovery
Related Articles
 How to Backup Text Messages on iPhone
Do you know how to backup text messages on iPhone? Here we recommend 5 solutions for you to save iPhone text messages.
 Top 5 Methods to Recover Notes from iPhone
Do you want to recover deleted notes from iPhone? You can find 5 best methods to get the deleted notes back from the article.
 5 Verified Solutions to Fix iMessages Not Syncing or Updating on Mac
When you find your iMessage is not syncing between iPhone and Mac, don't panic. This guide shows you 5 solutions to fix this problem and let you check iMessages on Mac as usual.
 A Step-by-step Guide to Transfer Messages from iPhone to Android
Transferring messages from iPhone to Android phone or tablet does involve a few steps, but it's not complicated. If you're making the switch, here is a step-by-step guide.