As one of the big fans of iPhone, there is nothing better than receiving the newly shipped iPhone 14. After the cheer, it is time to do the tedious and boring jog, to move data from old iPhone to new iPhone.
The hardest task about switching data to new iPhone is transferring a large number of music favorites
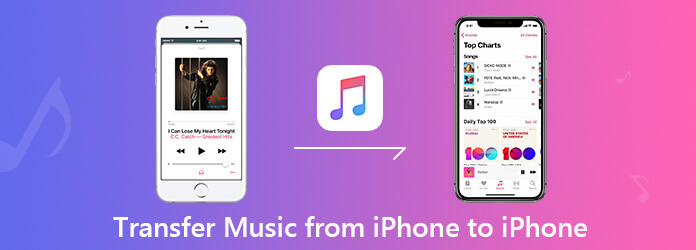
How to transfer music from iPhone to iPhone?
Use iTunes?
Yes. But it is an old story.
This article connects the 8 proven ways of sharing music between iPhone and iPhone with the apps, including iTunes, even without computer.
Are you ready for both iPhone devices?
Let’s drive right in.
Though iTunes is a little complicated to use to sync songs from iPhone to iPhone, especially those who are new to iTunes, it is the first tool that you may consider from Apple.
Step 1. Connect old iPhone to computer
Run the latest iTunes on your computer. Connect your old iPhone to computer with the USB cable and iTunes will detect it automatically. If necessary, just unlock your iPhone to hit “Trust” button.
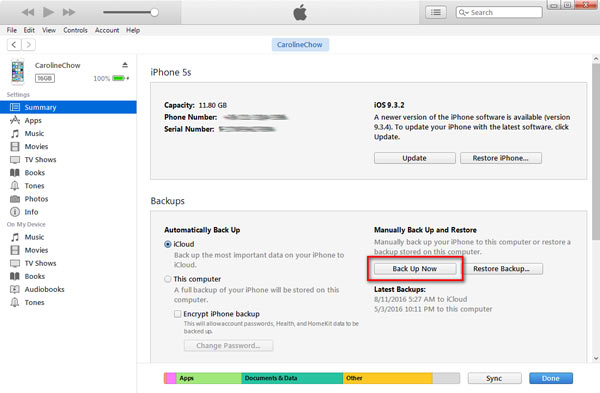
Step 2. Backup music for old iPhone
Click your iPhone icon in the upper-left corner and you will see the Summary tab by default.
Click “Back Up Now” under “Backups” to start backup the data including music on old iPhone to your computer using iTunes.
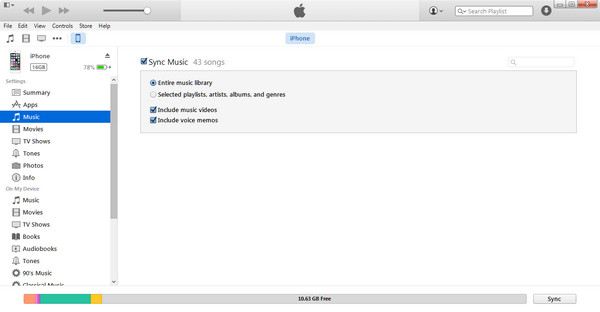
Step 3. Sync music to new iPhone
After the syncing process is done, just unplug your old iPhone. Plug your new iPhone to computer.
Click your iPhone icon and “Music” under “Settings” > Select the checkbox of “Sync Music” > Select “Entire music library” or “Selected playlists, artists, albums and genres” and click “Sync” to start transferring the songs from old iPhone to new iPhone.
Note: While using iTunes to transfer songs from one iPhone to another one, you will replace the existing music with the sync songs. In another word, you existing music on new iPhone will be erased.
iTunes is a little hard to use? Just try the iTunes similar tool, Finder, to finish the task in the next method.
Finder syncing with iPhone/iPad/iPod is the new feature of macOS Catalina. Similar to iTunes, Finder can transfer songs, albums, playlists, movies, TV shows, podcasts, books, audiobooks, photos, videos, contacts and calendars between iOS devices and Mac. Honestly, it is easier than iTunes.
Step 1. Connect iPhone to Mac
Plug your iPhone to Mac running in macOS Catalina with the USB cable. Open Finder and click your iPhone to select it. If prompted, just trust your iPhone.
Step 2. Backup iPhone music
Go to “General” tab to select “Back up all of the data on your iPhone to this Mac” and click “Back Up Now” to backup all supported data from iPhone to Mac with Finder.
After the backup is complete, just unplug your iPhone to Mac.

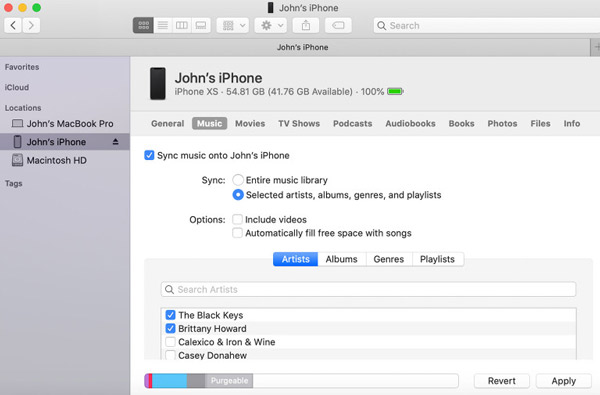
Step 3. Get music from Finder to another iPhone
Connect your another iPhone (XX iPhone) to Mac with the USB cable, find and click your iPhone name, select “Music” option and tick the box before “Sync music onto XX’s iPhone” and select the checkbox next to Sync to choose from “Entire music library” or “Selected playlists, artists, albums and genres”.
Finally, click “Apply” to start copying music from one iPhone to another iPhone.
Tips
Do not want to erase any data on another iPhone? The next method is what you will need.
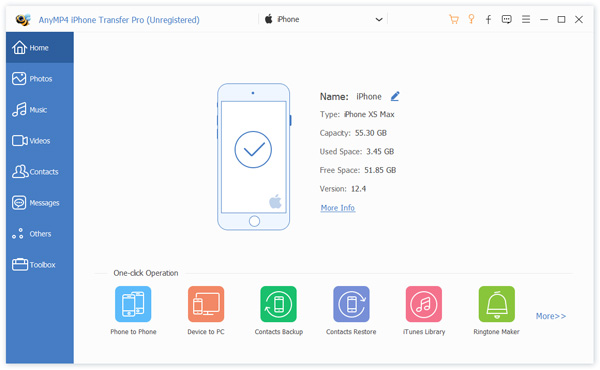
For keeping the existing songs safe without data loss, you are recommended to use the third-party app, AnyMP4 iPhone Transfer Pro, which is compatible with Windows and Mac computer.
iPhone Transfer Pro is the app that can transfer music, videos, contacts, photos and messages for iPhone, iPad and iPod. It can keep the synced data and existing data on iPhone iPad iPod safely. While transferring music, it can sync songs, iTunes U, podcasts, ringtones, audiobooks, voice memos and playlists from iPhone to iPhone, from iPhone to iTunes, from iTunes to iPhone, between iPhone and computer.
Moreover, it can create ringtones with the music files, delete songs, create a new music playlist and share songs between the playlists.
Secure Download
Secure Download
Now, let’s break down the exact process.
Step 1. Connect both iPhone devices to computer
Run this app on your computer. Use the two USB cables to connect both iPhone devices to computer. If promoted, just unlock iPhone and hit “Trust” button on iOS devices. Then this software will detect your iOS device automatically.
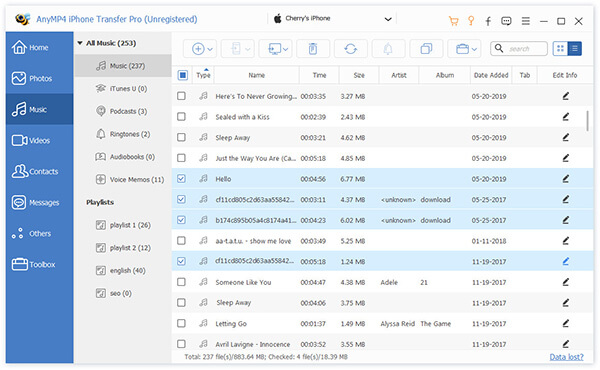
Step 2. Select songs
In the main interface, you need to enable the old iPhone to be displayed in the Device list by clicking its name from the drop-down list.
Then select “Music” tab from the left list, and you can see all the music files in the right window.
Select the music type and find the music that you want to transfer to another iPhone.
Tick the checkbox next to the song. You can select multiple songs by pressing the Ctrl key.
Step 3. Export songs to another iPhone
After confirming the songs that you want to move, click the “Export to Device” button (the third image like a phone in the upper corner) to select another iPhone name from the drop-down list.
Then this software will start transferring music from one iPhone to another iPhone.
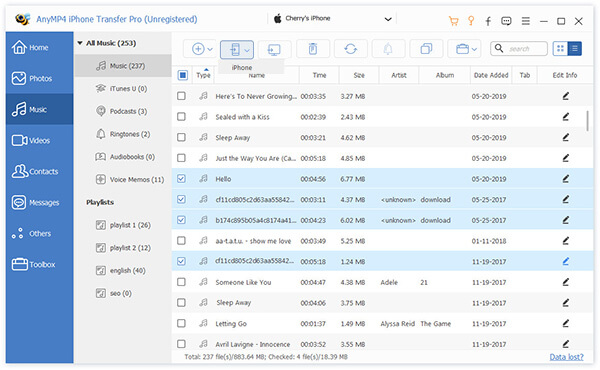
Both the selected synced songs and the existing songs on another iPhone will coexist.
If you just want to share your music with your family members who are not sitting next to you, then the above methods do not work for you.
Apple Music will do it exactly.
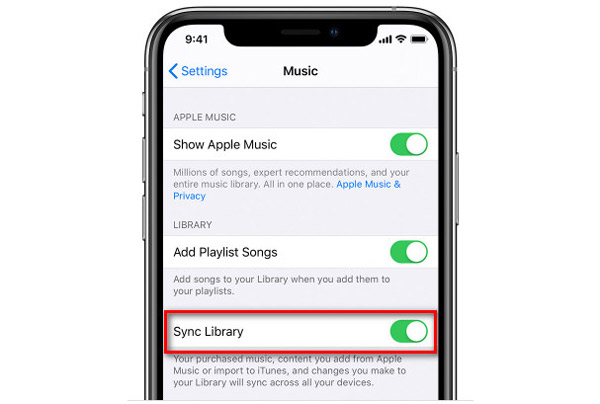
Apple Music is the subscription service from Apple, which you can access your music library on all iOS devices with the same Apple ID, after turning on Sync Library.
Before you use Apple Music to transfer music from one iPhone to another iPhone, you should meet the following needs:
Now, you can follow the steps of moving music from iPhone to another iPhone.
Go to “Settings” > “Music” > Turn on “Sync Library”. Then your purchased music, and content you add from the music player will sync across all your devices, including another iPhone.
Then on another iPhone, just repeat the steps, and you can easily sync the songs from Apple Music.
Tips:
Just as mentioned above, if you only want to get the purchased songs from iPhone to iPhone, what you need is the Apple ID with the iTunes Store.
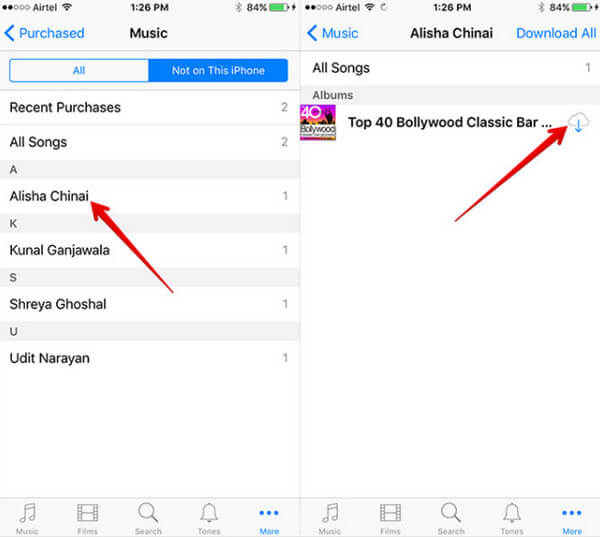
Step 1. Run iTunes Store on another iPhone. Sign in with the same Apple ID that you use to purchase the songs on old iPhone.
Step 2. Tap “More” in the menu at the bottom of the screen, and then tap the “Purchased” icon.
Step 3. Hit “Music”, find the music that you want to transfer to another iPhone and tap it.
Step 4. Tap the download button and wait seconds, then you will see the song redownloaded in your Music app on another iPhone.
AirDrop is the wireless transfer feature on iPhone, iPad and Mac. It can send photos, videos, websites, locations and more. Similar to Bluetooth, it requires you to keep both iPhone devices together.
For using AirDrop feature, you should make sure your iPhone is running in iOS 7 or later and Apple Music running iOS 8.4 or later. Then enable your Wi-Fi and Bluetooth on both iPhone devices. Last, you need to sign in with your Apple ID.
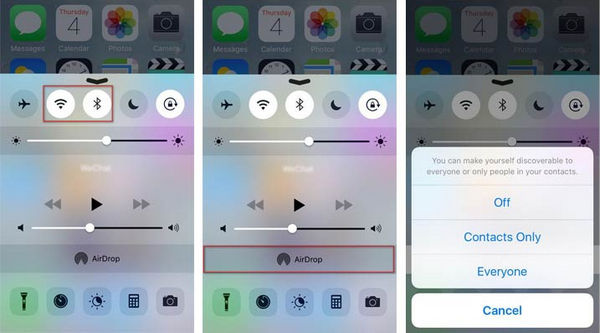
Step 1. On both iPhone, swipe from bottom to up to turn on Control Centre, turn on "AirDrop", and choose "Everyone".
Do not see AirDrop on Control Centre? Just touch and hold the top-left group of controls to find it.
Step 2. On another iPhone, open Apple Music, hit the new tab and find the song that you want to share with iPhone.
Step 3. Tap "More" on the right bottom to select "Share Song…", where you will be given various ways like Airdrop, Message, Facebook, Mail, Twitter, etc., to send your music, and here you need to choose "AirDrop" to send music from iPhone to iPhone.
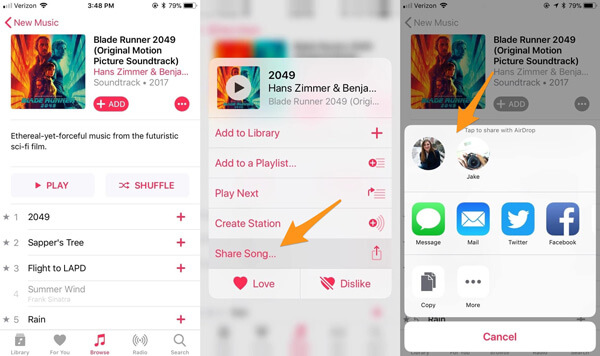
Repeat the way, and you can send the songs from one iPhone to another iPhone one by one.
Note: AirDrop can be found on Apple Music subscription service. The music you add to iTunes and then sync to iPhone or songs added from other third-party apps into iPhone cannot be shared. Music saved to iCloud through iTunes Match can be transferred with AirDrop.
Dropbox is the app that you can use to transfer music from iPhone to iPhone via its cloud service. For using it, you should install Dropbox on both devices and sign in the same account. Do not forget to connect both devices to Wi-Fi connection to make the music transfer.
Step 1. Run Dropbox on one iPhone, tap “Add Files” to select the songs you want to move, and then tap “Upload”. Then it will take some time to upload the songs from one iPhone to Dropbox cloud.
Step 2. Open Dropbox on another iPhone, and wait minutes until the songs appear in the Dropbox folder. After that, you can listen to music via Dropbox or save them to another iPhone.
Note: Dropbox only provides you with the free 2GB storage. If your music file size is over 2GB, you need to purchase the extra space.
The last method of sending music from iPhone to iPhone may be ignored by many of you. However, it is the method that can copy your iPhone music to another iPhone by using Home Sharing.
Home Sharing is the feature on iOS devices and Mac to share, stream, and import media from up to 5 computers that are connected to your home Wi-Fi network.
Before you use Home Sharing, you should follow the rules as below:
Step 1. Set up Home Sharing
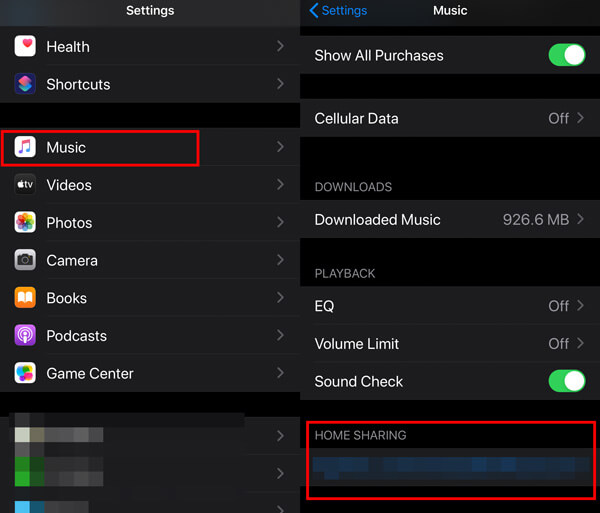
On iPhone go to “Settings” > “Music” > Sign in the Apple ID under Home Sharing.
Enable the settings on both devices.
Step 2. Share music from iPhone to another
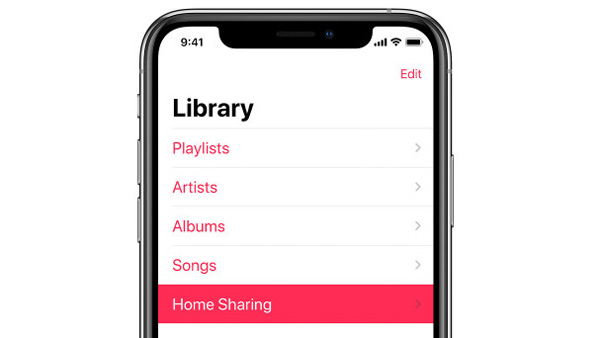
On one iPhone, go to Music app, and tap “Library” > Tap “Home Sharing” > Choose the music library you want to share.
Then on another iPhone, open the Music app, and you can see the shared music files.
Note: Instead of keeping the music files on another iPhone, this method with Home Sharing just enables you to play the songs.
It is easy to switch from one iPhone to another iPhone. However, it is not an easy task to transfer music from iPhone to iPhone. This post collects the top 8 ways to complete it with iTunes, iTunes Store, Apple Music, Home Sharing, AirDrop, Dropbox, Finder on Mac, and the third-party app.
Whether you want to move the downloaded or imported songs, or purchase music files, you can also sync all of them from old iPhone and new iPhone.
Which way is your favorite one?
Let me know by leaving your comments.
 Updated by Riley Mitchell to Mobile Transfer
Related Articles
 Top 6 Programs to Backup SMS on Android
Do you know how to backup SMS on Android? The article explains 6 excellent ways to backup SMS.
 How to Backup Text Messages on iPhone
Do you know how to backup iPhone text messages? Here we recommend 5 ways to do it.
 Best Ways to Backup Text Messages on Android
Worry about your text messages got lost? You just need to backup text messages on Android timely.
 How to Retrieve Voicemail on iPhone
AnyMP4 iPhone Voicemail Recovery offers the best solution to retrieve Voicemail from iPhone.