Music on iPhone always carries lots of pleasures to relax you. However, as the music downloads and purchases increase, the storage on your iPhone/iPod reduces. For some reasons, the copy of music from iPhone iPod to a new computer can avoid songs loss. Thus, many users like you are seeking ways to transfer music to iTunes from iPhone, iPad and iPod.
In this post, a full guide to showing you how to move music, including songs and playlists, from iPhone to Windows and Mac computer using iTunes.

For Windows users, iTunes is the recommended tool to get music from iPhone to computer. iTunes can backup music from such iOS devices as iPhone, iPad and iPod, to computer with iTunes.
But you should keep it in mind that the music files purchased from iTunes Store and App Store, and synced from iTunes like imported MP3s or CDs, cannot be moved from iPhone to iTunes.
Step 1: Connect iPhone to Windows computer with the USB cable
Get the USB cable to plug your iPhone to computer. Run the latest iTunes on this computer, and it will detect your iPhone automatically.
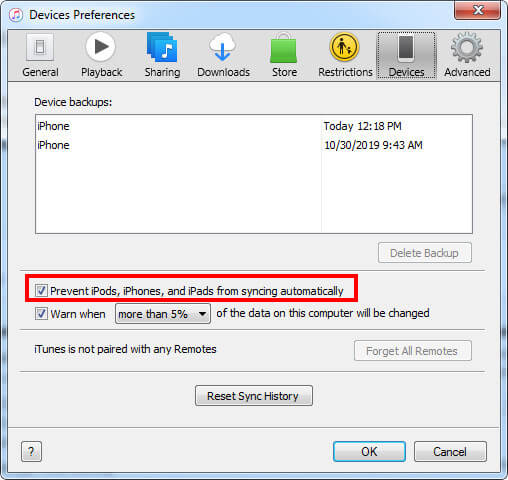
For avoiding data loss due to Automatic iTunes sync, you should disable automatic iTunes sync. (Run iTunes > Click “Edit” > Select “Preferences” > “Devices” > Uncheck the box before “Prevent iPods, iPhones, and iPads from syncing automatically”.)
Step 2: Backup data including music to computer using iTunes
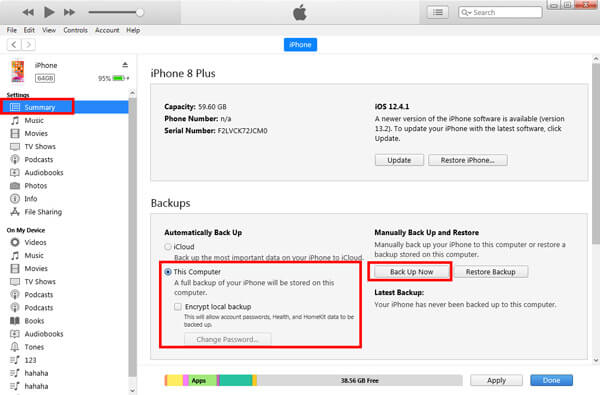
Find your iPhone icon at the top and click it to enter the default “Summary” section.
Select “This Computer” under “Backups” and locate the right window and click the “Back Up Now” button at the right side under “Manually Back Up and Restore”.
Then iTunes will start backing up the data and settings, including the songs from iPhone to this computer with iTunes. The time of backup depends on the data on your iOS devices.
Tips:
1. iTunes gives you the option to create the password to encrypt local music backup.
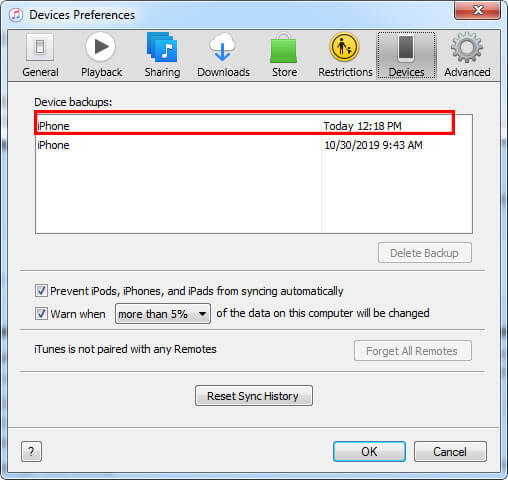
2. After the backup is done, you can check it: Click “Edit” at the menu of iTunes, and select “Preferences” from the drop-down list > Locate “Devices” section and you can see anew backup list with the date marked.
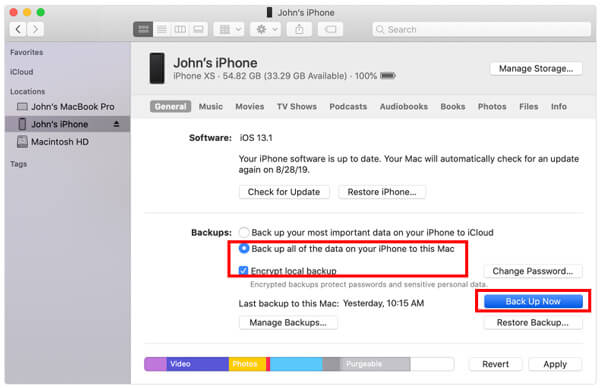
The above steps are following the guide on Windows computer. If you run Mac, the steps are similar to send the songs from iPhone iPad iPod to Mac with iTunes. An extra tip is that the users who are running on a Mac with macOS Catalina 10.15, the steps come to be easier.
You just need to connect your iPhone to Mac, and open Finder to click your iPhone name. Then just follow the steps similar to those in iTunes to load songs from iPhone to Mac.
As mentioned before, iTunes only copies music that is not from iTunes Store or App Store. For getting music files that are purchased, you should take the second method.
The whole process is easy accompanying with the Apple ID.
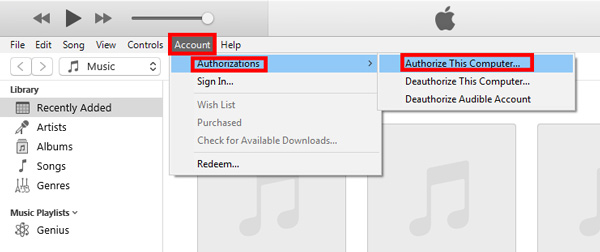
Step 1: Sign in to Apple ID in iTunes on computer
Make iTunes up to date, and run it. Go to “Account” > “Authorizations” > “Authorize This Computer” and enter your Apple ID and password that is used on your iPhone to purchase the songs.
Note: One Apple ID can be authorized up to 5 computers. If it exceeds, you have to de-authorize other computers firstly.
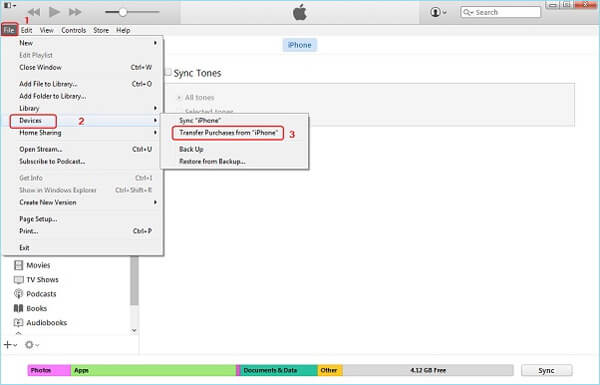
Step 2: Transfer Purchased songs from iPhone to iTunes
Connect iPhone to the computer with a USB cable, select “File” > “Devices” > “Transfer Purchases from [your iPhone name]” to share the songs from your iPhone to this computer.
The purchases include purchased music, videos, audiobooks, etc.
Then you can click “Recently Added” from the left panel of iTunes to check the newly imported songs.
For saving the purchased music files from iTunes to your computer, just select the song and tap the “Download” button next to the song to put the songs from iTunes to the computer.
For Mac users, the steps work similarly.
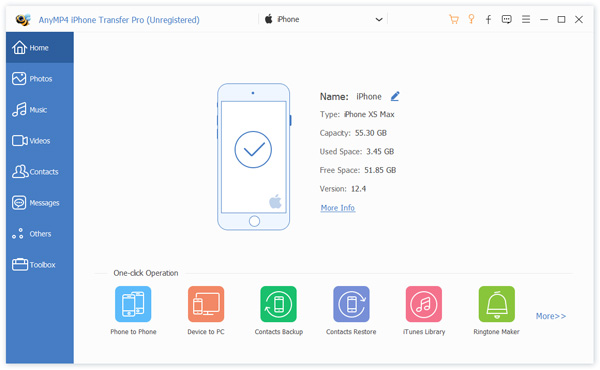
The last way is the easiest method to share the music files including the playlists from iPhone to iTunes Library, even the music that you synced with iTunes before. What you need is AnyMP4 iPhone Transfer Pro, which is the professional music transfer software from iPhone iPad and iPod to iTunes. Moreover, it lets you add the songs and the music playlists to computer, and share the media files among iPhone iPad and iPod without hassle.
What you can benefit from this music transfer software:
Secure Download
Secure Download
Now, let’s see how it works to transfer music from iPhone to computer.
Step 1: Connect iPhone to computer
After downloading this software on your computer, install and run it. Make sure iTunes is up-to-date, and do not run it while using this software.
If prompted, just follow the on-screen instructions to unlock iPhone and tap “Trust” on iPhone.
Then this software will detect your iPhone automatically.
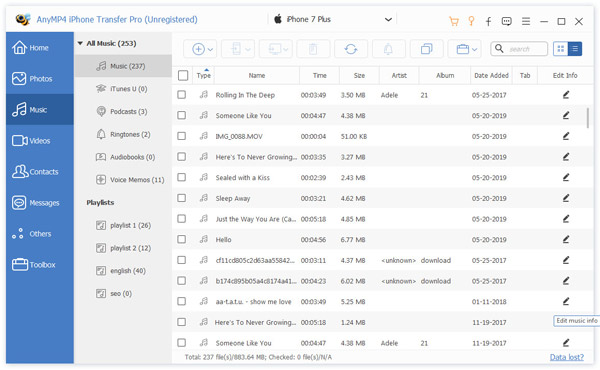
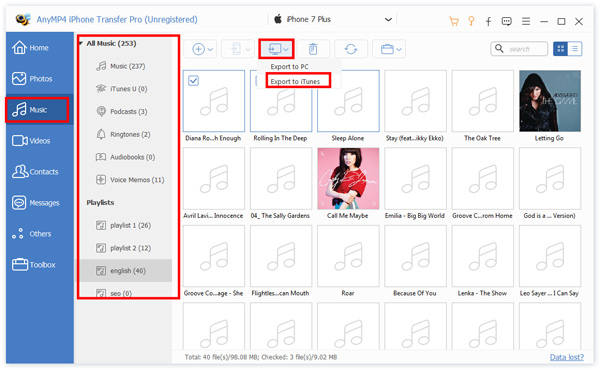
Step 2: Select songs on iPhone
From the left sidebar, you can see all the data types (Music, Videos, Contacts, Photos and Messages). Here click “Music” and you will see all the music file types show on the right side, Music, iTunes U, Podcasts, Ringtones, Audiobooks, Voice Memos and Playlists.
Select one song and double-click it to play it. Moreover, you can use the edit button to edit the album before importing to iTunes.
Step 3: Export selected songs and playlists from iPhone to iTunes Library
After confirming all the music files, just select the checkbox before the songs, and click “Export to PC” (the computer image) at the top and select “Export to iTunes” to start uploading songs from iPhone to iTunes directly.
If you want to share songs from iPhone to iPhone, just connect both iPhones and select the “Export to Device” to pick up your other iPhone.
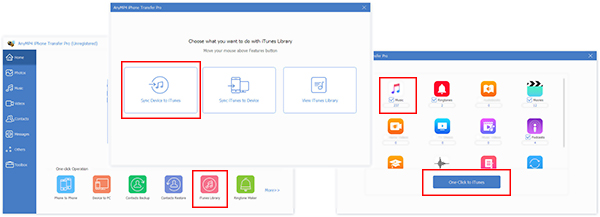
Alternatively, you can start a quick music transfer from iPhone to iTunes Library with this software.
Just run this utility. Select “iTunes Library” at the bottom of the main interface when connecting iPhone > Select “Sync Device to iTunes” > Select the checkbox of “Music” > Click “One-Click to iTunes” and all the music on your iPhone will go to iTunes Library.
That’s all there is to it.
Putting music from computer to iPhone with iTunes is seeking for ear listening, while transferring songs from iPhone to iTunes is for data backup and space free-up on iPhone iPad and iPod. In this post, we talk about how to copy songs from iPhone to iTunes in 3 easy ways. The first 2 solutions can transfer music including the purchases from iPhone to iTunes, but the process will be divided into 2 parts. The last method is the one-stop solution to sync iPhone songs and playlists to iTunes Library with iPhone Transfer Pro.
Which one is your preferred one?
Let me know by leaving your comments below.
 Posted by Riley Mitchell to Mobile Transfer
 Related Articles
 How to Backup Text Messages on iPhone
Do you know how to backup iPhone text messages? Here we recommend 5 ways.
 How to Recover Call History on iPhone
This iPhone Call History Recovery offers the solution to recover deleted Call History.
 How to Backup iPhone Photos With Ease
You can get 3 different methods to backup iPhone photos to computer or cloud storage with ease.
 How to Retrieve Voicemail on iPhone
AnyMP4 iPhone Voicemail Recovery offers the best solution to retrieve Voicemail from iPhone.