3 Ways to Convert WAV to FLAC
SUMMARY:
Converting from WAV format to FLAC format is always lossless. It means that while reducing the file size, no audio quality will be lost. You can do this easily via AnyMP4, VLC, or CloudConvert.
- Method 1: AynMP4 Video Converter Ultimate [Premium]
1. Click +Add File to import WAV.
2. Select FLAC in the Output Format picker.
3. Click Convert to begin the conversion.
- Method 2: VLC Media Player [Desktop]
1. Click Media > Convert/Save or press Ctrl+R.
2. Click +Add in the File tab and select your WAV file.
3. Next to Profile, select the Audio - FLAC, then click Start to convert.
- Method 3: CloudConvert [Online]
1. Go to CloudConvert and click Select File to upload your WAV file.
2. Ensure the output format is set to FLAC and click Convert.
While WAV files are great for preserving all the details of the original recording, there's no denying their large file sizes. Transcoding WAV files to FLAC is among the most effective ways to free up space while retaining the source's quality. With FLAC's lossless compression, you get a smaller file size while still preserving all the bits of the original audio. Another advantage of FLAC is its support for a wide range of embedded metadata, which lets you organize your library more effectively. In this article, we will compare the best software options to convert WAV to FLAC. We will also describe how to perform the conversion and maintain the quality of your audio and metadata.
WAV vs. FLAC: Understanding the Lossless Tug-of-War
What is WAV?
A WAV file is uncompressed audio format that preserves the original LPCM data. It is common to use the file format in professional sound recording and editing due to its excellent quality and lack of compression. However, it consumes more storage space than compressed formats.
What is FLAC?
FLAC is a lossless codec that compresses audio files without discarding any content; hence, the output is an exact replica of the original sound. The compressed file size is 30-60% smaller than the original WAV file.
Method 1: The Choice of Professionals - AnyMP4 Video Converter Ultimate
AnyMP4 Video Converter Ultimate is the pro’s choice, compatible with Windows and Mac OS. It uses the most advanced hardware-accelerated media processing to batch-convert WAV to FLAC at 120× speed. Beyond FLAC, it can also output 500+ other lossless and lossy audio formats. You can also modify the sample rate, bitrate, and audio channels to meet different playback requirements. Notably, it includes editing tools for trimming, reducing noise, and boosting volume. It also features a built-in metadata editor that can help you update ID3 tags.
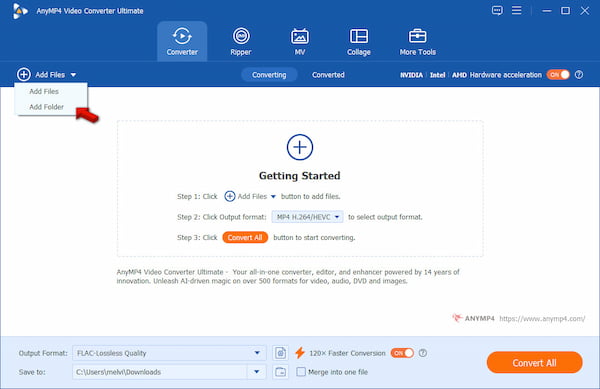
1. Download AnyMP4 Video Converter Ultimate and complete the installation procedure. After setup, the software will open automatically. Click +Add Files to add the WAV sources from your computer. If all your files are saved in a single folder, click Add Folder instead.
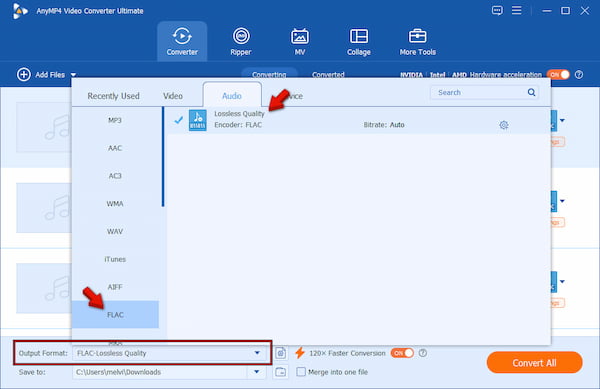
2. Go to the Output Format picker, click the Audio category, and select FLAC. Importantly, choose a quality preset that matches the source's quality. However, since FLAC is already a lossless format, the only option available is Lossless Quality.
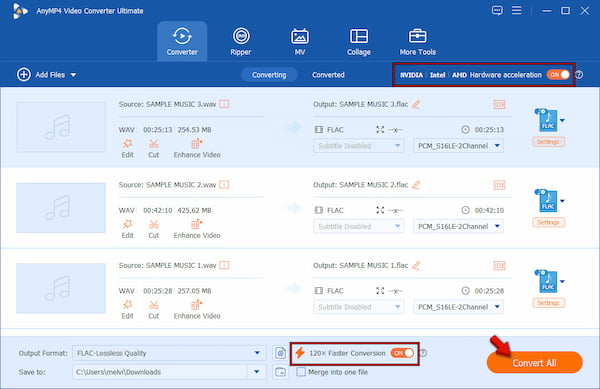
3. Return to the main interface, enable Hardware Acceleration, and toggle the 120× Faster Conversion button to accelerate the conversion. In Save To, set the destination path, then click Convert All to convert WAV files to FLAC.
To evaluate the performance of AnyMP4, we put it to the test. For our test, we have chosen a file size of 2.19GB, consisting of 100 WAV files. The 37 hours and 25 minutes of WAV files were converted to FLAC-Lossless Quality within 2 minutes and 34 seconds only. In our audit, there were no distortions, glitches, or any downgrade in the FLACs' sound.
Method 2: Open Source Power with VLC
Aside from being a WAV player, VLC includes a hidden Convert/Save feature. With it, you can re-encode almost any audio, including .wav to FLAC format. However, you need to create a new FLAC profile because it is not available from the profile list by default. You can also import multiple files, but ensure each is less than 50 MB to prevent the software from crashing.
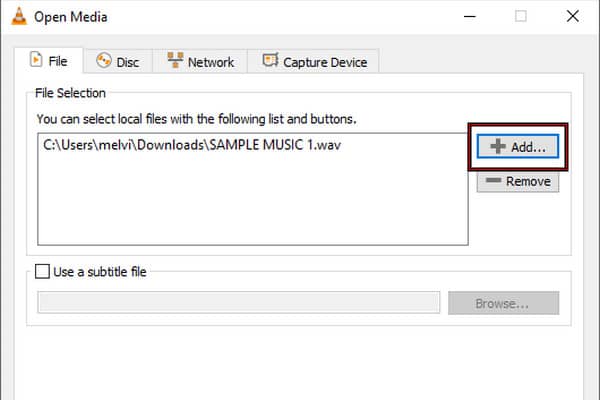
1. On VLC, press Ctrl+R or click Media and select Convert/Save to open the Open Media window. Import your WAV file(s) by clicking +Add, then hit Convert/Save to continue.
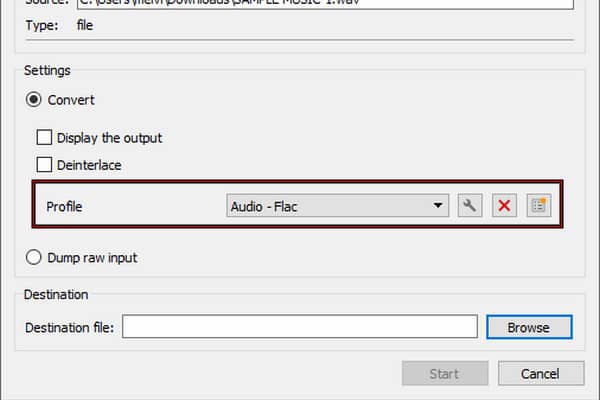
2. Go to the Profile picker and choose Audio – Flac. Click Browse next to Destination File to set the output directory, then hit Start to convert.
Note
If this is your first time using VLC, you need to create a new profile to convert WAV to FLAC. Click Create a New Profile, select FLAC in the Encapsulation tab, and adjust settings in the Audio Codec tab. Then, click Create to obtain the newly created profile.
Method 3: Easy Online Conversion with CloudConvert
If you want to escape the hassle of installing software, CloudConvert can convert WAV to FLAC online. Don’t worry about your sensitive files; it encrypts the files during transit and removes them from its servers within 24 hours.
To convert: It's easy with CloudConvert. Drop your WAV source directly into the upload area. Alternatively, click Select File to import files from your computer, cloud storage, or via URL. Click the Select Format picker and select FLAC. After setting up your target format, click Convert to process the conversion, then you need to download it to save it locally.
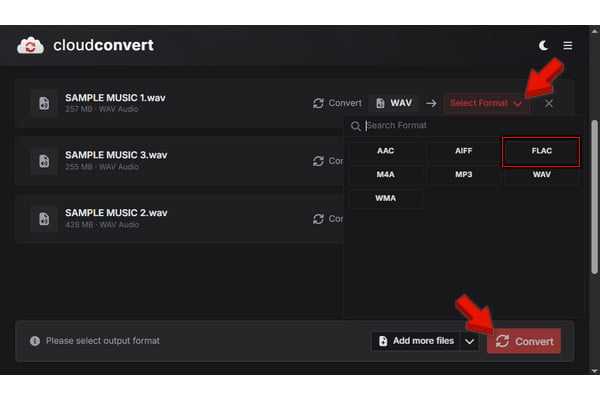
CloudConvert can handle almost all media and file types with ease and efficiency. To be real with you, CloudConvert is free, but with certain limitations. Do not import a file exceeding 1 GB; otherwise, it won’t upload. Also, the conversion per day in the free tier is only 25.
Solving Common Conversion Problems
Metadata and ID3 Tags
Some converters only transfer the audio and ignore metadata. It leaves you no album titles, no track numbers, or even no album artwork. To avoid this, use a converter with a built-in metadata editor, like AnyMP4, and always check the information after the conversion.
High-Resolution Audio (24-bit/192kHz)
When converting high-resolution audio (24-bit/192kHz) from WAV to FLAC, ensure the output settings match the input settings to avoid accidental down-sampling. After the conversion, open the FLAC file to ensure it preserves the high-resolution audio. Sometimes, using high-resolution WAV can be the reason why FLAC files so big after conversion.
Pro-Tips for an Optimized Audio Library
- • Go with FLAC compression level 5 for optimal conversion speed and smaller files, without compromising audio quality.
- • Test your converted FLAC files using FLAC Frontend to ensure they are exact copies of the original WAV files.
- • Do not delete your WAV files until you are sure that your FLAC files have the right metadata and play perfectly.
Troubleshooting Common Issues
File is Corrupt After Conversion
Corruption of FLAC occurs when the conversion is interrupted, insufficient drive space, or incomplete file transfer. It is advisable to ensure you have sufficient space and not close the converter until the process finishes before converting the file.
Unable to Play FLAC Files in a Player
Despite being a popular format that plays well on many devices, some media players, car stereos, and older systems do not support FLAC files. You can solve this problem by changing the format to MP3. Learn the FLAC vs MP3 vs WAV differences here.
Flac Does Not Show Any File Size Decrease
If your WAV file contains a lot of compressible data, FLAC should make it smaller. However, the extent of the reduction depends on the audio. Not all WAV files get any smaller when converted to FLAC since there isn't much redundant data to remove.
FAQs about WAV to FLAC Conversions
Will I lose audio quality if I convert WAV to FLAC?
No, you will not lose audio quality because FLAC uses lossless compression. When you decode or play it, it creates an exact bit-for-bit copy of the source WAV.
Does FLAC support 5.1 Surround Sound?
Yes, FLAC fully supports 5.1 surround sound. To be real with you, it supports up to 8 independent audio channels, including 7.1, without any loss in audio quality.
Why choose FLAC over MP3?
Go for FLAC if the highest sound quality is what you are looking for. Whereas MP3 removes the audio content and compresses it to reduce file size. FLAC does the opposite, using lossless compression.
CONCLUSION
WAV to FLAC conversion is a proven way to reduce storage space usage while maintaining audio quality. If you just need a rare conversion, you can use any free software, such as VLC and CloudConvert. But if you want to convert your files in bulk, have advanced output options, preserve the metadata, and have a much more pleasant experience, then AnyMP4 Video Converter Ultimate is what you need. Download it right now!




 Add your comments to join the discussion here