Users of the Mac operating system are fortunate, as their software offers built-in editing options that provide basic video adjustment tools to its consumers. Among these software, QuickTime Player is designed not only as a media player but also for minor and casual editing. In this article, we will provide a guide for the media player tool of macOS to provide two solutions for why you can’t trim a video in QuickTime Player. To learn how to use them, we will provide step-by-step tutorials for both options, as well as basic video trimming tips and a third-party alternative for more accessible trimming.

We will begin this guide by introducing the most basic option in QuickTime Player to trim videos with a guide on using the Trim option in QuickTime’s Edit tab. This option is limited to Start and End trimming, which allows you to cut the video only at the start and end portions.
To learn how to use it, please read our three-step guide below.
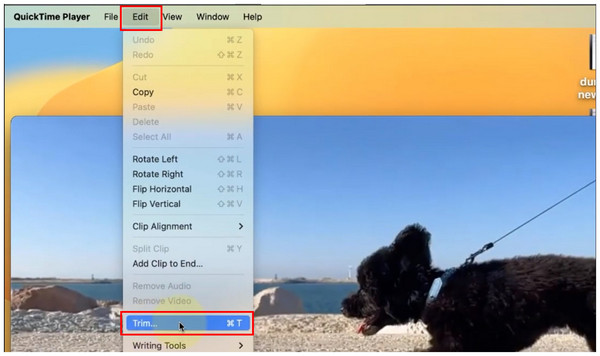
1. Open the video you want to edit using QuickTime Player. Then, click the Edit menu in the program and select Trim.
2. After selecting the Trim tab, the Trimming Bars will appear on the video playback. Click and drag the bars to trim the beginning and end of the video.

3. Adjust the Trimming Bars to capture the desired part of the video in between them, then select the Trim button to confirm your adjustments.

Among trimming tools, start and end cutting is the basic option for editing videos. This is ideal for removing unwanted parts of the video, especially the unnecessary parts in the final seconds. This is the most basic option in learning how to trim video with QuickTime Player.
Although most videos have unwanted sections at the start or the end, cutting sections in the middle part is equally important. Fortunately, video trimming in QuickTime Player features a Split Clip function specifically designed for removing parts between videos.
To learn how to use this more advanced cutting option, please read the full guide on using the Split Clip below.
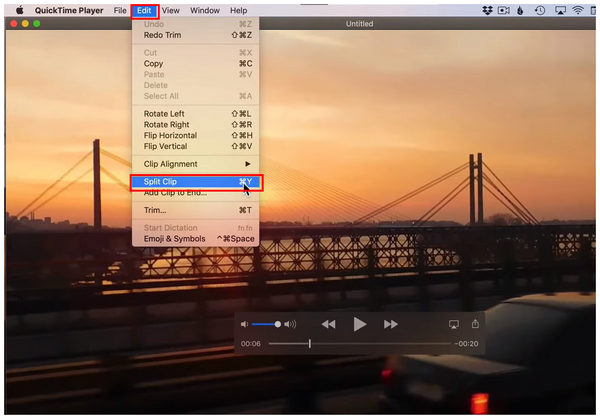
1. Open the video you want to cut in the middle in QuickTime Player, select Edit, and click on Split Clip.
2. After selecting Split Clip, the software will cut the video at the point where your play bar is located. You will find a Red Line in it, which can be adjusted to where the second point of the cut will end.
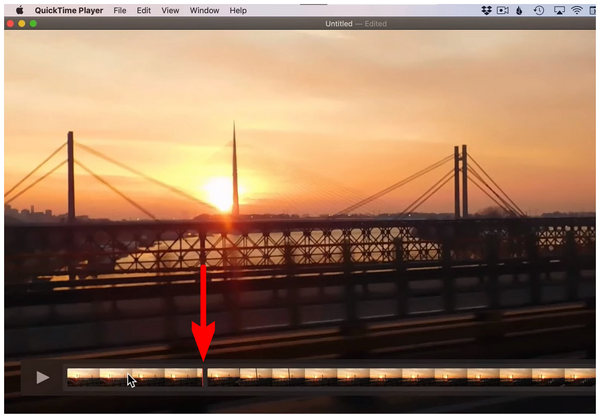
Adjust the Red Line to set the video cut ending.

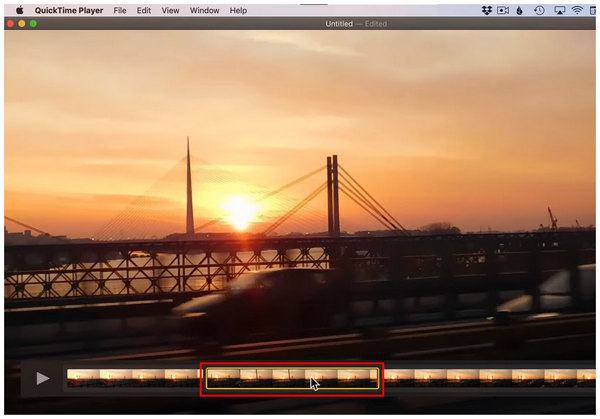
3. The start and end points of the Split Clip will now cut the video into three sections. To trim the middle section, delete the section selected by Split Clip.
Since the Split Clip feature of QuickTime Player also lacks accurate section cutting, this limits the tool to only basic editing. This makes it inapplicable for more advanced editing and creative works.
If you want to refine your footage, just follow this post to edit a video in QuickTime.
Now that you have learned that you can trim videos in QuickTime Player, let us move on to practical tips for editing these video projects.
When using the basic trim option, ensure that you hold the click and drag the Trimming Bar for more precise trimming. This also improves your efficiency, as there will be no need to repeatedly adjust the Trimming Bar.
If you made a mistake in applying the trim effect, you can easily undo the changes using the Command + Z shortcut on your keyboard. Due to the presence of this fail-safe, trimming videos will be way easier to control.
If you are having trouble on why you can't trim a video in QuickTime Player, the best potential solution is to restart your QuickTime Player or your entire Mac computer. This is because the inaccessible Trim option is often caused by codec or format-related issues.
Since QuickTime Player’s editing options are limited to facilitate its ease of use, using a more advanced third-party editor is the ideal option, especially if you are looking for a trimmer tool that offers more precise adjustments. Among the multimedia tools available on the market, AnyMP4 Video Converter Ultimate is a great option, thanks to its exclusive Video Trimmer tool.
Compatible with both Windows and Mac computers, AnyMP4 Video Converter Ultimate is a multimedia tool that offers flexible video editing features, including an exclusive Video Trimmer tool that works more accurately than QuickTime Player options.
The Video Trimmer tool in the program also offers beginner-friendly trimming bars, allowing you to easily click and drag to trim videos quickly. However, the impressive video cutting option in the software is its accurate time-based trimmer, which works by adding a set start and end time to accurately identify where the video cut will begin and stop up to the last second.
To improve the quality of trimmed videos, fade-in and fade-out effects may be added to the program. This is a practical addition to the program's more advanced editing tools, featuring segment trimming and fast split editing. These features allow the trimmer tool to work on the start, end, and middle parts of the media.
To ensure the program functions well, it supports over 500 video formats, including MP4, MOV, WMV, AVI, MKV, and GIF. Customizable parameters may also be edited in these files for video format, encoder, and audio channel.
In addition to the Video Trimmer tool, the program also offers a range of practical video editing features. These include Video Cropper, Video Rotator, Video Reverser, Video Compressor, Video Watermark Remover, Video Enhancer, and Video Speed Controller, all of which are available in the program's Toolbox feature. Together with the format Converter of the program, it also offers MV Editor, Collage Maker, and 3D Maker features.
For an easier time learning how to use AnyMP4 Video Converter Ultimate as a video trimming program, make sure to read our three-step tutorial below.
Do not forget to download the software as well for an easier time following our guide.
Secure Download
Secure Download
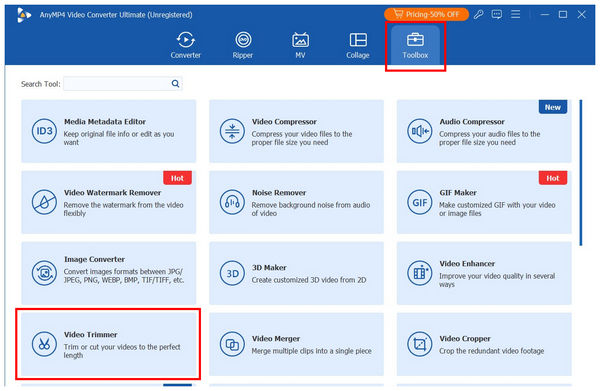
1. Open AnyMP4 Video Converter Ultimate, then select the Toolbox tab in the menu. Next, find the Video Trimmer option among the available tools. Upload the video file you want to cut in the Add File menu that will appear.
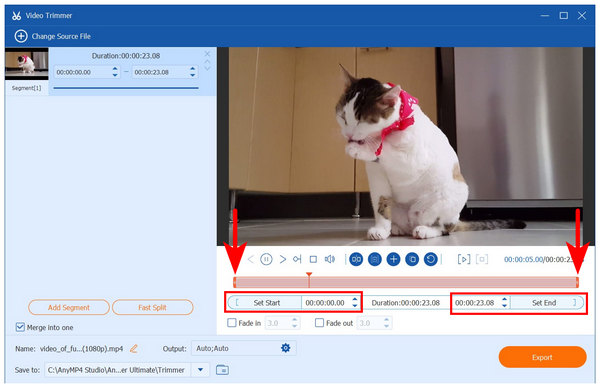
2. After importing the file into Video Trimmer, you can use the Trimming Bars at the start and end of the video for basic trimming. For a more accurate option, you can add specific times in the Set Start and Set End menus to indicate when the trimming will begin and end. Optionally, you may add Fade In and Fade Out effects for a smoother video cut effect.
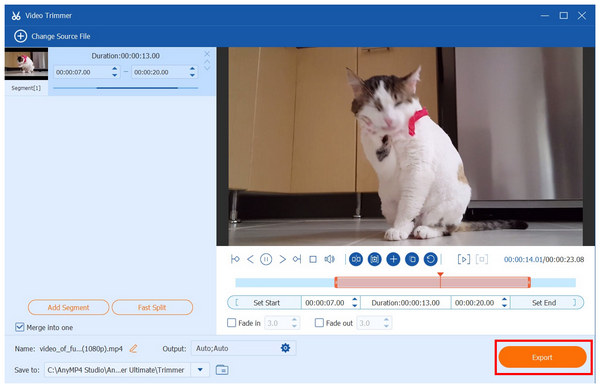
3. With the trimming adjustments applied, click Export to produce the edited video with accurate trims.
Due to the more accurate video trimming software in AnyMP4 Video Converter Ultimate, the program not only serves as a great alternative but also as a direct upgrade. This makes the program an ideal option for those seeking a versatile tool for video trimming and more.
Does QuickTime Player permanently save the trimmed video?
Yes, it does. QuickTime can save editing adjustments that the user applies. This includes video trimmings.
Will I lose video quality when I trim a video with QuickTime?
No, you will not. QuickTime can preserve the video quality of edited media within it. This makes the software a function tool for basic video adjustments.
What's the shortcut to trim a video in QuickTime?
The shortcut to access the video trimmer in QuickTime is Command + T. This will immediately open the software's trimming tool. You can then edit the files using the yellow bars in the trimming menu.
Is QuickTime a beginner-friendly video editor?
Yes, it is. QuickTime is the default video player and editor on Mac computers. They are very easy to use. Unfortunately, this restricts the software from being available for more advanced adjustments.
Should I use QuickTime for simple video editing work?
Yes, you should. QuickTime is designed for beginner-friendly video editing. This makes using the tool for simpler editing highly ideal.
Now that we have provided the tutorial on the easiest options for learning how to trim videos in QuickTime Player, we hope you will now be able to easily remove unwanted sections of your videos without any issues. However, if the basic trimming function of QuickTime is too basic for your liking, we highly recommend using AnyMP4 Video Converter Ultimate’s Video Trimmer tool, not only as an alternative but as a direct upgrade. Download the software now to start using it.
 Updated by Mark Cristobal to Edit Video
Related Articles
 Trim Videos on Windows Without Quality Loss
Want to get free or professional clip tools for Windows? This post shows you how to cut the video length with some tools to keep the attention of your viewers.
 Top 2 Methods to Trim TS Video File on Your Desktop and Online
Want to trim TS video files and remove unneeded frames? This tutorial shares two easy methods to do it on computer quickly.
 Concrete Tutorial to Crop a Video in QuickTime Player Correctly
We explain whether you can crop a video in QuickTime Player on Mac and the workflow, so that you can edit your video as you wish.
 How to Edit QuickTime Videos With Basic Tools Easily
Want to edit QuickTime video without extra software? Use QuickTime Player to edit and export videos. Also, learn the best alternative tool for advanced editing.