QuickTime Player is a built-in media tool on macOS that goes beyond just playing videos. It also offers a set of features for basic video editing. As a native Apple application, it provides an intuitive interface for users to perform essential edits. While QuickTime Player is ideal for quick and simple edits, it isn't designed for advanced editing tasks. In this post, you'll learn how to edit QuickTime videos using QuickTime Player. We'll cover the basics so you can easily enhance your videos right from your Mac. For more advanced editing capabilities, we'll also point you toward a more powerful alternative.
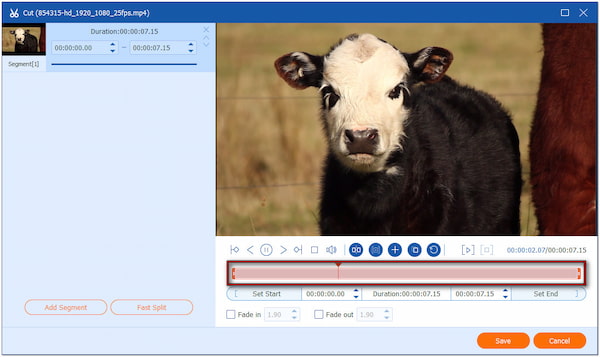
The Trim tool allows you to cut out unwanted video sections from the beginning or end. It's an intuitive way to shorten videos and focus only on essential content. This tool helps in shortening the video's timeline cleanly and quickly.
Here's how to edit QuickTime video:
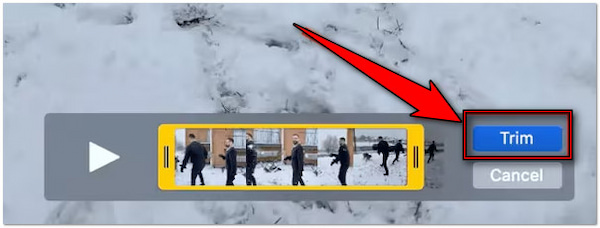
1.Open the video in QuickTime Player and click the Edit tab in the top menu. Select the Trim option; a yellow bar with handles appears on the timeline. Drag the left or right yellow handle to set the start and end of the clip. The greyed-out area will be trimmed off.
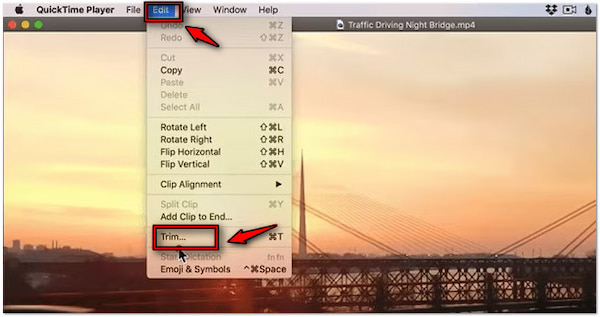
2.Click and hold a yellow handle to display individual frames for more precise adjustments. Once satisfied, click Trim to cut out the beginning or end of the video clip.
Important Note: QuickTime Player doesn't offer a crop tool to remove parts of the video frame. If you wish to crop a QuickTime video, please refer to the provided link.
The Split Clip feature provides a straightforward solution to divide a video into multiple segments. This makes it possible to rearrange or manage each segment individually. Once split, clips are displayed on a timeline, where they can be dragged and reordered.
Here's how to edit videos with QuickTime Player:
1.Load the video in QuickTime Player, click View, and select Show Clips from the menu. You'll see the playhead appear. Move the red vertical line to where you want to split the clip. Use the left or right arrow keys for fine positioning.

2.Hold Option and press the arrow keys to jump between clip boundaries. Click Edit and select Split Clip to insert another clip or drag them to rearrange the video. Repeat the process if you want to create more clips.
Creative Tip: Drag a video from Finder and place it into the gap between two clips to add a new video selection. This is ideal for rearranging video scenes perfectly.
How can I edit a QuickTime video to change its orientation? You can use the built-in Rotate and Flip tools to fix orientation issues. You can correct videos shot sideways or upside-down, or even create mirrored effects. Simply select Rotate Left/Right or Flip Horizontal/Vertical.
1.Add the video in QuickTime Player and proceed to the Edit tab. Select the Rotate Left option to rotate the video counterclockwise. Otherwise, choose the Rotate Right option to rotate the video clockwise.
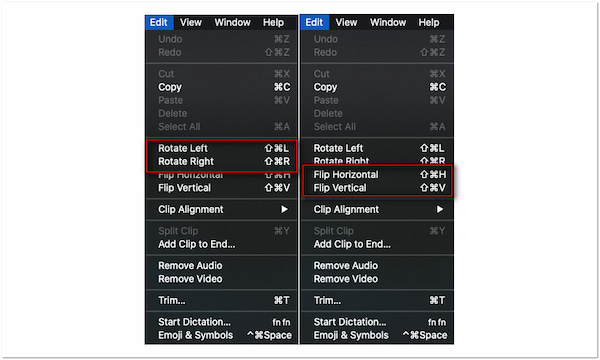
2.Apart from video rotation, you can also flip your videos vertically or horizontally. In the same pulldown menu, select the Flip Vertical or Flip Horizontal options.
Important Note: These options are accessible only when clips are selected in Show Clips mode. Please note that these options only affect individual clips rather than the whole project.
QuickTime Player offers the flexibility to add or remove audio tracks directly within the app. You can simply drag and drop audio files into the video timeline to layer a sound. Conversely, selecting the Remove Audio option strips the video of its original sound, resulting in a silent video.
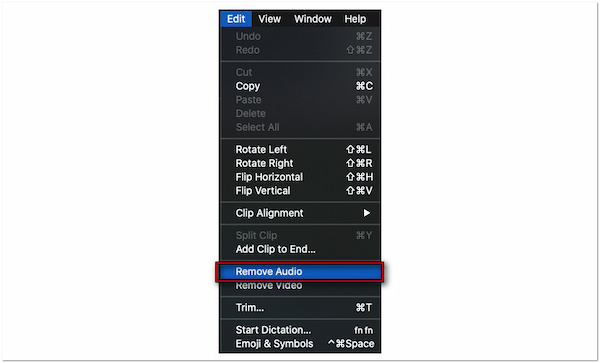
Here's how to edit a QuickTime video:
1.Import the video into QuickTime Player and drag the audio file onto the video window. The audio file gets automatically added to your video.
2.To remove an audio track from the video, navigate to the Edit tab. Select the Remove Audio option from the pulldown menu. It will strip the original sound from your video.
Creative Tip: Record a voiceover or music using the built-in microphone as your audio track.
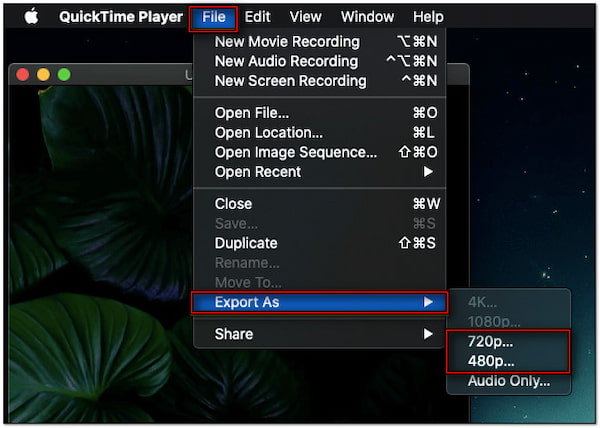
QuickTime Player enables you to finalize and share your videos in various resolutions. Options include 4K, 1080p, 720p, and 480p. In addition, it supports audio-only export and allows you to preserve transparency when supported.
1.Click the File tab and select the Export As option from the pulldown menu. You'll get a roundup of resolutions: 4K, 1080p, 720p, 480p, and Audio Only.
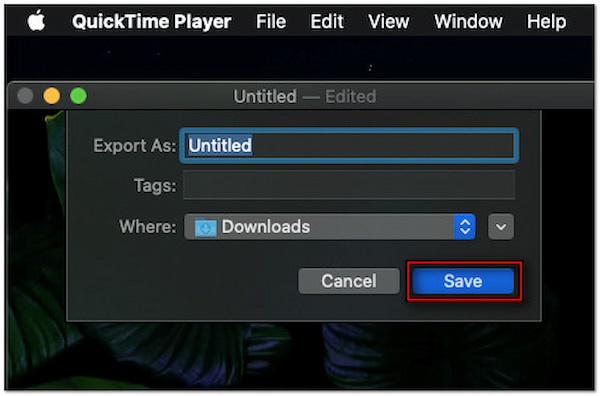
2.In the Format pop-up menu, enter a title for your project in the Export As field. Now, specify an output directory in the Where selector. Once everything is good, click Save.
Important Note: You can export QuickTime in MP4 and share it with other Mac users in various ways. Some of the options available are AirDrop, Messages, Mail, YouTube, Facebook, etc.
QuickTime Player is a built-in macOS app, boasting essential tools for basic video editing. However, in terms of advanced creative controls, the software is somewhat lacking. It leads many users to seek advanced features for professional or complex editing tasks:
• It is native to Mac, meaning Windows users won't be able to access the app.
• It saves the project to the .mov format, which may not be compatible with all devices
• It downscale video resolution, impacting the final quality of the exported video project.
• It does not offer features like color correction, audio adjustments, and complex effects.
• It lacks features such as transitions, effects, titles, and the ability to work with multiple clips.
Though QuickTime Player is excellent for basic edits, it lacks many features required for professional video projects. If you're looking for a more flexible alternative to edit QuickTime videos, AnyMP4 Video Converter Ultimate offers a one-stop solution. In addition to its media conversion, the software includes both basic and advanced editing tools.
Not to mention, the basic editing tools include trim, crop, rotate, flip, and merge videos. You can also apply filters, adjust basic video effects, insert text, and overlay custom images. What's more, you can adjust volume levels and synchronize external audio tracks precisely with video. On top of that, you can process multiple files simultaneously and export videos in Ultra HD.
Here's how to edit a video in QuickTime Player alternative:
1.Begin by downloading the AnyMP4 Video Converter Ultimate for free. Install the QuickTime Player alternative and wait for the installation process to finish. Once completed, open the software on your computer to begin the video editing.
Secure Download
Secure Download
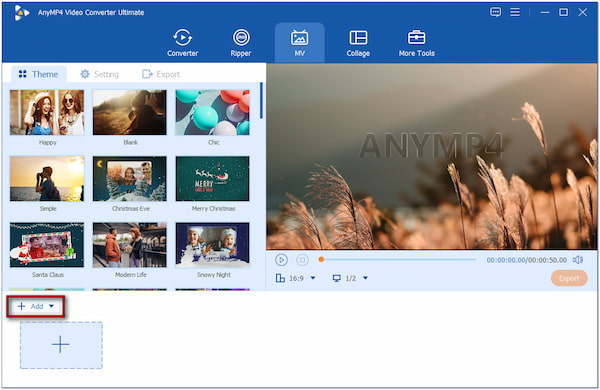
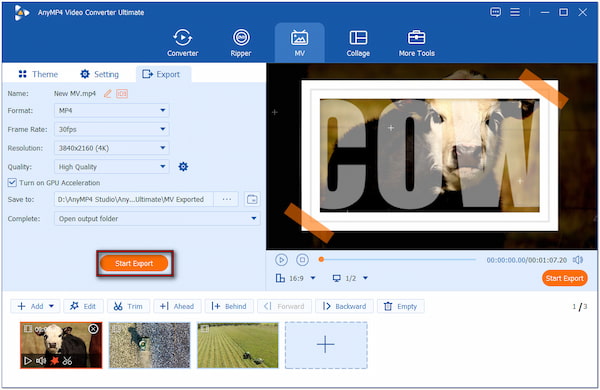
2.As soon as it launches, it will take you to the Converter tab by default. Move to the MV tab and click the + Add button to import your videos. If you added multiple clips, drag and drop them within the MV timeline to reorder them.
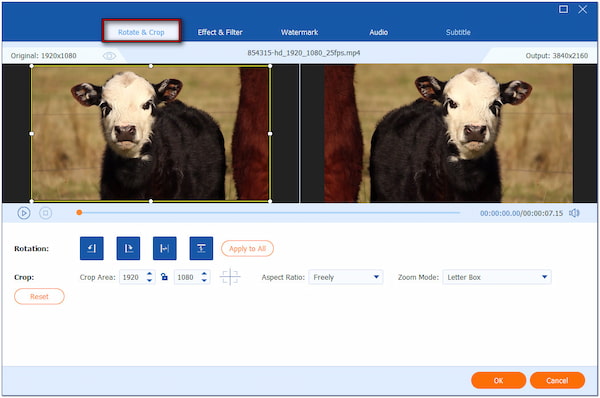
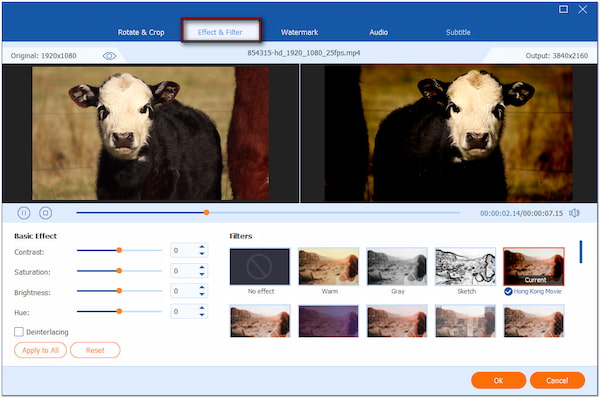
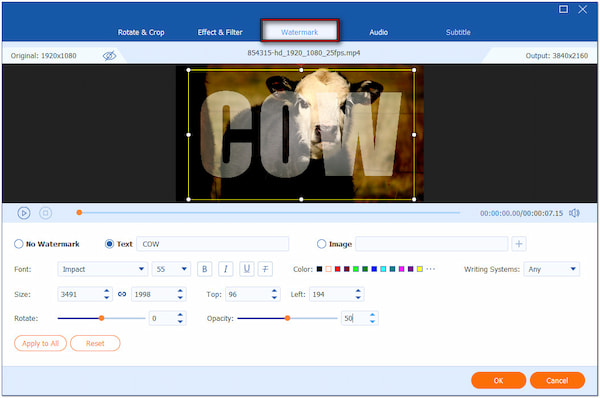
3.In the Theme section, choose a pre-designed video template to automatically add transitions. Click the Trim button to accurately trim each video. Use the start and end sliders to remove unwanted video portions. Next, click the Edit button and apply the following:
Rotate & Crop: Correct video orientation and adjust the visible area of the video frame. You can rotate left/right, flip horizontally/vertically, or crop the video to preset aspect ratios.
Effect & Filter: Improve video effects by adjusting contrast, saturation, brightness, and hue. Also, you can apply filters to instantly change the tone of the video.
Watermark: Insert custom text and modify font, size, color, position, and transparency. On the other hand, you can upload a custom image and place it anywhere in the video.
Audio: Increase or decrease the volume to fix audio that is too quiet or loud. Adjust the delay to synchronize the audio that is out of sync with the video.

4.Once done with the editing, proceed to the Export section and modify the output settings. Select MP4, set the frame rate to 30 fps, and change the resolution to 3840×2160 (4K). Finally, click the Start Export button to save your video project.
If you find QuickTime Player too limited, AnyMP4 Video Converter Ultimate is a powerful, all-in-one alternative. The MV Maker provides everything you need to edit videos in one place. If you need a specific tool, like compress a QuickTime video, you can explore the More Tools tab. Here, you can find over 20+ editing features, including basic, advanced, and AI-powered tools.
What video format does QuickTime use?
QuickTime uses the MOV format, which is a multimedia container developed by Apple. It is designed for macOS and iOS and uses video codecs like H.264 or HEVC for compression.
Does Mac have built-in video editing?
Yes, macOS includes QuickTime Player. Though the name suggests it is a media playback software, it also operates as a video editor. iMovie is also a built-in video editor for Mac.
Why is QuickTime trim greyed out?
The Trim option in QuickTime is greyed out because the file format or codec is not editable in QuickTime. Another reason is that the video is already trimmed or fragmented.
QuickTime Player remains a reliable built-in video editor, offering a quick solution to edit QuickTime videos. However, it falls short in creative flexibility. For those looking to go beyond QuickTime's limitations, we highly recommend using AnyMP4 Video Converter Ultimate. It's a versatile and comprehensive tool that handles video editing with precision.
 Posted by Mark Cristobal to Edit Video
Related Articles
 2 Easy Ways to Speed Up Video in QuickTime for Faster Playback
You can learn two ways with detailed steps to speed up videos in QuickTime easily, which will save time when watching long videos, tutorials, meetings, etc.
 5 Solutions to Solve QuickTime Not Playing MP4 Error
Read this article to learn 5 solutions you can follow to fix QuickTime can’t play MP4 videos error. Also, check the best video player alternative for macOS.
 How to Loop Video in QuickTime Player: Step-by-Step Tutorial
Do you want to learn how to use QuickTime to loop videos? Read this article to learn how to loop a video on Quicktime Player and discover its limitations.
 Top 10 Alternatives to QuickTime for Mac Computers
Looking for the best alternative to QuickTime Player? Read this article to discover ten media player options that you can use as an alternative to QuickTime.