Trimming video directly in PowerPoint not only makes the presentation more concise but also avoids distracting the audience's attention with long clips. Whether you are making classroom handouts, corporate presentations, teaching tutorials, or marketing slideshows, trimming video can significantly improve the efficiency and professionalism of your message.
This guide will give you a detailed overview of how to trim a video in PowerPoint, and provide practical tips to help you create more polished and engaging presentation content.
After embedding videos (such as MPEG, MP4, AVI, etc.) into PowerPoint, you can use the built-in clip tools to adjust the playback start and end times. Below, we demonstrate the process using PowerPoint 2016 on Windows as an example.
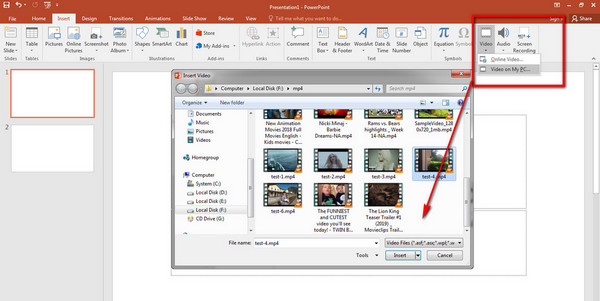
1.Insert a Video
Launch PowerPoint on your computer and start a new project. Then, navigate to the Insert tab and click the Video button under the Media section. You can select your local video you want to trim, then click the Insert button to insert a video into PowerPoint.
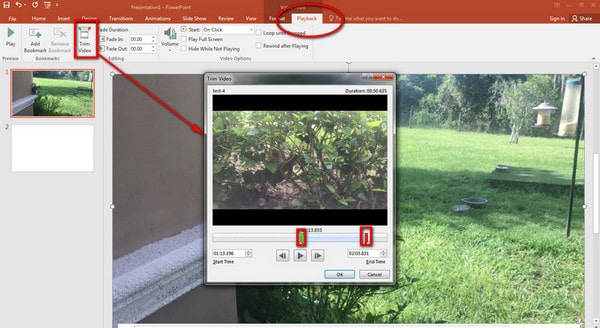
2.Find the Trimming Tool
After inserting the video, the Video Tools tab will appear at the top of the interface, where you can navigate to the Playback menu. Then, click the Trim Video button to open the trimming window.
3.Trim the Video
You can drag the marker to trim the video. You are also allowed to set the start and end time.
Note: Additionally, you can more precisely identify the start and end points by using the Previous Frame and Next Frame buttons.
4.Preview and Play the Video
To check the length of the video, you can click the Play button to preview the playback. Then, click the OK button to finish the trimming process.
All the above is the method of how to trim a video in PowerPoint (2016) on Windows. PowerPoint's video editing feature, though simple, proves remarkably convenient in practical use, especially for quickly processing video clips for presentations. Dragging markers or frame-by-frame positioning makes it intuitive. However, it's important to note that embedding videos will significantly increase the file size. We recommend compressing the files beforehand or limiting their duration.
For Mac users:
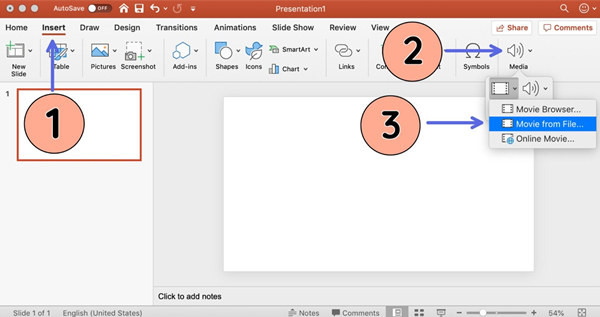
When using PowerPoint to trim videos on macOS, the interface differs slightly from Windows. Mac users need to go to Insert > Media > Movie from File to add a local video, then click the video to activate the Movie Format tab, and select Trim Video to make adjustments. While the core functionality is similar, the button placement and label names vary slightly.
Note: Not every version of PowerPoint supports video cutting. Windows has supported video trimming since PowerPoint 2010, while macOS did from PowerPoint 2016.
While PowerPoint offers the trimming feature for videos, the situation differs when embedding YouTube videos. Next, we'll cover how to handle embedded YouTube videos in PowerPoint. We also use PowerPoint 2016 on Windows as an example.
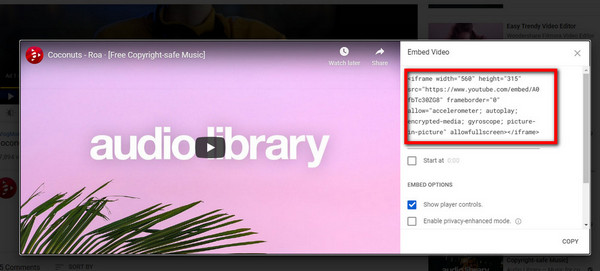
1.Get the Embed Code
Open the YouTube video you intend to trim, click the Share button, and the Embed Video window will appear. Then, copy the embed code to the clipboard.
Note: You can select the embed options, including whether to show player controls and whether to enable privacy-enhanced mode. In addition, you can determine the starting time of the video.
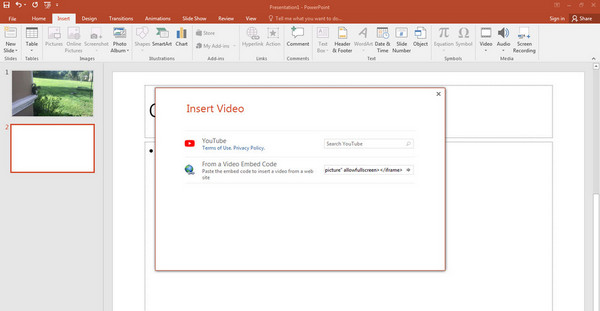
2.Insert the Video
Open PowerPoint 2016 and navigate to the Insert tab. Then, select the Video > Online Video and paste the emded code into the embed code box.
3.Trim the Video
To trim the video, you must adjust the code. If you want the video to be played starting from 1:00 and ending at 3:30, you can add ?start=60&end=210&rel=0 before the video URL. After that, click the Insert button to complete the trimming.
The above tutorial explains how to shorten YouTube videos using PowerPoint. While PowerPoint does offer the ability to embed YouTube videos, I've found in practice that the so-called ‘trimming’ function merely sets the start and end playback time. It doesn't allow precise control over the playback time or the deletion of segments. Embedding code is suitable for quickly displaying a segment of content, but it falls slightly short in stability and compatibility, especially when loading failures are prone to occur across different devices or network environments. Therefore, if more precise editing effects are required, I prefer to download the video first, process it using professional tools, and then embed it.
Note: PowerPoint on macOS offers simplified functionality and typically does not support direct embedding of YouTube videos. Mac users are advised to use edited video files instead. Even on Windows systems, PowerPoint versions prior to 2010 (including 2010) do not support embedding or trimming YouTube videos.
Although PowerPoint is powerful for creating presentations, it still has significant limitations when it comes to video trimming, for example, it doesn’t support batch processing and exporting. Therefore, a specialized video editing tool is much better, such as AnyMP4 Video Converter Ultimate.
Secure Download
Secure Download
AnyMP4 Video Converter Ultimate is a comprehensive video processing tool designed for users who need to efficiently edit, convert, and optimize videos. Compared to the limitations of PowerPoint video trimming, AnyMP4 offers a more professional and flexible solution, particularly suited for presenters or content creators requiring precise control over video segments. It supports precise start and end time settings to trim unwanted sections without re-encoding, preserving original video quality. And it can cut the video into several segmentss by setting the number of the segments and the average duration. In addition, it allows you to copy segment and create a new segment.
Core Features:
Now, let’s take a look at how to trim videos with it.
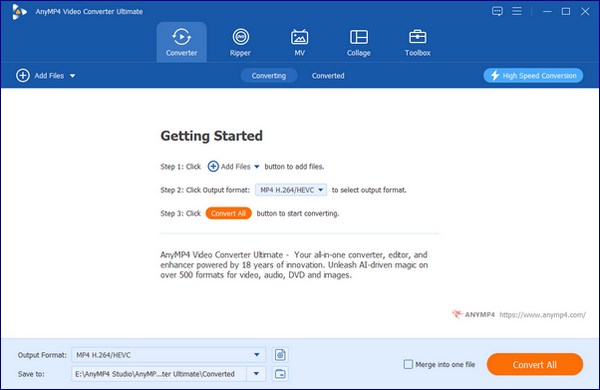
1.Install the Software
Download AnyMP4 Video Converter Ultimate from the official website and follow the on-screen instructions to complete the installation on your computer.
2.Import Your Video
Launch the program and click the Add Files button to load the video you want to trim. Alternatively, you can drag and drop the file directly into the workspace.
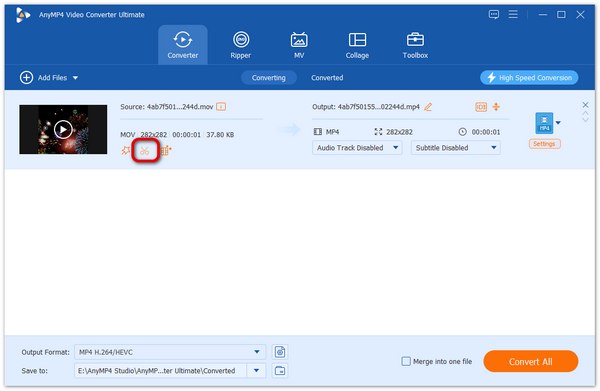
3.Access the Trimming Tool
Once the video is imported, click the Cut button to open the trimming interface. You can manually set the start and end times or drag the marker on the timeline to select the desired segment. Then, click the Save button to confirm your adjustments.
You can also split the video into multiple segments by specifying the number of parts and the average duration.
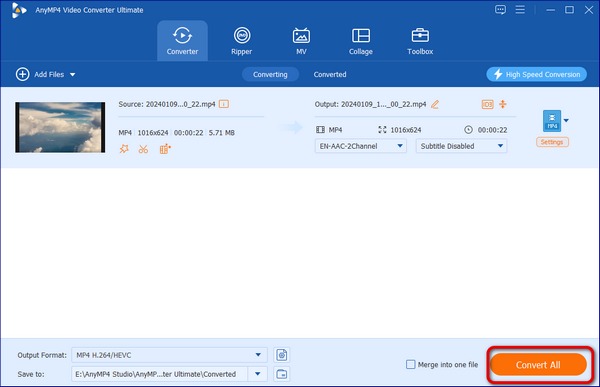
4.Customize Output Settings
Before exporting, choose your preferred output format, resolution, encoder, and other settings. When ready, click the Convert All button to process the trimmed video. The completed file will appear under the Converted tab.
After that, the trimming process will be finished. Overall, this video editing tool offers a very smooth user experience. Installation is quick, the interface is clear, and importing videos is convenient. The editing functions are intuitive, so that you can set precise timings or simply drag the timeline slider. When editing some home videos, I tried the average segmentation feature, which worked well and saved me a lot of time. Before exporting, you can also customize the format and video quality to meet different needs.
Here are some tips to help you trim a video more effectively in PowerPoint:
• Prioritize using professional video editing tools: Before importing into PowerPoint, it's recommended to trim videos using professional software (such as AnyMP4 Video Converter Ultimate) to avoid repeated adjustments within the PPT.
• Note compatibility and format: It is recommended to use MP4 format videos encoded with H.264 to ensure smooth playback across different devices and versions of PowerPoint.
• Control file size: Compress videos after trimming to a reasonable size to prevent slow slide loading, especially during remote presentations or sharing.
• Preview playback: After trimming, always preview videos in presentation mode to verify precise cuts and smooth transitions.
Can I crop an embedded video in PowerPoint?
Yes, you can crop an embedded video in PowerPoint to remove unwanted portions of the frame using the Crop tool on the Video Format tab. After selecting the video, find the Crop tool, and drag the cropping handles to adjust the video's frame.
Will trimming a video in PowerPoint affect its quality?
Trimming a video in PowerPoint does not directly affect its quality as long as you are using the native trimming features. However, if you compress the video after trimming, it may lead to some loss of quality depending on the compression settings.
Can I trim a video on PowerPoint on Mac?
Yes, you can trim a video in PowerPoint on a Mac by selecting the video, going to the Playback tab, and choosing Trim Video. In the Trim Video dialog box, use the green marker to set the new start time and the red marker to set the new end time for your clip. You can then use the play and pause buttons to find the exact frames and the Nudge buttons to fine-tune the start and end points.
In this article, we have explored how to trim a video in PowerPoint, including local videos and YouTube videos, and different devices and different versions of PowerPoint vary. However, the PowerPoint has a lot of limitations in terms of Video trimming. AnyMP4 Video Converter Ultimate makes up for its shortcomings very well. Download and try it now!
 Posted by Mark Cristobal to Edit Video
More readings
 Video Trimmer - 16 Best Video Trimmer/Shortener/Cutter Apps
How can I trim a video online without a watermark? How do I cut a section out of a video? This post lists the 16 best video trimmers for you.
 5 Free WMV Splitters to Trim the WMV Videos into Different Video Clips
Is there a free way to split the large WMVs on your computer? Here are the 5 best free WMV splitters to trim and split the WMV file from the article.
 Trim Videos on Windows Without Quality Loss
Want to get free or professional clip tools for Windows? This post shows you how to cut the video length with some tools to keep the attention of your viewers.
 How to Trim H.264 Without Re-encoding - H264 Video Cutter
How do I trim an h.264 file? Which is better, H 264 or H 265? What is the best H264 video cutter? You can get an H264 cutter to trim H.264 without re-encoding.