The full name of Premiere is Adobe Premiere Pro, which is a professional video editing program developed by Adobe. It includes a suite of advanced video editing tools for creating high-quality videos. Sometimes, people need to flip the video for some reason. For example, the most common reason is to make the video look real. After all, it is well known that the front camera of a mobile phone usually mirrors the image or video, and flipping the image horizontally can restore the real effect. At this time, it is necessary to use Premiere to flip the video. This article will introduce the various methods for flipping videos in Premiere. If you are interested, keep reading!

To avoid confusion, let us first distinguish between flipping and rotating a video. Generally speaking, flipping refers to the horizontal or vertical mirroring of pictures or videos along an axis. In contrast, rotation refers to rotating a certain angle, either clockwise or counterclockwise, around the center point to change its direction.
In this section, we will introduce three methods for flipping video in Premiere, including the Flip Effect, Transform Effect, and Basic 3D Effect, and provide detailed steps for each method.
To flip a video in Premiere Pro using the standard Flip effect, you can follow these steps:
1. Open the Effects panel.
Import the video into Premiere Pro and drag it to the Timeline. Then, go to Window > Effects in the top menu, or use the keyboard shortcut Shift + 7.
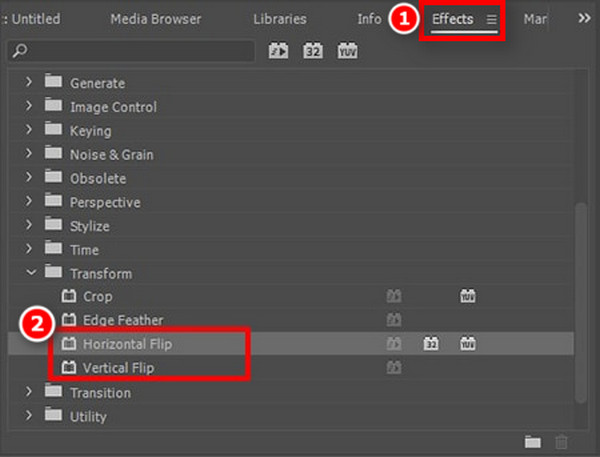
2. Find the flip Effect.
In the search bar of the Effects panel, type Flip. You will see the following two options, from which you can choose according to your needs.
• Horizontal Flip: Flips the video left-to-right (creates a mirror image).
• Vertical Flip: Flips the video top-to-bottom (makes it upside down).
3. Apply the flip Effect.
Select the flip effect you want and drag it directly onto the video clip in the timeline. Finally, confirm that the flip effect has been successfully applied to the video.
Note: This method can be used to modify video clips simply. If you need to animate the flip or adjust the pivot point, you should use the Transform effect instead.
The method of using the Transform Effect to flip video is similar to using the Flip Effect mentioned above, and the following are the specific steps:
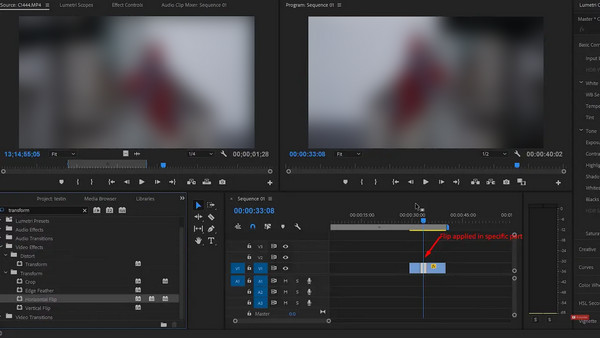
1. Cut the video flip.
Press the C key to select the Razor tool. Then click the timeline of the video clip to select the start and end of the part to be flipped.
2. Select the flip effect.
Go to the Transform tab in the lower left corner and select Horizontal Flip or Vertical Flip as the video flip effect.
3. Apply the flip effect.
Click and drag the selected flip effect to the position of the clip you want to flip in the timeline.
Unlike using the standard Flip Effect to flip a video (2D and flat), the method of using Basic 3D Effect enhances the sense of perspective. To flip a video via Basic 3D Effect, follow these steps:
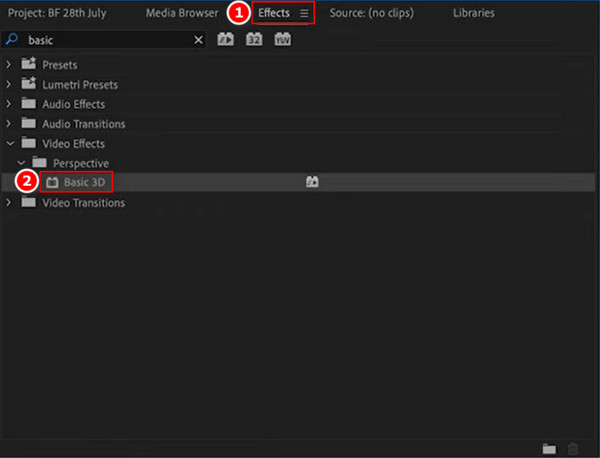
1. Apply the Basic 3D effect.
Open the Effects panel and search for Basic 3D under Video Effects > Perspective. Then, drag and drop the effect onto your video clip on the timeline.
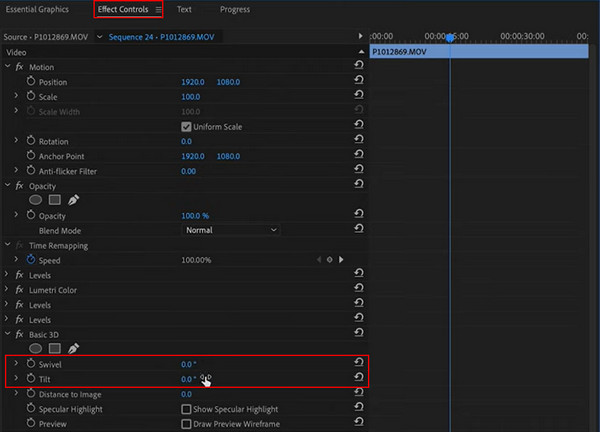
2. Adjust the flip effects and controls.
Go to the Effect Controls panel and find the Basic 3D section. Adjust the Swivel value to 180° for a horizontal flip, or adjust the Tilt value to 180° for a vertical flip.
There are often some unforeseen complications when flipping videos in Premiere. Here are the most common problems and their final solutions.
1.Black bars appear: This occurs when the geometry of the image changes, but the video isn't scaled to fill the sequence frame. Generally, this problem can be solved by rotating the video by 90°, 180°, or 270 °. Or manually adjust the scale in Effect Controls > Motion until the black bar disappears.
2.Text/Signage is backwards: This is the classic result of flipping an image that was already correct, or using the wrong type of flip. If your text is backward, you need a Horizontal Flip. If the video is upside down, you need a Vertical Flip.
3.Flip the specific part of a clip: The problem is when you only want to flip a specific part or just want to flip an object in the video clip, not all of it. To apply the flip effect only to the selected clip, use the Razor Tool to cut the video and select the specific part to flip.
Considering the above-mentioned problems with flipping videos in Premiere, there are sometimes issues. Here we strongly recommend a good alternative for you: AnyMP4 Video Converter Ultimate - Video Rotator. This multi-functional video editor software is compatible with Windows and Mac computers. It comes with a variety of professional tools for video editing, and Video Rotator is one of them, which makes it easy for you to flip horizontally or vertically. Below are the specific steps:
1. Download AnyMP4 Video Converter Ultimate and install it on your Windows/Mac computer. And installing, launch it.
Secure Download
Secure Download
2. To flip the video, we need to click the More Tools tab at the top of the interface and then navigate to one of the built-in professional tools of AnyMP4 Video Converter Ultimate: Video Rotator.

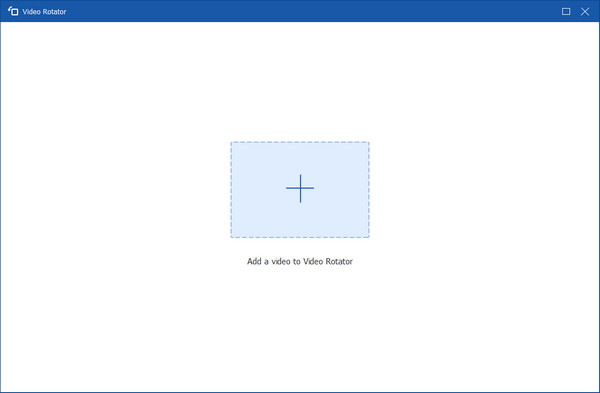
3. Click the plus button in the centre of the interface to import the video you want to flip to Video Rotator.
4. After importing the video to be flipped, you can choose to Vertically Flip or Horizontally Flip the video in the rotation options. In the process, you can also preview the output effects.
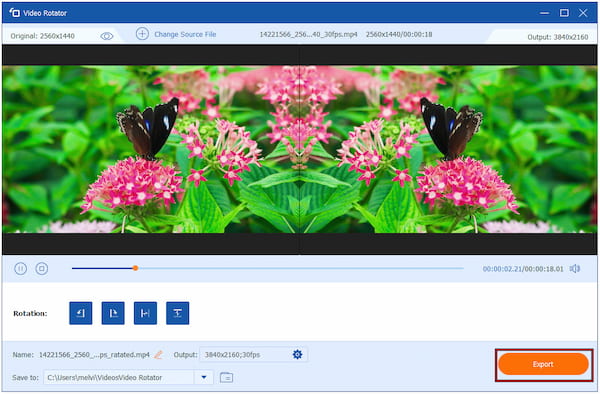
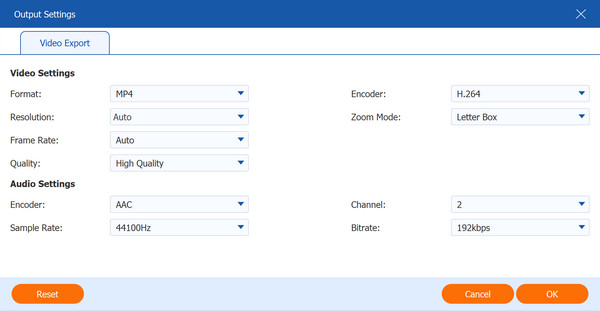
5. Click the gear button next to the Output option to configure settings for exporting the video, including format, resolution, frame rate, quality, etc.
Finally, click the Export button in the lower-right corner to get the flipped video.
How do I flip a video horizontally or vertically in Premiere Pro?
You can flip a video horizontally or vertically in Premiere Pro using the dedicated Horizontal Flip or Vertical Flip effects, or by adjusting the Transform effect.
Can I flip only a portion of a video clip?
Yes, you absolutely can flip only a portion of a video clip in Premiere Pro using two main methods: splitting the clip or using an effect mask.
Why is my video upside down even after I apply the "Flip" effect?
This usually happens because of the Order of Operations in Premiere Pro. Premiere Pro processes standard effects (like Flip) before it processes the built-in Motion settings (like Scale and Rotation).
By reading the three ways in this article, we believe you have learned how to flip a video in Premiere. However, due to some common problems in this method, we also provide you with an alternative: use the professional video flipping tool, Video Rotator, which is built into the third-party video editing software AnyMP4 Video Converter Ultimate. It enables you to easily complete the flipped video and make other edits. Now, click the download button below to download it for free and try it out.
Secure Download
Secure Download
 Updated by Mark Cristobal to Edit Video
More readings
 Step-by-step to Speed up a Video in Adobe Premiere Pro Properly
There are three ways to speed up a video in Adobe Premiere Pro in a variety of conditions. You can learn the workflow of each way in this single tutorial.
 How to Make Video Quality Better in Premiere Pro
Join us, discover what we need, and learn how to improve video quality in Premiere Pro. Check this to learn how to enhance video quality with this tool.
 How to Get Rid of Background Noise Using Premiere (Advance Tips)
This article is all you need to reduce background noise in Premiere Pro. We will guide you on doing the advanced method together with an alternative tool.
 Color Grading in Premiere Pro to Fix Video Visual Effect
Check this and learn the secrets of color grading in Premiere Pro with this guide. Elevate your editing skills and create visually captivating content.