Computer operating systems are the key software required to make computers functional. Windows and Mac are two of the most used operating systems on the market. However, these two are not available for free. A third competitor in Linux offers a solution to this problem, as it is free to use. In this article, we will provide a detailed guide on learning how to compress videos using FFmpeg on the Linux operating system. We will provide a step-by-step guide, alongside practical tips, for more effective video compression.
Before proceeding to our tutorial, let's first discuss the importance of learning how to use FFmpeg to compress videos using the compress video command on Linux. Since Linux is an open-source operating system, most of its users are often technically knowledgeable with the intricacies of coding.
Although coding and command lines can be intimidating for common users, those familiar with this skill usually prefer them, as they are highly efficient and faster to use when executed correctly.
This applies to generic file management tasks, such as compressing video files, and FFmpeg is one of the top command-line tools for most operating systems. With that in mind, learning the compress video command line for FFmpeg on Linux drastically improves the file management efficiency for the Linux OS.
Without further ado, let's proceed to the tutorial on using the FFmpeg command to compress videos. Although this tutorial uses a Windows-based command prompt, the command lines featured in this guide will also be usable on Linux systems.
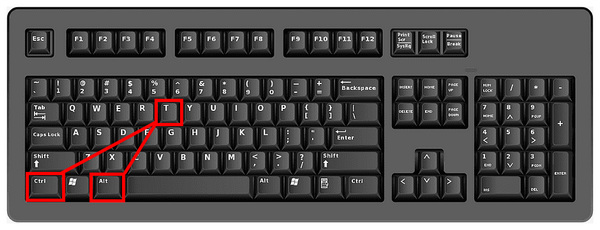
1. On your Linux computer, use the keyboard shortcut Control + Alt + T to open the command Terminal.
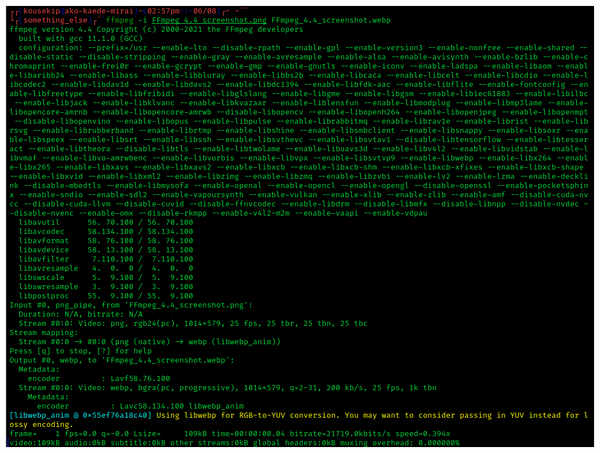
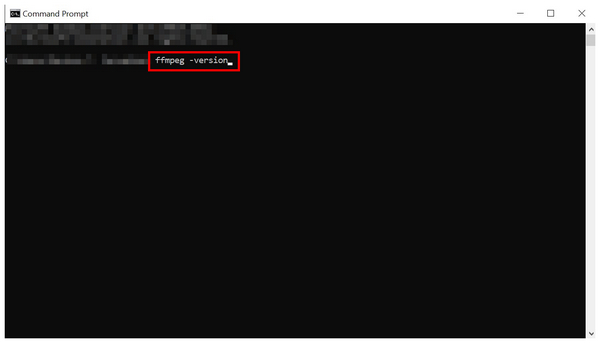
2. In the Linux Terminal, type the command line ffmpeg -version to check if FFmpeg is active on your computer. If FFmpeg is active, the version details of the currently installed version on your computer will show up in the Terminal./p>
3. Once you have confirmed that FFmpeg is active, type the command line “ffmpeg -i input.mp4 -vcodec libx264 -crf 28 -preset fast -acodec aac output.mp4”. Ensure that you change the 'input.mp4' and 'output.mp4' lines to the file names of the video you want to compress and the file name you want to save the compressed video as.
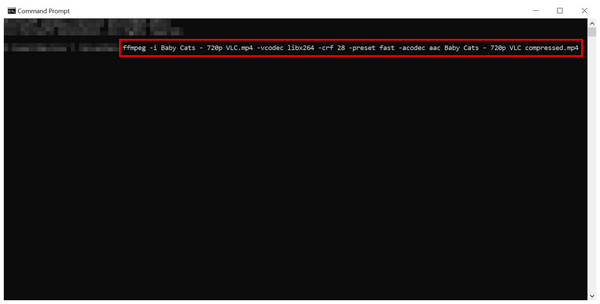
The FFmpeg video compression command in the third step of the guide involves editing the video codec, control rate factor, compression speed, and audio codec. However, you can still use more advanced command lines to further compress the video.
When applying FFmpeg compress video commands, consider the target platform where the compressed video will be saved. The MP4 format is a safe output file option for videos due to its wide compatibility. Although you will compress your video using the Linux operating system, ensure that your edited file remains readable when accessed on a different platform. The previously proposed MP4 is a safe option.
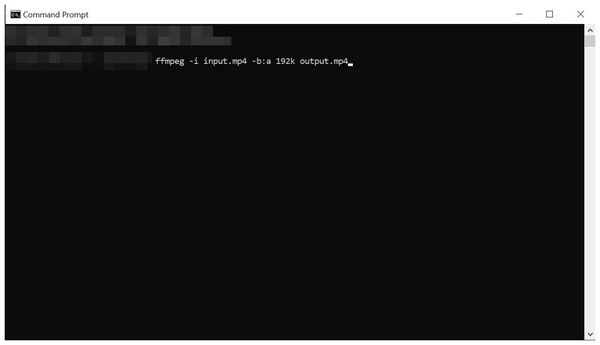
Although audio quality is important, learning how to balance storage consumption and audio quality is equally important. When editing the audio bitrate of videos, avoid setting a value that is too high or too low, as this can significantly affect the audio quality. Since modern videos are meant to be consumed with high-quality audio, learning how to balance bitrate value is crucial. For more information about the bitrate compression, you can click it here.
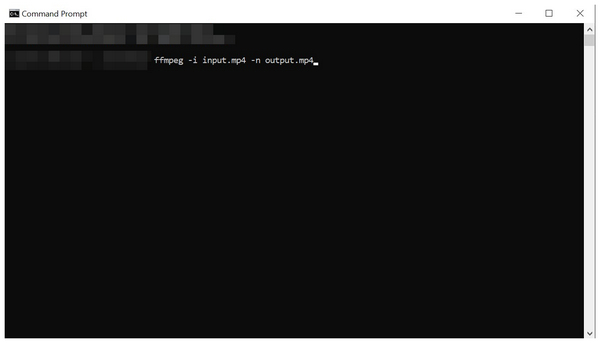
Since video compression accesses files on your computer, you must ensure that the original file is not overwritten by its compressed version. To prevent overwriting, add the “-n” command in FFmpeg. With the help of this command, you will be able to create a new file for the video that you have compressed, rather than it replacing the original file that you have edited.
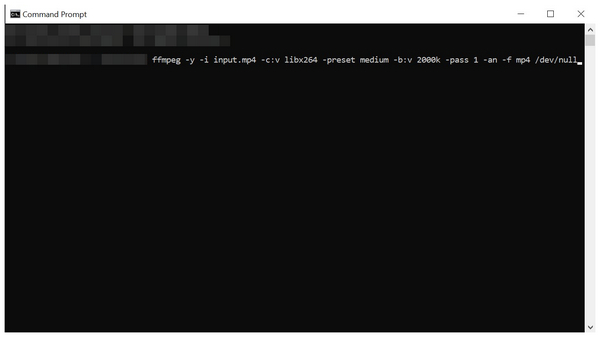
For improved quality optimization, videos edited using FFmpeg commands should use two-pass encoding lines. Although two-pass encoding is more advanced, learning how to use it will be worthwhile, as it edits videos without compromising quality. Once you have learned how to add two-pass encoding lines, your video’s quality, bitrate, and compressed file size will be heavily optimized to their best version.
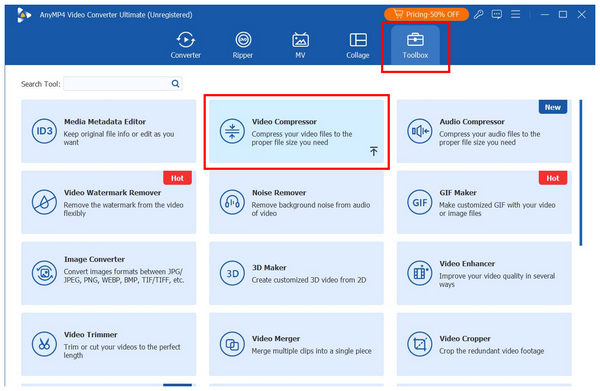
With the command-based video compression of FFmpeg for Linux now reviewed, let us proceed to the best video compressor alternative for Windows and Mac: AnyMP4 Video Converter Ultimate.
Available for two of the most popular desktop operating systems, AnyMP4 Video Converter Ultimate is a multimedia tool equipped with versatile options for managing video files. This includes a professional-grade Video Compressor tool within its Toolbox section.
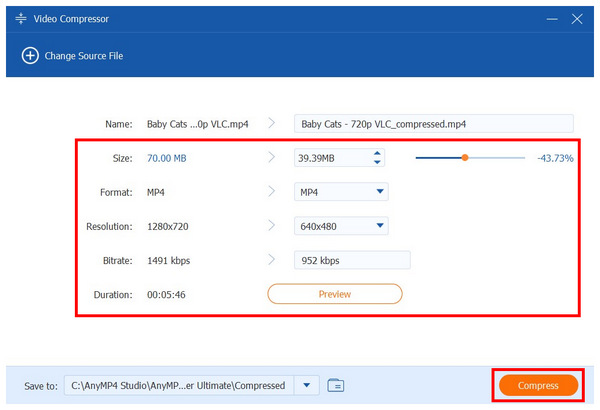
The program's Video Compressor tool makes applying compression settings to your video as simple as possible. This is due to the available settings in the compressor tool, such as the Compression Rate selector, Output File to specific size setter, Resolution editor, and Bitrate editor.
These settings may be selected using a well-labeled menu instead of the command-based option in FFmpeg. Moreover, a video preview function is available on the compressor menu, allowing users to check their video quality before proceeding with the compression process.
To further enhance the quality of video size reduction, AnyMP4 Video Converter Ultimate supports over 500 video formats, including MP4, MKV, AVI, MOV, and more. These formats may also be selected if you want to change the file type of the video you are compressing.
With these features now discussed, we recommend downloading the program now using the link below. Then, proceed to our tutorial for a quick guide on using AnyMP4 Video Converter Ultimate to compress videos on Windows or Mac.
Secure Download
Secure Download
1. Open AnyMP4 Video Converter Ultimate and go to the Toolbox section. Then, select the Video Compressor tool.
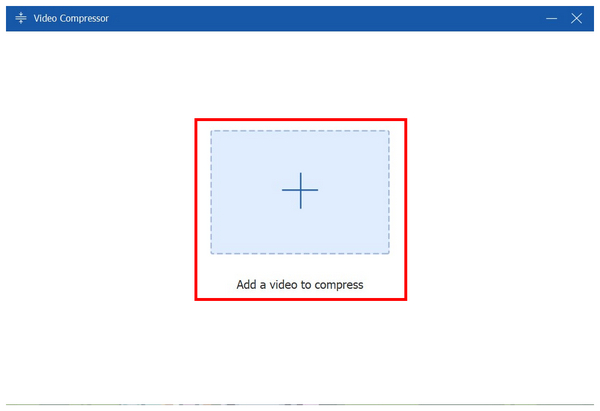
2. After selecting the Video Compressor tool, click the Add Button in the pop-up that appears. Then, browse your files to add the video you want to compress.
3. After adding the video to the Video Compressor tool, you can adjust the video using the various compression settings available in the tool, including Compression Rate, Defined Output File Size, Format, Resolution, and Bitrate. Once you have adjusted these settings, simply click Compress to initiate the compression process. To ensure the quality of your compressed video, please preview your compressed file using the named button.
With the simplified video compression options of AnyMP4 Video Converter Ultimate, along with its built-in quality control preview, you can easily compress videos on Mac or Windows without relying on advanced command lines.
Is compressing videos on Linux difficult?
Yes, it is. Compressing videos in the OS requires prior knowledge of commands. You need to learn these lines to make using Linux easier.
Is command-based editing beginner-friendly?
No, it is not. If you plan to use command-based editing, you must learn these prior skills. This makes command-based management very intimidating.
Should I use Linux if I am a beginner?
Linux is typically not advisable for beginners. Complete beginners on computer devices should use a simpler OS like Windows or Mac. Experienced users best use Linux.
What makes Linux a good operating system?
Linux is free to use and rewards experience. This combination made it a good option for experienced users. However, these same factors make it a bad option for beginners.
What does "Compress Video Command on Linux" typically refer to?
The compress video command refers to the command lines used in the Linux terminal to compress files on your computer. However, this skill is hard to use and learn. Despite that, experienced users prefer it due to its practicality.
Now that you have learned the essential FFmpeg video compression commands, we hope that this article has helped you with file management and storage solutions on your Linux computer. However, if FFmpeg commands are too much for your current technical skills, fear not, since AnyMP4 Video Converter Ultimate offers a beginner-friendly solution for video compression needs. To learn more about that alternative, make sure to download it using the link down below.
Secure Download
Secure Download
 Updated by Mark Cristobal to Editor
More readings
 How to Edit Videos on Mac and Windows: 4 Easy Ways
Video editing helps you create the desired, wonderful effects. Read this article to learn how to edit videos on Mac and Windows in 4 easy ways.
 How to Rotate a Video in Windows Media Player to Right Orientation
This tutorial tells you how to efficiently rotate a video in Windows Media Player and the best alternatives to get right orientation and angle of the video.
 Top 8 Methods to Compress Videos on Mac without Quality Loss
Compressing video is a common way to free up space and improve performance. This guide shares you 8 easiest methods to compress videos on Mac computers.
 5 Best Ways to Crop a Video on Mac with QuickTime and More
This tutorial shows you how to resize a video clip on Mac with or without QuickTime for beginners and advanced users. Read and learn more to start cropping.