Nowadays, video editing plays a key role in how people share stories and ideas to social media. It helps turn messy, unorganized footage into a clear and interesting video. By removing unnecessary parts and placing clips in the correct order, editors can shape the story's flow and keep viewers engaged. Editing also adds visual style and emotion through things like color changes, effects, and music. Whether someone is making a movie, an ad, or a video for friends, editing is the final touch that makes everything look and feel just right. Today, we will share with you how to edit videos on Mac and Windows to make your video more perfect and attractive.
What is Video Editing? In short, Video editing means cutting, moving, and organizing video clips to make a complete and polished final version. It’s an important step after filming, where the original footage gets turned into something ready to watch, like a movie, TV show, ad, or online video.
To edit videos properly, a suitable video editing tool is essential. You can choose a proper tool according to your editing purpose, budget, skill level, and operating system. The recommended tools include iMovie, Final Cut, and others. Video editing uses a lot of computer power, so you’ll need a fast processor, plenty of memory (RAM), and a strong graphics card to make sure everything runs smoothly and doesn’t lag. High-quality video files, like 4K or 8K, are really big and can fill up your computer quickly. To keep things running fast, it’s a good idea to store your project files on an external SSD instead of your computer’s main drive.
Here are some of the most common terms you'll encounter in the world of video editing:
• Timeline: Where you arrange clips in order to build your video.
• Transitions Effects that smoothly move from one clip to another.
• Color Grading Adjusting colors to set the mood or style.
• Trim: Cutting or adjusting videos and audio to make it neat, tidy, or the right size.
• Cut Splitting or trimming clips to remove parts or rearrange scenes.
• Clips The pieces of video you edit and combine.
• Aspect Ratio The shape of your video frame (like widescreen or vertical).
These are the building blocks that help turn raw footage into a polished video.
After knowing basic information about video editing, now, follow us to see how to edit videos on Mac using iMovie. iMovie is a free video editing tool developed by Apple that works on Mac, iPhone, and iPad. It’s built to help you make great-looking videos easily, with simple tools and a clean layout. You can bring in your video clips, cut and arrange them, add smooth transitions, titles, and music. Moreover, iMovie includes fun features like Magic Movies, Storyboards, and effects like green screen and picture-in-picture, so it’s great for both beginners and professionals.
Now, here is the detailed guide on how to use iMovie to edit video files.
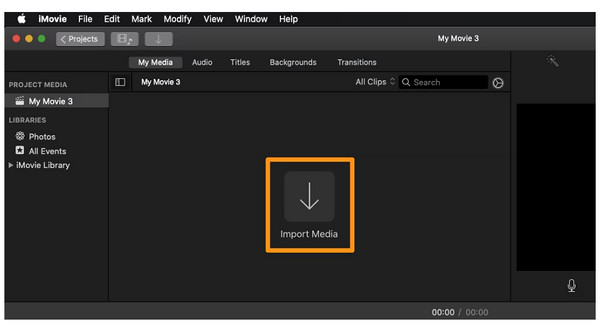
1. Open your iMovie and click File > New Project to open the Create new project dialog. Give a name to the project and click Create button. Hit the Import Media button to add videos to iMovie.
Tip: If you want to import videos from camera, connect it to your Mac, turn on your camera and set it to connect mode. When prompted, click Import button. iMovie will import your videos immediately.
2. After importing, place the video to the timeline and start video editing on Mac.
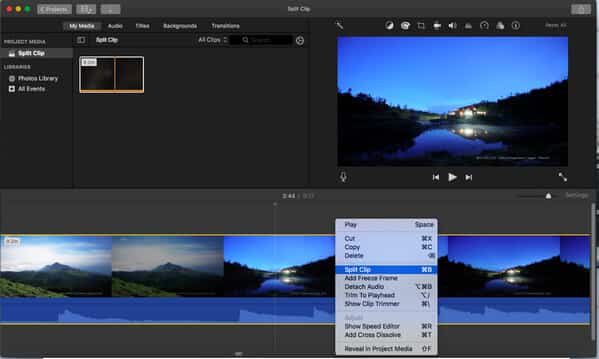
Split a video: Put your cursor over where you'd like to split in the timeline. Then right-click on the point and choose Split Clip.
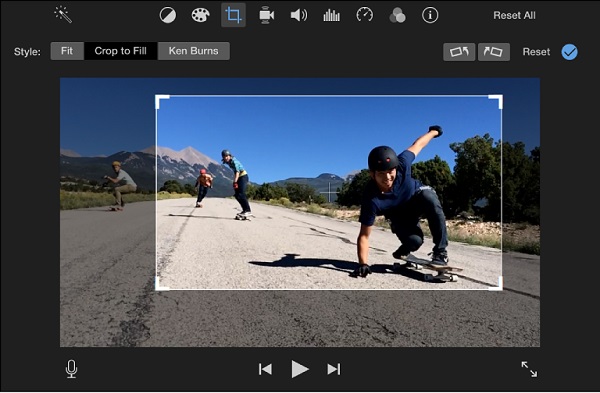
Crop a video: Locate the top of the preview window and press the Crop icon. That will trigger the control border on the video. Drag the four corners to enclose the area you want to retain. When it is done, click the Apply icon at upper right corner.
Rotate a video: Select the video clip or frames to edit on the timeline. Hit the Rotate Clockwise or Rotate Counterclockwise buttons above the preview window until you get the right orientation.
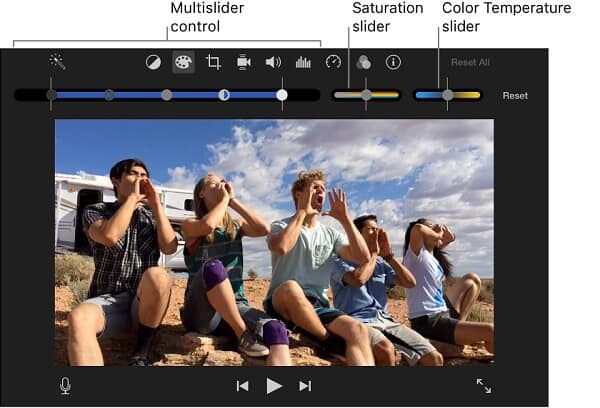
Adjust video color: To correct the video color, hit the Color Balance button above the preview window. Then you will get several options, Auto, Match Color, White Balance and Skin Tone Balance. Try each one to make the video look better. If you want to adjust video color manually, click the Color Palette icon and then move the sliders to get the desired color.
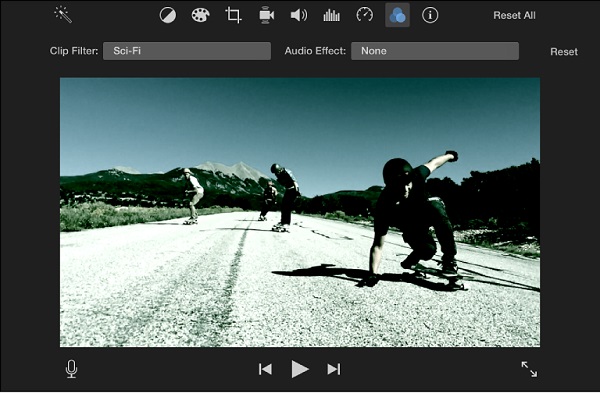
Add effects: Select the video clip, go to the top of the window and click the Video Effect icon. Then the Choose Video Effect dialog will pop up. Select a filter and apply it on your video. Play the video in the preview window to look at the result and hit Done to finish.
3. When video editing on Mac is complete, go to the File menu and choose Save Project.
Note: The video project can be edited later; however, it cannot play in most media player. If you want to look at the video on your computer or mobile device, you will need to convert the project to video file. On the other hand, iMovie has a version for iOS, so it is able to edit videos on iPad too.

iMovie is an excellent choice for you to edit videos on Macs. With its user-friendly interface, beginners can easily edit videos using it. One of its biggest advantages is that it’s free and works smoothly across Mac, iPhone, and iPad. In addition, it has a video noise reduction feature for better audio effects. The only drawback is that when it comes to advanced editing features, experienced editors may find it too basic for complex projects.
Now, we want to introduce how to edit videos on Windows computers.
The Windows Photos app comes already installed on most Windows computers and is easy to use. Its main job is to help you look at and organize your pictures, but it also has a basic video editor built in - called Photos Legacy in Windows 11. This editor is great for beginners or anyone who just wants to do simple things like cut clips, add text, use filters, and put music in the background. It’s not meant for big, complicated editing projects, but it works well for making quick slideshows or short videos from your own photos and clips. It is suitable for users who use Windows 10 and before Windows. If you need more advanced tools on Windows 11, Microsoft recommends using the Clipchamp app instead.
Read on to see how to use it to edit videos with ease.
1. Right-click on the video file you want to edit, and choose Open with > Photos in the drop-down list to open it.

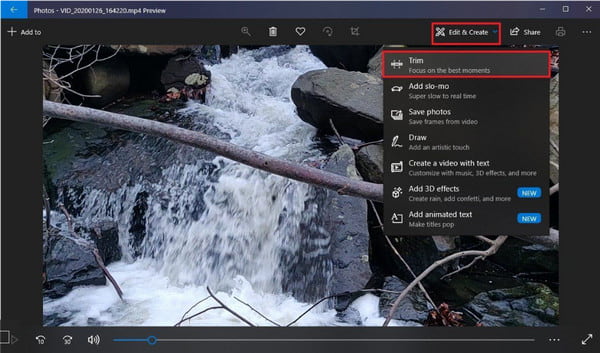
2. In the Photo app, choose the Edit & Create option in the top right corner. You can see there are many editing options: Trim, Add slo-mo, Save photos, Draw, Create a video with text, Add 3D effects, and Add animated text. Choose Trim here to enter the editing interface.
Note: You can choose other editing options to edit your videos.
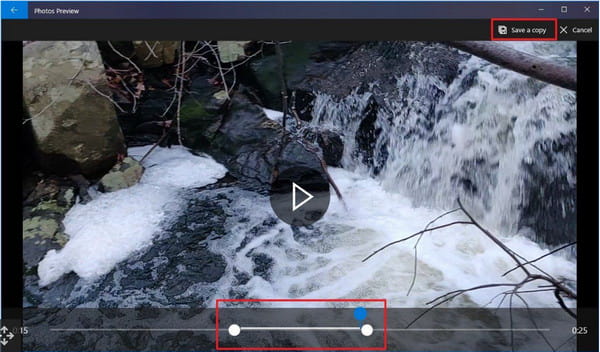
3. Drag the white pins on both sides to choose the section of the video you want to cut. Slide the blue pin across the video to preview and check that you’ve picked the right part.
Lastly, select Save a copy in the top right to export the trimmed video.
This way is easy and intuitive, right? With this convenient way, you can edit videos on Windows computers without downloading and buying other tools. The shortcoming is obvious as it lacks advanced editing features, and you can try other professional tools.
Microsoft Clipchamp can be called the built-in editing tool on Windows 11, which is pre-installed on Windows 11 and available from the Microsoft Store for Windows 10 users. It offers a drag-and-drop interface with tools for trimming, cropping, adding text, transitions, and music. You can choose from ready-made templates or start from scratch, and enhance your videos with features like screen recording, green screen effects, and AI-powered voiceovers and subtitles. Whether you're making content for social media, school, or work, Clipchamp makes video creation simple and accessible.
Don't hurry. Let's follow us to see how to edit videos in Clipchamp.
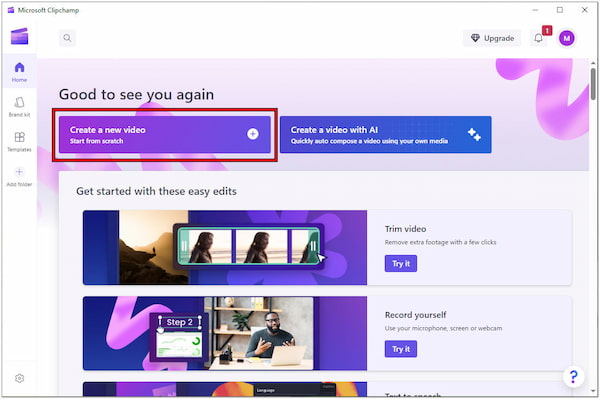
1. Go to the search bar of your computer. Search and open Clipchamp on your Windows computer. Then, click the Create a new video option to start working on your timeline. To add files from your computer, click Import Media.
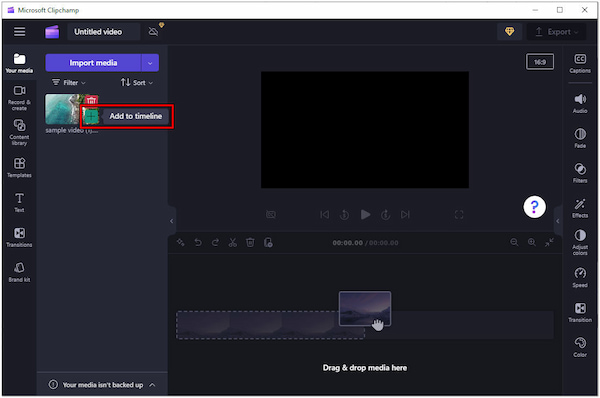
2. There are many types of editing tools. Here, we choose Trim as an example.
Drag your video clip from the media library down to the timeline at the bottom of the screen.
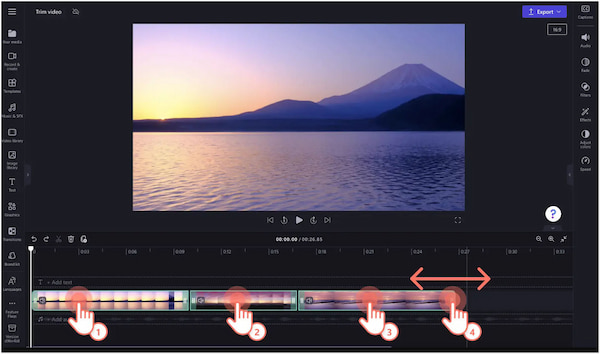
3. Click the video clip to choose it. Move your cursor to either end until a trimming tool appears. Slide it inward to remove the parts you don’t need. Use the playhead to check and make sure the trimmed section looks the way you want.
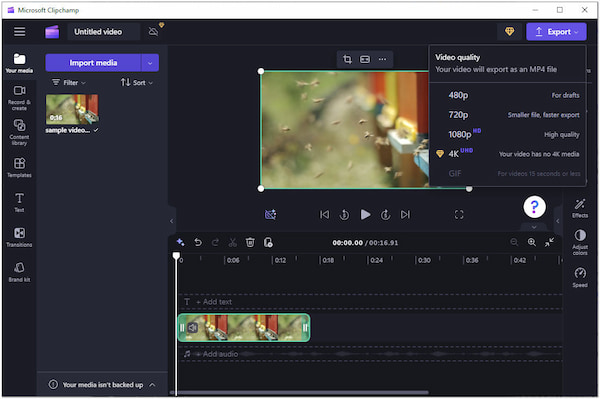
4. Finally, go to the top right corner to move your cursor to the ExportExport option, and it will show 480P, 720P, and 1080P options. You can also choose 4K output for the paid version. Choose one from the above three free options to begin the exporting process.
Clipchamp is actually a powerful tool to provide various editing features to enable you to personalize your videos. We only provide how to trim videos on it to simply show you its easy operating method. To further learn its usage, you can read 'How to edit videos in Clipchamp', this article to have a deeper understanding. The only pity is that its free version provides limited features for you to edit videos.
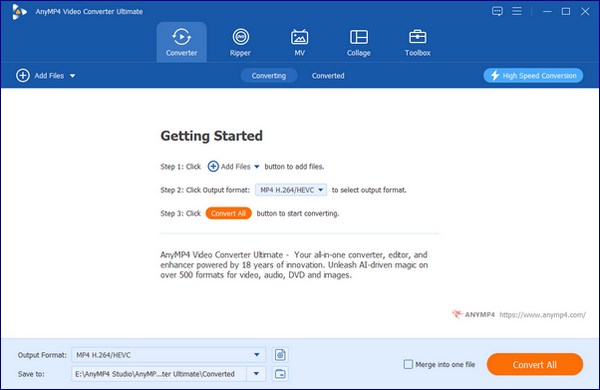
Lastly, we want to introduce AnyMP4 Video Converter Ultimate for you to edit videos, which is a cross-platform video editing software. It offers multiple video editing tools for you to adjust videos, such as video trimmer, video reverser, noise remover, video enhancer, and many others, which are various to meet your editing needs from different aspects. It allows you to input many video/audio formats and export them to MP4, MOV, MKV, MP3, and many other choices. If you have specific requirements of the output file, you can even customize the parameters, such as resolution, encoder, and others. Download it to have a try!
Now, read the steps below to learn its usage.
1. Download and install AnyMP4 Video Converter Ultimate on your computer. Double-click the software icon to launch the software.
Secure Download
Secure Download
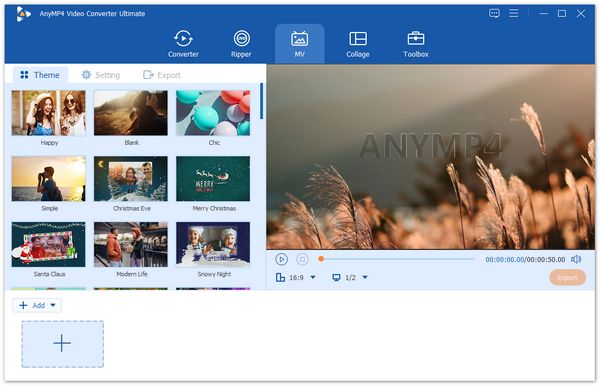
2. On the main interface, you will see many different sections in the top menu bar. To edit and create videos, choose the MV section. Then, click Add to import the video files you want to edit.
Note: If you have a specific editing purpose, you can go to the Toolbox to search for the editing tools you need.
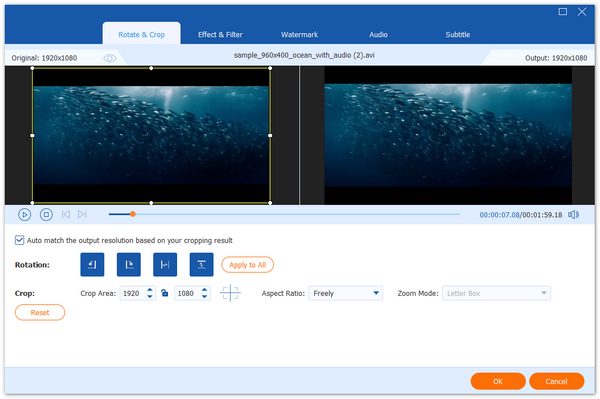
3. Choose the Edit button to enter the professional window for you to rotate, crop, apply effects, manage watermarks, and adjust audio tracks and subtitles. When it's done, click OK to save the adjustment.
Note: You can also choose the Trim option to trim videos, and select Behind / ForwardBehind / Forward to adjust the video positions.
4. Lastly, click Settings to adjust audio tracks, and choose Export to edit output parameters. Click Start Export again to save the final videos.

AnyMP4 Video Converter Ultimate is quite a comprehensive video editing tool for you to adjust videos. It has an intuitive interface that is friendly for beginners to learn its usage. With the various editing features, you can use it to create attractive videos. However, if you need very fine video editing, this tool is not suitable. You can try Adobe Premiere Pro, DaVinci Resolve, and so on.
Does Mac still use iMovie?
Yes, iMovie is still available and supported on Mac, iPhone, and iPad.
What is the best video editor for Mac?
For beginners, iMovie is great. For professionals, Final Cut Pro and Adobe Premiere Pro are top choices.
Can you use iMovie on Windows?
No, iMovie is only available on Apple devices. It can't be installed on Windows.
Is Microsoft Clipchamp any good?
Yes, Clipchamp is solid for beginners and quick edits. It’s easy to use, but advanced features require a paid plan.
This tutorial has shown you how to edit videos on Mac and Windows in 4 easy ways. We share with you the detailed steps that allow you to follow to edit videos. You can choose one preferred method to create beautiful videos on your own. Each tool has its unique features, and you can try them first to select a suitable tool. Among them, AnyMP4 Video Converter Ultimate is the most recommended for its rich editing features and multiple output formats.
 Updated by Mark Cristobal to Edit Video
Related Articles
 How to Edit Videos on iPhone with The Best Video Editor Apps
In addition to edit videos on iPhone with Photos for iOS, this article tells you more video editing apps to crop, trim, rotate, or adjust videos on iPhone.
 How to Edit a PDF File with Top 15 PDF Editors
How to edit a PDF file? Get the PDF editor to help you. Read and get your best PDF editor software here from the top-15 list, and start to edit a PDF file.
 Concrete Guide to Help You Adjust Audio Delay on Windows/Mac
The first thing you can do to resolve the audio out of sync is to read our guide and adjust audio delay in VLC or other software easily and quickly.
 2 Ways to Make a Video Slow Motion For Watching and Editing
Are you looking for a video speed changer to slow down the playback speed of your video? Lucky you! Check right here the techniques to make it possible.