When it comes to the laptop market, the Lenovo brand is one of the top contenders across the different price points of the product. The availability of the brand from entry-level, midrange, up to gaming-optimized price points is highly commendable. However, users of Lenovo often ask online how to record screen on Lenovo laptops since this practical function is usually overlooked outside of mobile devices. In this article, we will highlight four reliable programs that are all reliable options for users who want to capture screen recordings. We will also provide a short guide on using each tool and practical tips to help our readers improve the quality of their screen recordings.
We will start this article by featuring the built-in option to record screens available on Lenovo laptops running Windows 10 and 11 with the Xbox Game Bar, a brand new feature on the recent versions of Windows OS integrated from the gaming console of Microsoft with the same name.
Like its namesake, this feature was developed to be especially useful for PC gamers. The program only works if your current display is outside your desktop or file manager. This factor makes it helpful in installing programs on your device, such as your browser or a video game you want to record.
Unfortunately, the tool's limitation to be activated on the most commonly used windows on your computer might cause inconvenience. To learn how to screen record on a Lenovo laptop in Windows 10/11/7, a detailed tutorial on using the Xbox Game Bar feature is presented below.
1. Press the Windows + G command on your Lenovo laptop to open the Xbox Game Bar menu. If you are using a gamepad, press the Xbox Guide button. In the game bar menu, select the Camera icon.

2. Once you have clicked on the Camera icon. The Capture menu will appear where the Record button can be found. To make the Record button functional, you must open a program on your computer. It will not work if you are on your computer's desktop or file manager.

3. After opening a program on your PC, click the Xbox Game Bar Record button to start recording. To end the recording process, press the Stop button on the recording pop-up that will appear on the screen.

Since the Xbox Game Bar cannot be enabled in some commonly used computer windows, this option has apparent limitations and recommended use. We only recommend using this option if you are focused on capturing gaming-related footage on your Lenovo laptop.
What Users Say About Xbox Game Bar
Most users of Xbox Game Bar applaud its accessibility for recording the screen on Windows, given its built-in nature on modern Windows 10/11 computers. Unfortunately, some feedback also includes the resource-hungry nature of the program, which may result in performance issues when gaming while using the software as a background recorder.
If the limitations of Xbox Game Bar look too inconvenient for you, looking for an alternative should be your top priority if you want to learn how to record video on Lenovo laptops. In this case, we recommend using AnyMP4 Screen Recorder due to its versatility and limitless usage as a screen recorder and capture program.
The program's compatibility is already better than the previous option since it supports more Windows OS versions from Windows 11/10/8/7. This already makes AnyMP4 Screen Recorder a more accessible option.
Moreover, users concerned about the duration limit when recording and pesky watermarks should not be worried since the program is entirely free of these nuisances. The software also supports real-time editing options from cursor highlights, brushes, text inputs, stickers, and more during live recordings.
Moving forward to post-recording, multiple output formats may be selected when saving a recorded video from the software. These formats range from MP4, MOV, WMV, MKV, F4V, WebM, MPEG-TS, and GIF. These formats support the tool’s option to provide a customizable recording region, even if you want to capture the entire screen or only a small portion.
To learn how to use AnyMP4 Screen Recorder, we highly recommend downloading the software now and then following our three-step guide below on how to use it.
Secure Download
Secure Download
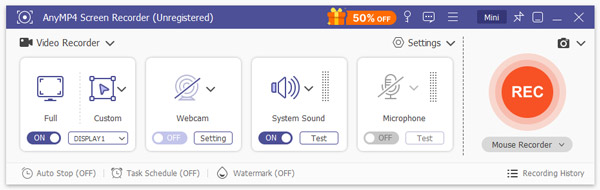
1. Open AnyMP4 Screen Recorder, and the software will start by default in the Video Recorder mode. This is ideal for general recording needs. Next, select Full to record the entire screen or click Custom to customize the portion of the screen you want to record.
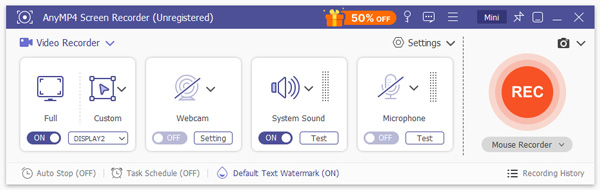
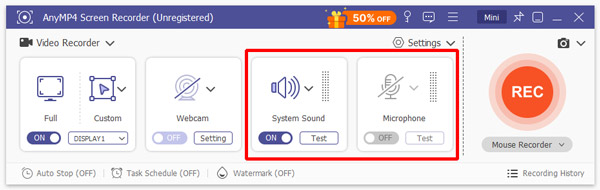
2. Customize the System and Microphone Audio configuration in the Video Recorder menu to modify the audio captured on your recording. You can adjust the settings only to capture system audio, microphone audio, both, or make your recording muted.
3. After selecting the portion of the screen that will be recorded and the audio capture you want to use, click the big REC button to begin the screen recording process.
Due to the versatility of AnyMP4 Screen Recorder, the tool makes for a strong contender if you are looking for a reliable video recording software for any section of your computer screen. It also helps that the program has multiple recording modes you can choose from according to your needs.
What Users Say About AnyMP4 Screen Recorder
AnyMP4 Screen Recorder received an overwhelmingly positive feedback from its users who are highly focused on complementing the program’s versatility due to its multiple recording modes. However, the limitations of the tool’s free version also result in some unremarkable reviews.
OBS Studio should be one of the top results online when looking for free screen recording software. The popularity of this software stems from its free-to-use nature since the program was developed as an open-source digital studio.
Since this free-to-use program is an all-around digital studio, it is a viable option if you are wondering how to record my screen on my Lenovo laptop. Unfortunately, keep in mind that the open-source nature of the software also made it one of the most advanced digital studios for computers. It may have a screen recording function, but setting it up and ensuring your footage is good quality is another story altogether.
If you are a complete beginner without the technical skills and experience required to run OBS Studio, we provide a quick overview on how to use it below.
1. Open OBS Studio and find the Sources tab in the middle section of the menu. Click the Plus button in the sources tab to select the sources OBS will capture.

2. Among the available sources, choose the Display Capture and Audio Output Capture to make OBS capture your screen’s display together with the system audio. You can also add the Audio Input Capture to add an external microphone as an audio source. You can proceed to the third step after choosing the sources you want to record.

3. Find the Start Recording button in the Controls tab in the lower right corner of the program’s menu. Press the button to begin the recording process. OBS will now start recording the output from your selected sources in the Sources tab.

Although OBS works as a screen recorder program, its complexity as a streaming software makes it an obsolete option for beginners or first-time users. The steep requirement of setting up a recording source and other advanced settings may feel too overwhelming for casual screen recording use.
What Users Say About OBS Studio
Since OBS Studio is inclined towards streaming and is usually utilized by streamers and content creators, the collective feedback of the program is centered around its capacity as a streaming tool. Unfortunately, there are not enough reviews of its use as a screen recorder.
If the default Xbox Game Bar recorder was good enough for you, we provided a few keyboard shortcuts that you can use to make recording videos much smoother and more convenient.
We have provided three of the most common commands used in Xbox Game Bar, according to the general reception of Windows users and PC gamers, for which the feature was designed.
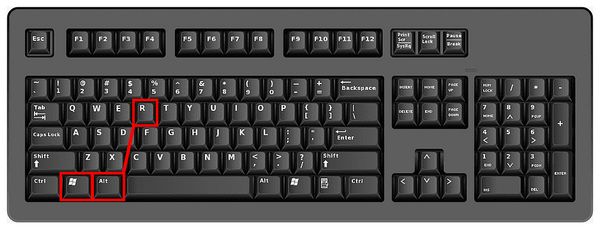
Windows Key + ALT + R: Start or stop recording.
Windows Key + Alt + G: Record the last 30 seconds of screen activity.

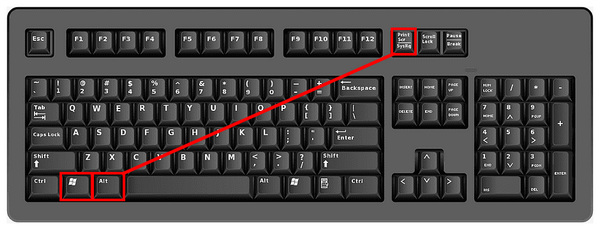
Windows Key + Alt + PrtScn: Take a screenshot of the screen activity.
With the help of these keyboard shortcuts, we hope your screen recording process will be much more seamless than before.
What Users Say About Keyboard Shortcuts
Since Keyboard Shortcuts are not required to use different computer functions, average Windows computer or laptop users are often unfamiliar with these hotkeys. However, users who are used to keyboard shortcuts highly recommend learning them since these hotkeys are convenient for automating screen captures.
Whether using the Xbox Game Bar, AnyMP4 Screen Recorder, or OBS Studio, double-checking to ensure your software is updated to the latest version will always be a convenient routine.
Since screen recordings are video files, expect they to occupy a significant space in your storage. Ensure the location where the screen recording will be saved has enough storage space.
If you are concerned about the quality, file size, and output format. Check if the recording settings you currently use match your screen recording needs.
When recording audio with a microphone, prepare the environment where you will do the recording, since your screen recording software may also capture any ambient noise or background audio.
Once you are all set with the recording, we recommend doing a test recording to ensure that the video quality, output settings, and audio quality are all in check.
We hope this article has helped you decide which screen recording software you will use on your Lenovo computer. If the limitations of Xbox Game Bar and the technicalities of OBS Studio look too much, make sure to check out AnyMP4 Screen Recorder if you want a free screen recorder program optimized for versatility.
Secure Download
Secure Download
 Posted by Riley Mitchell to Record Video
Related Articles
 Easy Ways of How to Record Screen on iPhone Without Effort
Have you ever been very frustrated because you don't know how to record screen on iPhone? Want to master this technique easily? Just read this guide to learn!
 2 Easy Ways to Screen Record on Motorola
This post will teach you how to screen record on Motorola using the native screen recording feature and alternative solutions. Find the detailed steps here!
 How to Screen Record Video and Audio on Samsung Devices
Capture your Samsung device’s screen effortlessly with our detailed guide. Learn how to screen record on Samsung devices, complete with easy-to-follow steps.
 How to Record Screen Video on HP Laptop with Your Sound and Face
Here're 3 easy ways to screen record on HP laptop. You can record not only the computer's screen, but also internal/external audio and webcam.