How to record screens on Windows? Recording your screen on Windows can be incredibly useful for creating tutorials, showcasing software, preserving memorable moments, and more. Whether you’re a content creator, educator, gamer, or professional, the ability to capture screen activities provides a versatile tool for communication and documentation. In this post, we’ll walk you through recording your screen on Windows using different methods, from built-in tools to third-party software solutions like AnyMP4 Screen Recorder. Get ready to unlock the power of screen recording and bring your ideas to life.
| Features | AnyMP4 Screen Recorder | Xbox Game Bar | OBS |
|---|---|---|---|
| OS Compatibility | Windows 10/11, macOS 10.13 and later | Windows 10/11 | Windows 10/11, macOS 10.15 and newer |
| Ease of Use |  |
|
 |
| Cost | Paid | Free | Free |
| Video Quality | Up to 4K UHD | Full HD | Up to 4K |
| Built-in Editor | |||
| Scheduled Recording | |||
| Watermark | |||
| Shortcut | |||
| Audio Support | System + mic | System + mic | System + mic |
| Webcam Overlay |
Xbox Game Bar is a built-in recording software for Windows 10 and 11 that provides various gaming-related tools and features, including screen recording, capturing screenshots, broadcasting gameplay, and more. Xbox Game Bar is primarily designed for gamers, but the screen recording functionality can be used for several purposes beyond gaming.
PROS
CONS
Here’s how to record the screen on Windows 10 using Xbox Game Bar:
1. Press the Windows key + G on your keyboard to open the Xbox Game Bar. For Windows 11 users, this shortcut should work also.
If this is your first time using the Xbox Game Bar, it will prompt you to confirm whether you’re using it for a game. You can select Yes; this is a game option to proceed.
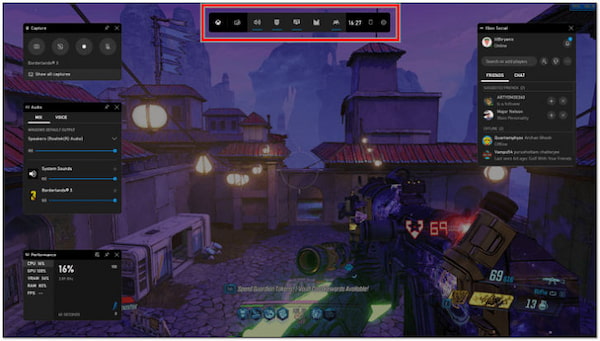
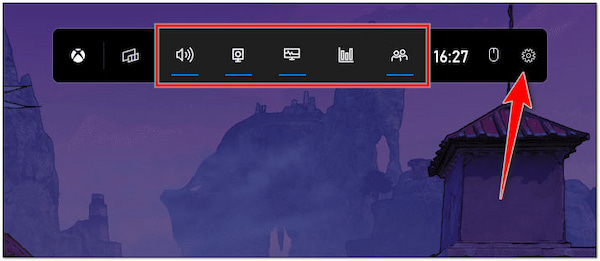
2. Once the Xbox Game Bar opens, you will see a panel with various options. Look for the recording controls.
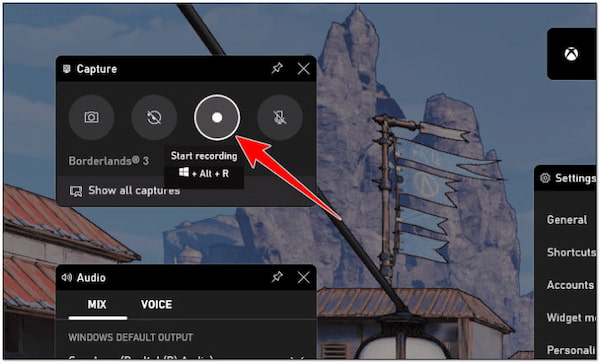
3. Click the red circle button labeled Record to start recording your screen. Optionally, you can configure some recording settings by clicking the Settings button before recording.
4. To end the recording, press the Windows key + G again or click the Stop button in the recording controls. Otherwise, return to the Xbox Game Bar and click the Stop button.
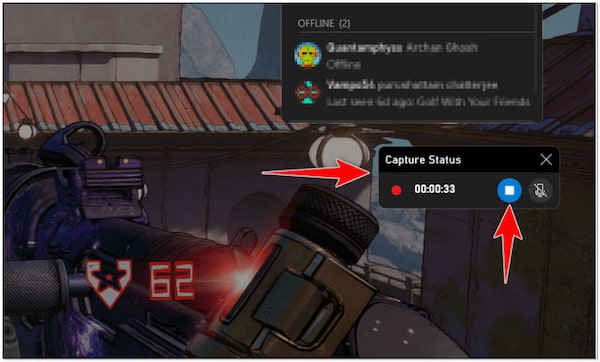
5. After you have stopped the recording, the Xbox Game Bar will notify you that your recording has been saved.
You can click this notification to access your recorded video or navigate to the Captures folder on your computer to find your recorded videos.
Xbox Game Bar recording feature is a convenient game recording option for quickly capturing screen activities, mainly for gamers and users who need simple recording functionalities without advanced editing. However, Xbox Game Bar is primarily designed for capturing games, so it might not be the most feature-rich screen recording solution for all use cases.
OBS is a popular open-source software for Windows 10 screen recording and streaming video content. Many content creators, gamers, educators, and professionals use it to capture screen activities, create video tutorials, stream gameplay, and more. OBS Studio is known for its flexibility and customization options, making it suitable for various recording needs.
PROS
CONS
Here’s how to screen record on Windows using OBS Studio:
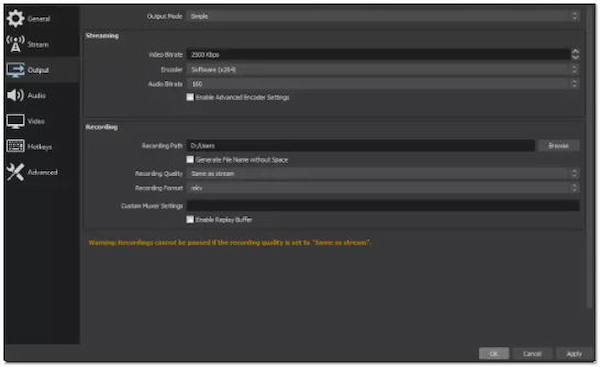
1. Before you start recording, configure the recording settings. To do so, click File, select Settings, and choose your desired recording settings in the Output tab.
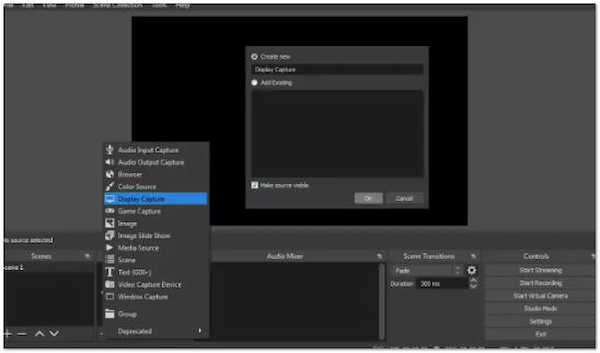
2. To begin, create a new scene by right-clicking the Scenes box and selecting Add Scene. Give the scene a name and click OK.
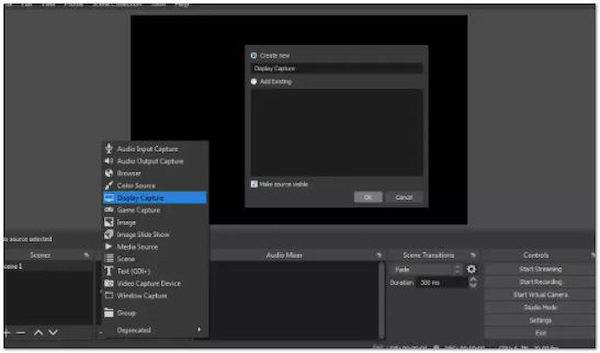
3. Next, click + under the Sources box and choose Display Capture to capture your computer’s screen. Otherwise, select Window Capture to capture a specific window.
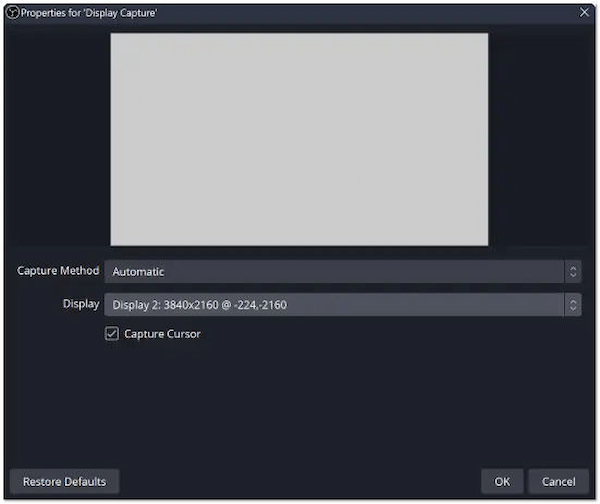
4. After adding a source, you can configure its settings by right-clicking the source in the Sources box and selecting Properties.
Configure audio settings in the Audio Mixer section to capture audio from your microphone or system sound.
5. Click Start Recording to enter the Preview mode to see how the recording will look. When you’re ready to start, click the Start Recording again.
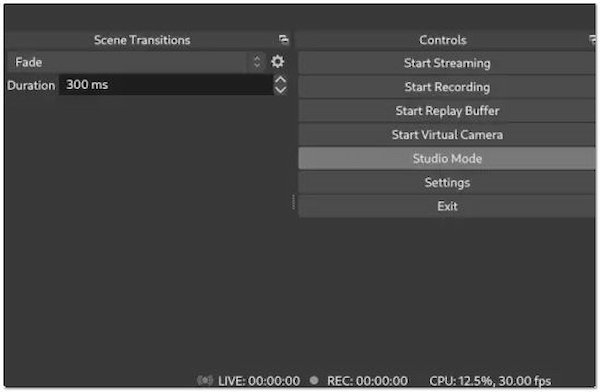
6. To stop recording, click Stop Recording. The recording will be saved in the location specified in the output settings. (Check where the OBS recording file location is?)
OBS is a powerful screen recording and streaming software offering high customization and control. It’s an excellent choice for users who need advanced recording features, flexibility, and the ability to create professional-quality content. However, beginners will need to invest time in learning how to use its features effectively.
AnyMP4 Screen Recorder is a comprehensive screen recording software that functions as a video, audio, game, window, webcam, and phone recorder. This screen recorder for Windows 10/11/8/7 is designed to capture various screen activities on your computer’s screen. It is intended for users who need to create video tutorials, record gaming sessions, capture online streaming videos, and more. It lets you capture your screen activities with the option to include audio from your system or microphone.
Recommendation
PROS
CONS
Here’s how to screen record on Windows with audio using AnyMP4 Screen Recorder.
1. Start by clicking Free Download to acquire the program. Install AnyMP4 Screen Recorder on your Screen and launch it afterward.
Secure Download
Secure Download
2. In the main interface, you will find various options for recording, such as Video Recorder, Audio Recorder, Game Recorder, etc.
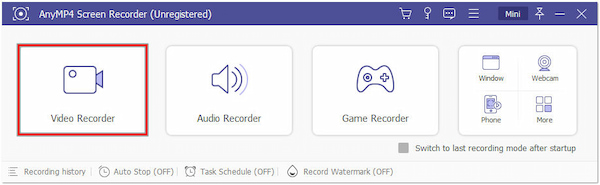
This tutorial will use the Video Recorder feature as part of the demonstration.
3. After selecting the Video Recorder tab, toggle the Recording Area tab. Choose whether to record the screen in Full or Custom.
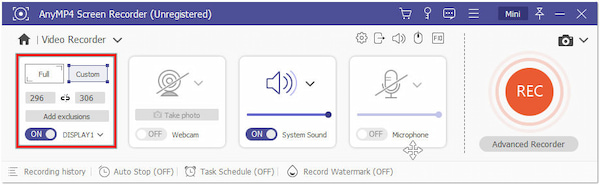
4. To record the screen with audio, decide whether to capture System Sound, Microphone audio, or both by toggling the buttons.
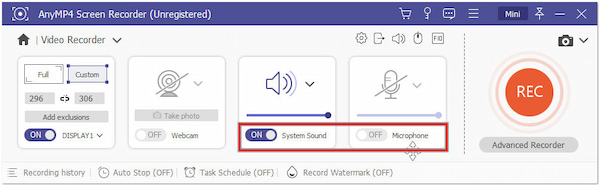
5. After configuring the recording area and audio settings, click REC to initiate the recording.
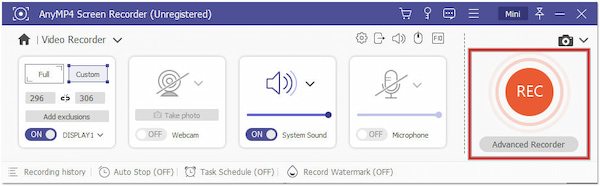
A three-second timer will appear on your screen, preparing you to start recording screen activities.
6. During recording, you’ll typically see a floating toolbar with options to pause or stop recording.
AnyMP4 Screen Recorder is a feature-rich Windows screen recorder with audio suitable for users who need to create professional-looking tutorial videos, record gameplay, or capture online content with audio. Besides that, AnyMP4 Screen Recorder will display a Preview window after the recording, enabling you to trim unnecessary recordings.
Does Windows have a screen recorder?
Windows 10/11 has a built-in screen recording feature called the Xbox Game Bar, which you can use to record your screen activities. On the other hand, Windows 7 and 8 don’t have a built-in screen recording feature. However, you can use AnyMP4 Screen Recorder on Windows 7 and 8 to capture screen activities.
Does Windows Game Bar record audio?
YES! Windows Game Bar allows you to screen record with in-game audio. However, it doesn’t currently support recording audio from external sources like microphones, which might be a limitation for some users, like streamers.
How long can OBS Studio record video?
OBS Studio’s recording duration depends on available storage space and system resources. There’s no strict time limit in most cases, but factors like available storage on your hard drive could limit the recording length. However, with AnyMP4 Screen Recorder, you don’t need to worry about the file size of the recording. It lets you record screen activities with no limit without minding the file size, as it consumes a significantly small file size for the recorded files.
Can Snipping Tool record video with audio?
When recording audio and visual content, such as videos, it’s important to note that the Snipping Tool doesn’t natively support audio recording. While you can use the Snipping Tool to capture images and videos, it doesn’t include the necessary components for capturing or syncing audio. It is something that must be added to the Snipping Tool.
Can I record a video in Windows Media Player?
Windows Media Player is primarily a media playback software and does not have built-in video recording features. It’s designed to play audio and video files, not to record new content. For those seeking to record videos, create tutorials, or capture screen activities, other specialized screen recording software, like AnyMP4 Screen Recorder, offers the functionality to capture and save video content from your screen, webcam, or other sources.
Can I record audio and screen together?
Yes, you can choose to record the microphone or system sound according to your case.
Does screen recording slow down my PC?
Yes, it does. It can, especially on older or low‑spec machines, since recording uses CPU and memory.
What is the best file format for sharing a screen recording?
MP4 is recommended because it’s widely supported, compressed, and easy to share across devices and platforms.
Screen recording on Windows has become an indispensable tool for various purposes, from sharing knowledge and training to capturing entertainment and preserving memories. The methods on how to record screens on Windows we’ve explored in this post offer various options to cater to your needs, whether you require basic recording capabilities or advanced features for editing and customization. As technology evolves, screen recording remains a valuable resource that empowers individuals and professionals to convey messages and create engaging content effectively. So, go ahead and start recording your screen using AnyMP4 Screen Recorder!
 Updated by Alice Thorne to Record Video
More readings
 10 Choices for Recording Microphone
Voice and Audio
10 Choices for Recording Microphone
Voice and Audio
This article reviews top 10 voice recorders on Windows and Mac. You can get the best voice recorder to record audio from your browser or microphone with ease.
 Top 4 Efficient Methods to Record a Video with
Audio on Mac Easily
Top 4 Efficient Methods to Record a Video with
Audio on Mac Easily
How to record a video on Mac with sound? When you want to make some video tutorial and capture the online videos, you can find top 4 efficient methods.
 iOS 11 Screen Recording – How to Screen
Record on iOS 11 with Ease
iOS 11 Screen Recording – How to Screen
Record on iOS 11 with Ease
After updating to iOS 11 or later versions, there will be a screen-recording feature. Learn more about screen recording on iOS with the default feature.
 Top 5 Chrome Audio Recorders – How to Record Audio
on Websites
Top 5 Chrome Audio Recorders – How to Record Audio
on Websites
Want to save appealing music on Chrome? What you need is just an audio recorder that enables you to capture audio on Chrome.