Screen recording on a Mac system has become an essential tool for several users, from professionals to casual users. As distance learning, remote work, and virtual jobs continue to rise, screen recording is essential. Fortunately, Mac users can benefit from several built-in and third-party screen recording tools. Since the demand for screen recording is stronger than ever, we will introduce you to some notable options. In this guidepost, we will explore various methods to screen record on Mac. We’ve compiled these approaches to help you pick the best screen recording software for your needs.
If you are running macOS Mojave or later versions, you can use the pre-installed tool. Mac’s built-in screenshot recording toolbar provides several options to capture and record your screen activities. These include recording the entire screen, a portion of the screen, the entire screen, a window, and a portion of the screen.
Here’s how to screen record on Mac shortcut using the built-in screen recording toolbar:
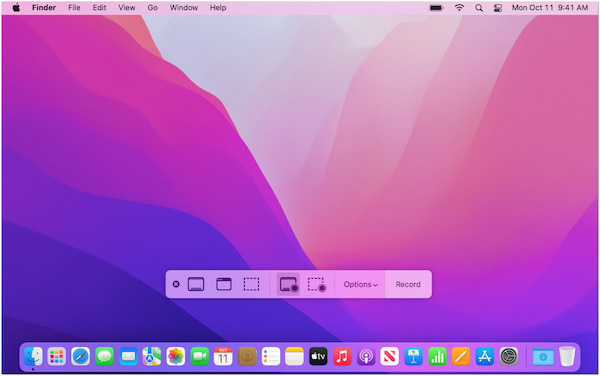
1. First things first, make sure the application or window you intend to record is open and ready. Now, press the Shift + Command + 5 key combinations to open the screenshot tools. Select Record a portion of the screen or Record the entire screen to record your screen.
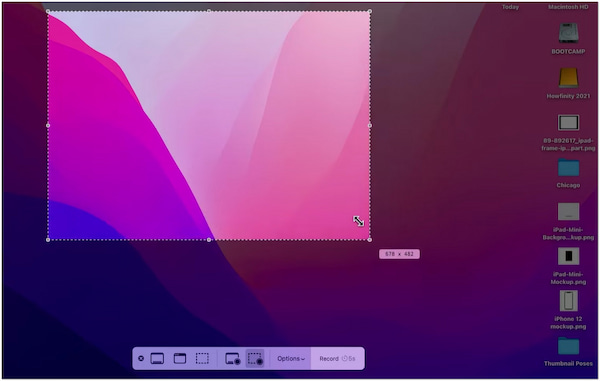
If you plan to record a portion of your screen, your cursor will turn into a crosshair. Drag the edges of the crosshair to draw a box and adjust the recording area.
2. Once everything is set, click the Record button to allow screen recording on Mac. To end the recording, click Stop in the menu bar or press Command + Control + Escape key combinations. By default, your recording will be saved to your desktop.
See, you can screen record on Mac even without downloading any application. However, you should be aware that this method only records visuals, excluding audio. In addition, it exports the recorded clip in MOV files only, requiring conversion to change the format.
QuickTime Player is another pre-installed app on Macs for screen recording. Unlike the built-in screen recording toolbar, QuickTime Player screen recording comes with basic features like internal audio and voiceover. This means your recordings include both visual and audio.
Here’s how to record screen on Mac Air using QuickTime Player:
1. Start by opening the QuickTime Player application on your MacBook Air. In the menu bar, click File and select the New Screen Recording option.

2. Proceed to Options in the toolbar and choose your audio input from the Microphone section. Next, decide to record the screen in full or only a selected portion.
3. After completing the previous step, click the Record button to initiate screen recording. Once done, click Stop or press Command + Control + Escape to end the recording.
QuickTime Player is an excellent choice for those who only need a basic screen recording. However, there are instances where the Stop button does not function, preventing you from ending the recording. If you have already faced this issue, check this guide to learn how to stop screen recording on a Mac using QuickTime.
If you are after flexibility and advanced features, AnyMP4 Screen Recorder provides the best way to screen record on Mac. It is a one-stop screen recording software that provides seven recording modes: Screen Recorder, Audio Recorder, Screen Capture, Game Recorder, Window Recorder, Webcam Recorder, and Phone Recorder. It lets you record your screen along with system sound, microphone, and even webcam simultaneously.
Moreover, it provides the option to record the screen in full, in a specific window, or a custom region. It also includes several tools to insert text, magnify the screen, focus on the subject, add callouts, and more. But what makes it truly remarkable is its added features. Some of these are advanced video trimmers, video compressors, sound boosters, sound extractors, media converters, and more. In terms of compatibility, it is accessible on all Macs, including Air, Mini, Pro, etc.
Here’s how to screen record on Mac with AnyMP4 Screen Recorder:
1. Beforehand, you need to get a free download of AnyMP4 Screen Recorder. Install the all-in-one screen recording software and wait for the installation process to finish. Once installation is complete, launch the AnyMP4 Screen Recorder on your Mac.
Secure Download
Secure Download
2. Now that the software is ready, you’ll be presented to the Screen Recorder mode by default. In the very first tab, choose your preferred recording area to capture your screen. Select Full to capture everything on your screen, or choose Custom to focus on a certain window/tab.
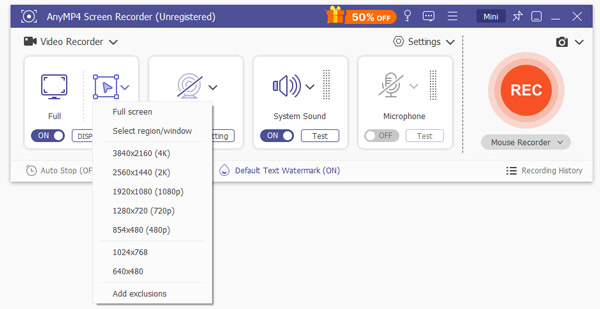
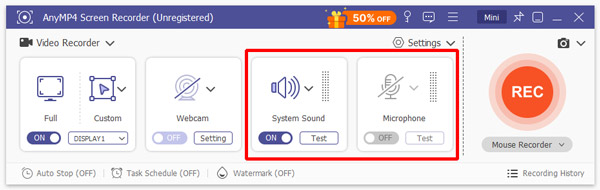
3. Next, proceed by toggling on the System Sound and Microphone to record MacBook Air with sound. By turning on these options, you will be able to capture the sounds from your Mac and even your voice in the recording.
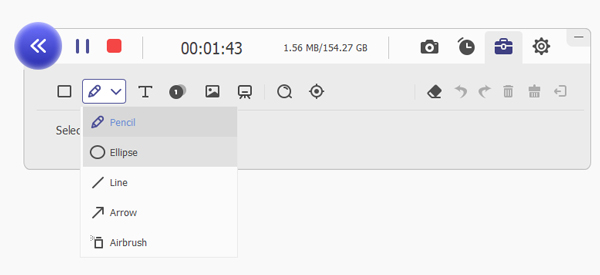
4. Once all set, click the big REC button to start the screen recording. You will see a three-second countdown indicating the recording is about to begin. During recording, you will notice a bar that includes several tools:
Camera: Take a screenshot while the screen is recording.

Toolbox: Access drawing and annotation tools, allowing you to draw shapes, lines, arrows, etc.
You can even add texts, callouts, and images and use magnifiers and focus tools.
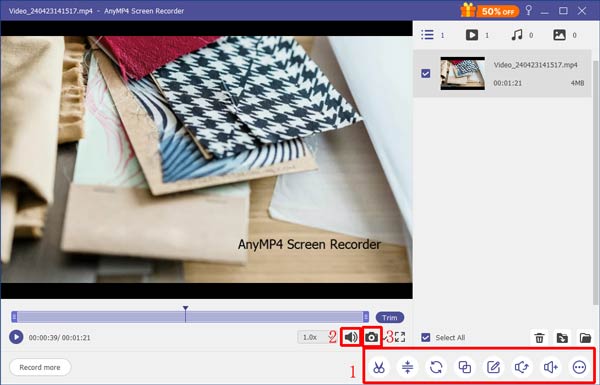
5. If you want to stop the recording, click the Stop button on the toolbar. Afterward, you will be taken into the preview window, where you can review your recording. Before saving the recorded clip, you can trim and merge recorded clips, boost sound, and more.
That’s how to screen record vids in 4K on Mac! Considering the software’s flexibility and advanced features, AnyMP4 Screen Recorder is the best screen recorder for Mac you could ever have. If you want to discover more of its exciting features, we bet you to grab it now.
If you’re a gamer or streamer, the OBS Studio is a powerful option on Mac. It is an open-source software that provides high-quality recording and streaming functionalities. Most gamers use this software due to its multi-source layering, real-time audio/video mixing, and transitions.
Here’s how to screen record on MacBook using OBS Studio:
1. Get OBS Studio and install the app on your Mac. Once it launches, move to the Scenes panel and click + to create a new Mac recording. Proceed to the Sources panel, click +, choose Display Capture, and click OK.

2. Still, in the Sources panel, click + and select Audio Input Capture to record the screen with audio. In the next window, select your audio input source and click OK to confirm.
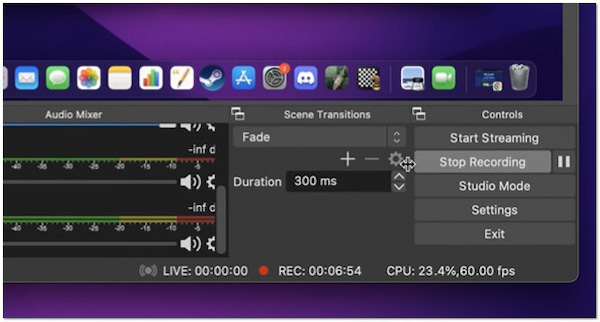
3. Now it’s time to record the screen. Click Start Recording to initiate and Stop Recording to end the screen recording. OBS will save your recording to the Movies folder by default.
Does screen recording on Mac record audio? Yes, OBS Studio allows you to screen record on Mac with audio, provided that you configure the audio settings. Not to mention, it has multiple input recording functionalities for both audio and video.
If you usually create instructional and tutorial videos, Snagit is the perfect screen recording software. It lets you easily record your screen with additional powerful editing tools. It includes several templates and overlay options for recordings.
Here’s how to start screen recording on Mac using Snagit:
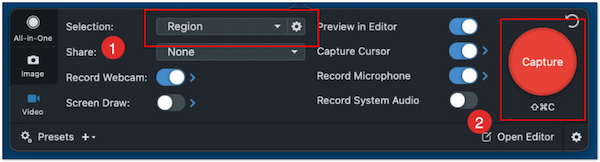
1. In the Snagit’s capture window, select the Video tab. Proceed to the Selection field and choose to record the screen in a specific region. Click the Capture button to display the crosshair, which you will use to select the area you want to record.
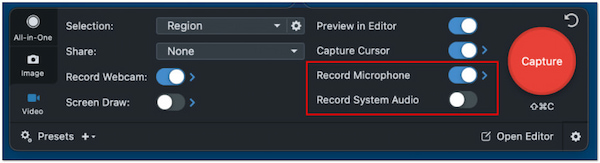
2. If you want your recording to come with sound, toggle on Record Microphone and Record System Audio. By doing so, you will be able to record voiceovers or capture the sounds that come from your Mac. You can also include your webcam in the recording if needed.
3. Once you’re ready, click Record, and a three-second countdown will be displayed before recording. Afterward, anything that shows in the specified recording area will be recorded. Then, click the blue square button to stop the recording.

Snagit enables you to record your Mac screen without dealing with a complicated interface. But, if you’re using its free version, it comes with several restrictions. This includes a limited day of free trial, access to recording options, length of recording, and more.
If you don’t want to download any software, using Chrome extensions like Loom screen recorder is ideal. It is best used if you frequently record activities or online conferences on your web browser. In actuality, it can be installed as an extension or as a standalone application.
Here’s how to take screen recording on Mac using Loom:
1. Initially, sign up for a Loom account and get its Chrome extension or macOS web app. Continue by opening the extension or web app and selecting a recording option. Options include Screen + Cam, Screen Only, or Cam Only (for webcam recording only).
2. Now, choose to record either your entire screen, a specific tab, or a window. Turn the webcam on to include your face during the recording. If you’re narrating or want to add voiceovers, ensure the microphone is turned on.
3. After completing the previous step, click Start Recording to capture your screen with audio. Once the recording has ended, click the red square button to end your recording. The recorded clip will open in the Loom’s interface for review.

Where do screen recordings go on Mac? As a cloud-based screen recorder, your screen recording will be automatically saved on the Loom Library. The good thing is that you can download these recordings for safekeeping or sharing.
This post has introduced multiple ways to screen record on Mac, from the built-in macOS features to third-party tools. Each of these tools brings something unique to the table, including recording with audio, editing options, and flexible recording settings. Among these, AnyMP4 Screen Recorder stands out. Its advanced recording modes, audio integration, editing tools, and compatibility with all Mac devices make it a comprehensive solution.
 Posted by Riley Mitchell to Record Video
More readings
 A Comprehensive Guide: How to Record Video on Mac
Learn how to record video on Mac computer using third-party and built-in tools. Capture screen activities, record yourself, and create engaging videos.
 Record Voice and Sound on Mac in 5+ Straightforward Solution
This guidepost will outline six ways how to record voice on Mac. We’ve curated the perfect toolkit for your internal and external audio recording needs.
 10 Choices for Recording Microphone Voice and Audio
This article reviews top 10 voice recorders on Windows and Mac. You can get the best voice recorder to record audio from your browser or microphone with ease.
 How to Record Screen on Canva on the Web
Are you looking for a solution for recording audio or video in Canva? Read this article to learn how to use it for your video or audio recording needs.