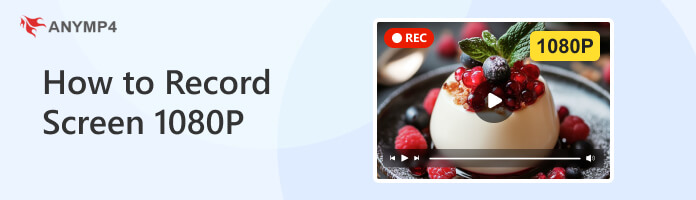
In our previous posts, we got plenty of requests to demonstrate the process of recording 1080p videos. Many users set their standards in recording videos in 1080p resolution. No wonder this high-definition video provides excellent quality but in a reasonable file size. Today’s topic will show you how to record a screen in 1080p resolution. So, if you want to learn the best settings for recording high-quality videos, look no further. We will help you optimize your settings and produce professional-quality recordings quickly.
Compatibility: Windows XP, Vista, 7, 8, 10, 11, and Mac OS X 10.9 or later
AnyMP4 Screen Recorder is a full-featured Windows and Mac software that records high-quality screens. It can capture on-screen activities in 1080p Full HD and up to 4K UHD. This software can export your high-quality recordings in a format of your choice. Some supported formats are MP4, MOV, WMV, MKV, F4V, and more.
FEATURES:
Here’s how to screen record in 1080p using AnyMP4 Screen Recorder:
1. First, you need to download the AnyMP4 Screen Recorder for free. Install the 1080p screen recorder and allow the installation process to finish. After completing the installation, launch the AnyMP4 Screen Recorder on your computer.
Secure Download
Secure Download
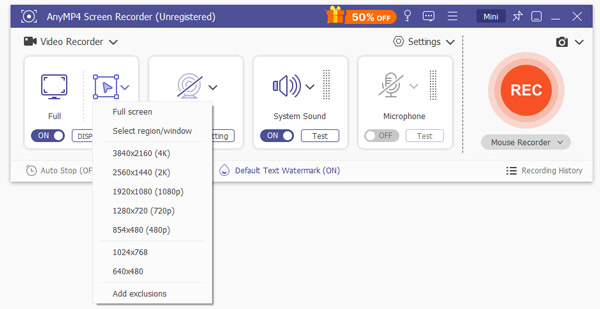
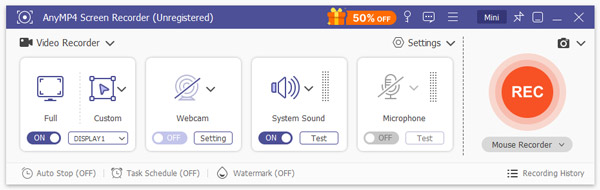
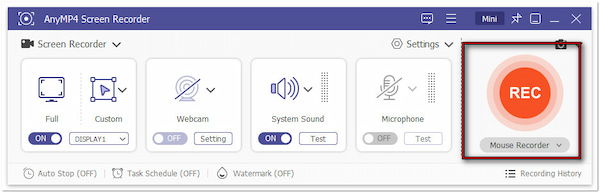
2. Upon launching the software, you will be headed into the Screen Recorder mode by default. In the Display tab, select your recording area using Full or Custom based on your preference. You can include the Webcam in the recording if you’re making gameplay videos.
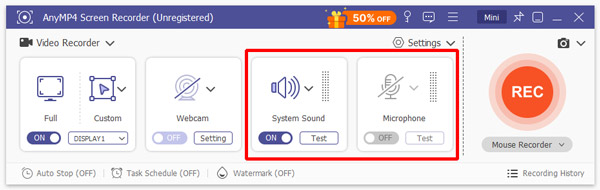
3. Beyond configuring the recording area, you can also set the audio recording settings. In the same menu bar, toggle the System Sound and Microphone on. Turning on these options lets you capture audio from your system and include your voice in the recording.
4. Once everything is good, click the big REC button to start the recording. A three-second countdown will give you time to prepare before the recording begins. The recorded HD screen will be saved in MP4 format by default. Still, you can change it to any other format beforehand.
5. Once you are done recording the screen in HD, click Red Square to end the recording. The software will take you to the preview window where you can review the HD recording. Use the editing tools to enhance the recorded screen if needed.

You should now know how to record the screen on Windows in 1080p. Since AnyMP4 Screen Recorder adopted the latest acceleration technology, you can expect to capture high-definition and smooth recording clips. So, get the free download now and try it!
Compatibility: Windows 11, Windows 10, Mac OS 11 or later, and Linux
OBS Studio is an HD screen recording software accessible on various operating systems. It allows you to capture a screen high-definition by customizing the recording settings. So, if you aim to record 1080p with OBS, check the following guide below:
1. Get started by opening the settings panel in OBS Studio by clicking the Settings button. Proceed to the Video option and set the Output (Scaled) Resolution to 1920×1080. This setting determines the resolution of the recorded video.
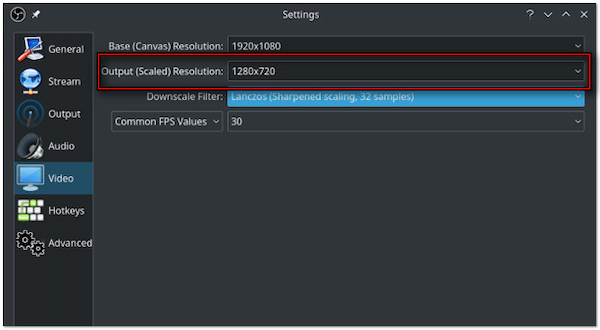
Remember, the output resolution can be the same as the Base (Canvas) Resolution or smaller. OBS Studio will downsize your recording if you set it to much smaller. This allows you to record a 1080p screen and output it to 720p.
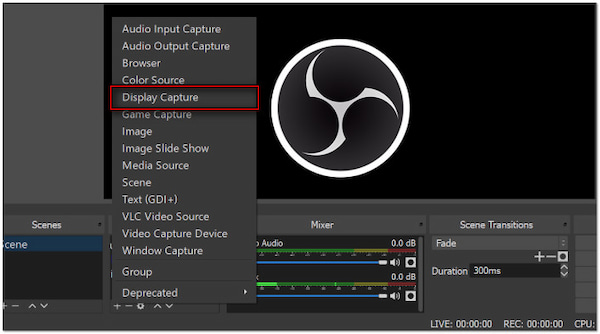
2. By default, OBS Studio auto-adds scenes to its interface. However, if needed, you can click the + button to add a new scene. Now, switch to the Sources panel and click the + button as a source. Select the Display Capture, create a new title, and click OK to proceed.
3. In the next window, select your Capture Method and Display. Now, switch back to the Settings and move to the Output option. In the Recording section, click the Browse button next to the Recording Path field to specify the destination of your recorded videos.

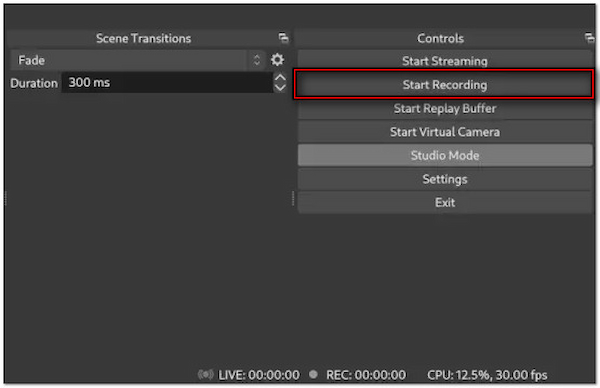
4. After completing all the configurations, click the Start Recording button to initiate the screen recording. OBS Studio will capture your scene based on the settings you have arranged. Once your recording is complete, click the Stop Recording button to end the recording.
That’s how to record a 1080p screen with this screen recording tool on Windows 11, 10, and Mac. Remember, factors beyond settings always influence the quality of your recording. Consider your hardware specifications, mainly the supported resolution of your computer display.
How do I change the resolution of the screen recording? Changing the video resolution of screen recording in AnyMP4 Screen Recorder is straightforward. This software lets you adjust the resolution before recording, ensuring you capture the screen in your desired quality.
Secure Download
Secure Download
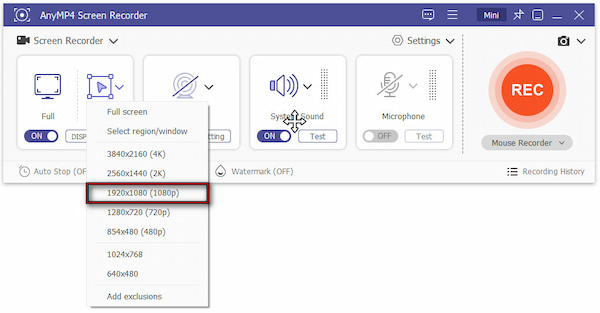
1. In AnyMP4, select the Screen Recorder mode to access the recording settings easily. Choose Full to capture the entire screen or Custom to select region/window. Now, click the dropdown arrow to select the 1080p video resolution.
If you select Custom, place the crosshair in an active window to select it. Otherwise, drag the edges of the frame to specify the region of your recording area.
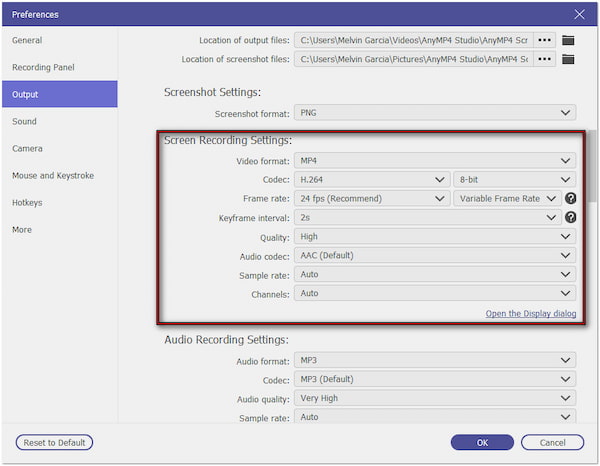
2. Now, click Settings in the top menu and proceed to the Output section. Under the Screen Recording Settings, select your preferred video format and codec. Then, set the frame rate to the recommended 24 fps for a smooth viewing experience.
3. Once you have set the resolution, you can initiate the screen recording. After stopping the recording, preview the clip immediately to see if the resolution meets your expectations. You can access the recorded video on your PC’s local folder afterward.
Remember, always set your preferred video resolution before recording your screen. The process is simple and can be done quickly, ensuring you can get your desired quality. For better results, ensure the Quality option is set to High or Very High.
With this post, you now know the basic settings about how to record a screen in 1080p. The featured software in this post provides everything you need to output high-definition video recordings. Although OBS Studio can be a good option, AnyMP4 Screen Recorder offers multiple resolutions, formats, and additional features. When you need to configure the quality of your recordings, you can always go back into this post and follow our guides.
 Posted by Riley Mitchell to Recorder
Related Articles
 A Comprehensive Guide: How to Record Video on Mac
Learn how to record video on Mac computer using third-party and built-in tools. Capture screen activities, record yourself, and create engaging videos.
 2 Easy Ways to Screen Record on Motorola
This post will teach you how to screen record on Motorola using the native screen recording feature and alternative solutions. Find the detailed steps here!
 Top 10 UHD 4K Screen Recorders for Windows and Mac [Free & Paid]
Which is the best screen recorder to record video and gameplay? Here is the top 10 4K screen capture software to record screen, video, and sound on computer.
 5 Top Trends HD Screen Recorders [Free and Paid Solutions]
Looking for the best HD screen recorder? This post will cover top-picked screen recorders that can capture screen activities in a resolution of up to 4K.