Are you wondering if a computer can record while in sleep mode? Simply put, computers are not designed to do it since sleep-mode computers are optimized to save energy. However, specialized screen recording software can capture computers in sleep mode. In this article, we will provide a clear answer for users curious about how I can record my screen in sleep mode.
However, three different power modes are sleep mode, locked screen, and screen off. Sleep mode saves energy and keeps your computer running at low power. Meanwhile, a locked screen makes your computer run in the same state while only adding security measures to make your display inaccessible. Finally, the screen-off mode only powers down your display while your computer maintains its current state. Sleep mode is the most complicated of the three modes, which warrants this article guide.
Please continue reading the article to learn how to record your screen while your computer is in sleep mode in three different ways.
Compatibility: Windows 11/10/8/7, macOS 10.13, or later versions
Unique Functions:
• Full-screen and screen-section recording.
• Up to 4K UHD screen recording quality.
• Access to annotation tools during screen recording.
Output Format: MP4, MOV, WMV, MKV, F4V, WebM, MPEG-TS, and GIF.
If you are looking for a reliable option to keep recording your screen while the computer is locked or in sleep mode, AnyMP4 Screen Recorder is the superior option among the other software featured in this guide. It was made possible by the combination of multiple features available with no time limit recording, scheduled recording, and the sleep mode bypass, making the software an ideal program to continue capturing your computer screen while it is in sleep mode.
Moreover, screen recordings are highly customizable in this program since they can capture the entire screen, a set section that can be adjusted, or a specific window or tab opened in your computer. In addition to that, recording activities can also be adjusted in the audio department since recordings may be captured from a microphone device or system audio. Webcam overlays are also supported since the program has a dedicated webcam recorder mode.
With the help of these features, AnyMP4 Screen Recorder takes the cake as the most advisable program among the ones presented in this article. The watermark-free recordings that may be saved in multiple output formats are just the cherry on top.
For a quick guide on how to use the tool to screen record your computer in sleep mode or not, please proceed to our complete guide below.
Download the program for free to follow each step and install it on your device easily.
Secure Download
Secure Download
1. Download AnyMP4 Screen Recorder on your computer and wait to install it. Once the tool is ready, the program will be set by default in its Video Recorder mode. In this menu, you can set the software to record your entire screen or only a specific section; you can also turn on the Webcam option to add a front-facing overlay on your screen.
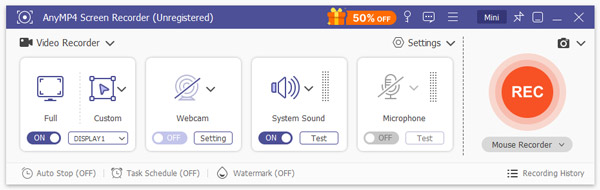
2. After setting up the screen portion you want to record, you can now adjust whether the screen recording will have audio. You can customize the audio capture settings to simultaneously record your System Sound, Microphone, or both. Simply switch each setting to On or Off.
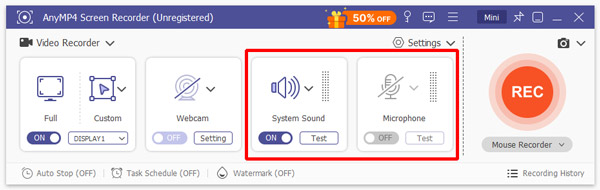
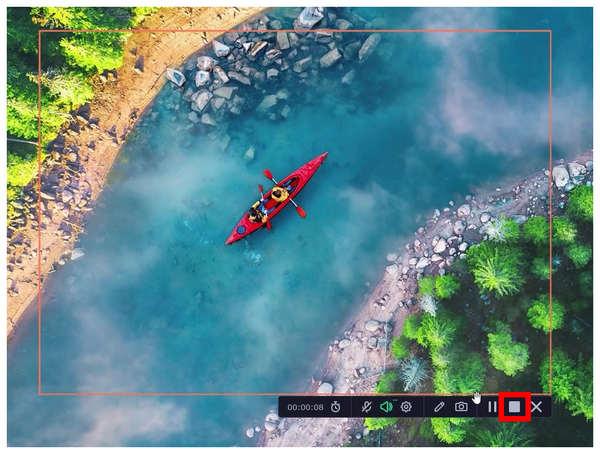
3. Now that the screen recording and audio settings have been adjusted, simply click the REC button to start recording on your computer. Since the program bypasses sleep mode, AnyMP4 Screen Recorder will continue capturing your computer’s screen while in sleep mode.
Now that you have learned how to record video without a screen on, we hope this guide will make your screen recording sessions much simpler and more convenient. This was made possible by the beginner-friendly interface and highly intuitive design of AnyMP4 Screen Recorder.
Compatibility: Windows 11/10/8/7, macOS X 10.10, or later versions.
Unique Functions:
• Designed as a streaming and broadcasting software.
• 4K UHD screen recorder with 60FPS support.
• It can record multiple sources, from webcams, microphones, screens, etc.
Output Format: MP4, MOV, MKV, FLV, TS, and M3U8.
Moving forward to the more advanced option, OBS Studio is also a good tool if you are already used to streaming content for video-sharing websites. Although it is well-known mainly as a streaming program, OBS Studio is also a fully functional screen recorder that can keep recording videos with the screen off or in sleep mode. Since it is often used for more advanced purposes, screen recordings captured by OBS are usually higher in quality and have a smoother framerate.
Unfortunately, OBS Studio has a significant weakness in terms of complexity. The program is inclined toward more advanced users, making it not advisable for beginners and intermediate users. Simply put, this program might be an overkill if you only want to record your screen and nothing else.
We have provided a short guide below to help you learn how to record with the screen off using OBS screen recorder mode.
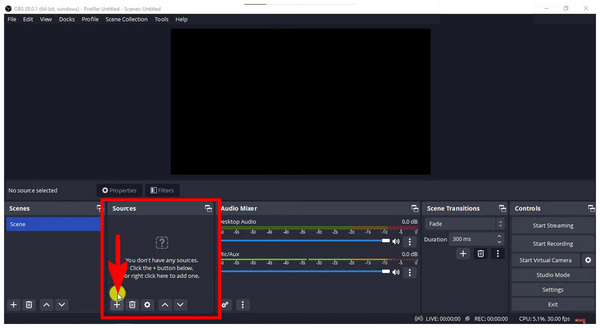
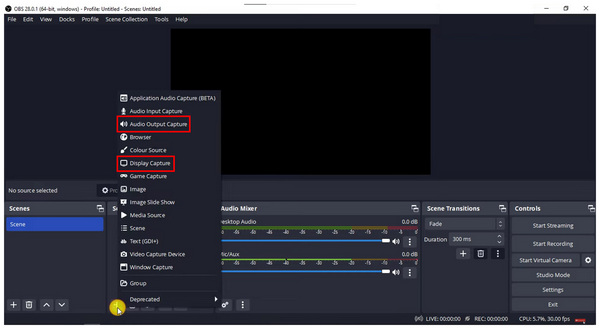
1. Open OBS Studio and move over to the Sources menu. The sources tab identifies the media source you want to share in OBS. This includes displays, audio, open tabs, and more. Simply click on the Plus button to add a source.
2. Among the available sources option, select Display Capture since the one you will share in OBS Studio is your computer’s display. If you want to add audio to your recorded footage, click on Audio Output Capture. In this guide, we will focus only on the Display Capture option.
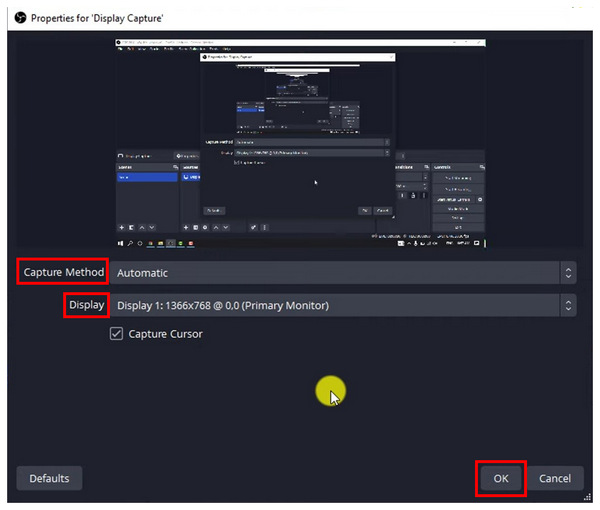
3. After selecting a source, a pop-up menu that can be used to adjust your chosen source will appear. In the case of the Display Capture, you can customize both the Capture Method and Display. Another setting may also be toggle to either show your cursor or not. Click on OK to confirm your adjustments.
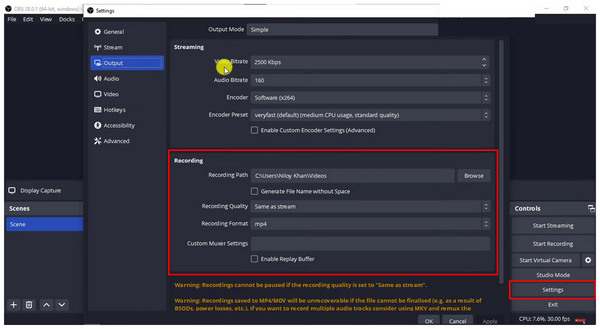
4. Now that your recording source has been added, adjust the Output Settings first. To do this, click on Setting in the lower right corner of OBS Studio. Then, select Output among the settings. In the Output Settings, you can customize the Recording Path where your recordings will be saved, Recording Quality, and Recording Format. Click OK to confirm the settings.
5. Finally, after the Sources, Display, and Output setups, you can start the recording mode. To do this, click Start Recording on the lower right corner of the program right above the Settings.
Although OBS has the most functionality among the programs in this article, this is highly compromised by its complicated settings and complex setup requirements. If you want to use OBS as a screen recorder tool, you must prepare to learn its core function for a while.
Compatibility: Windows 11/10/8/7, macOS 10.13, or later versions.
Unique Functions:
• Beginner-friendly.
• It has a full-screen and screen section recorder.
• High-quality screen recorder.
Output Format: MP4, MKV, AVI, MOV, WMV, WEBM, and GIF.
After discussing the most technically demanding recorder in the second option, we can now proceed to the third solution of recording video with the screen off with another easy-to-use tool, Movavi Screen Recorder. Similar to AnyMP4 Screen Recorder, this program was also designed with ease of use in mind. Fortunately, the software can record high-quality recordings without being too complicated.
Unfortunately, its lack of a menu may be challenging for new users to familiarize since it relies on image-based buttons without text to state their purpose directly. Movavi Screen Recorder might be easy to use, but its button-based functions might confuse first-time users.
1. Open Movavi Screen Recorder and look for its recording overlay on the rightmost part of your screen. Click on the button that looks like a Recording Camera.

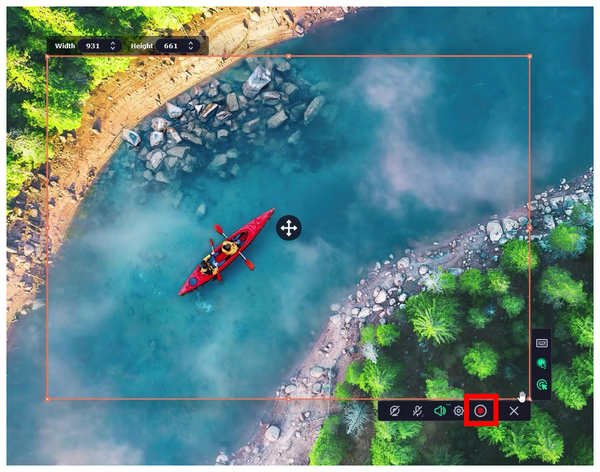
2. Next, select the screen portion you want to record. You can also adjust this to capture the entire screen. Simply move the cursor to scope the whole display.

3. Once you have selected your recording area, click the Record button in the menu. It is a circular button with a red spot in the middle.
4. You can adjust the audio settings in real-time while recording. The microphone and system input may be enabled, allowing you to choose your chosen audio recording mode. To stop the recording, click on the Stop button, the Square button with smooth edges.
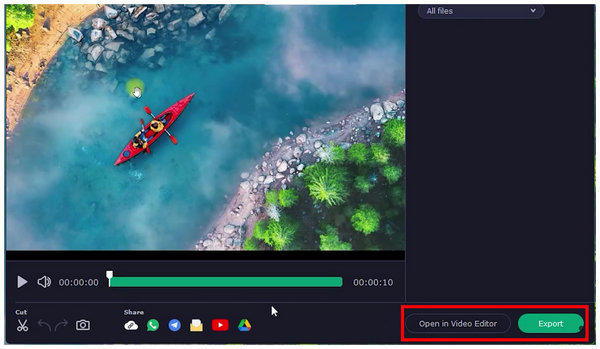
5. Click Export in the post-processing menu to save your recorded footage. In this section, you can also trim the video you recorded. For more advanced editing options, click on the Open Video Editor button.
Movavi Screen Recorder makes for a strong case if you are looking for a straightforward recorder. Unfortunately, its lack of a proper menu similar to AnyMP4 Screen Recorder might be a significant disadvantage. It may make using the program for the first time challenging and confusing.
We hope this article has helped you decide which of the three screen recording programs will work best, depending on your needs and current technical knowledge if you are looking for software that perfectly blends functionality and ease of use, download and try AnyMP4 Screen Recorder.
Secure Download
Secure Download
 Posted by Riley Mitchell to Record Video
Related Articles
 How to Record TV Shows: A Guide for Capturing Your Favorites
Learn how to record TV shows easily using DVRs or screen recording software. Follow our detailed guide to capture and enjoy your favorite programs.
 The Best Roblox Recorder Software For Smooth 60FPS Recording
Read this article to learn how to record Roblox gaming videos at 60PFS that is way better and easier to use than their low resolution built-in recorder.
 2 Easy Ways to Screen Record on Motorola
This post will teach you how to screen record on Motorola using the native screen recording feature and alternative solutions. Find the detailed steps here!
 Record Voice and Sound on Mac in 5+ Straightforward Solution
This guidepost will outline six ways how to record voice on Mac. We’ve curated the perfect toolkit for your internal and external audio recording needs.