The demand for screen recording on Mac and PC has grown over time due to the practicality that screen recordings can provide. Ranging from screen recording for personal needs, content creation, or other similar uses, the popularity of screen recorder software may be linked directly to its practical uses. In this article, we will provide our readers with a full guide on some of the best software to screen record in the background for both Windows and macOS. We will also explore each option’s pros and cons to help you discover which works best according to your needs.
Screen recorders are the only option for capturing live meetings for personal or professional use. Background recording tools may also bypass the security of online meeting apps.
To provide a comprehensive guide or reference for troubleshooting and repair purposes, screen recorders are advisable to provide a clear example of errors that may occur on your computer.
For users interested in content creation, screen recordings are necessary to capture tutorials and gaming-related videos.
It is also advisable to use screen recorder software to track and review your usual digital activity to ensure your productivity.
Finally, the most practical option for using secret screen recorders in the background is to bypass privacy protections, such as black screens on online meeting sites.
Compatibility: Windows 10/11
If you want to learn how to record a screen in the background in Windows 10 or Windows 11, you can reliably use Xbox Game Bar, a newly added feature in these latest versions of Windows.
As its name suggests, the Xbox Game Bar is optimized to capture screenshots and screen recordings of gameplay footage running on your PC. Due to this design, most of its features are optimized to capture action-packed moments, such as the Clip function to record the last 30 seconds of your screen and the in-game record, which only works in Windows outside the desktop and file manager.
Unfortunately, the software's lack of advanced features and editing options hinders its functional use for most advanced users. It can record in the background, but it is severely limited in what software it can record.
PROS
CONS
1. Press Windows + G as a shortcut to open the Xbox Game Bar. In the game bar menu, select the Camera button to open the Capture menu, where you can find the screen recording function.

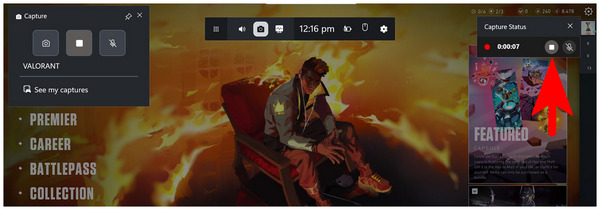
2. Inside the Capture menu, you can find the Record button where the screen recording function can be activated. Before opening the Record button, make sure to open another software first because the recording tool does not work in the desktop or file manager.
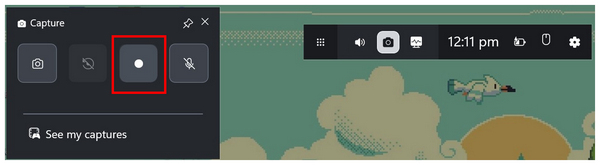
3. Once you have opened another software on your PC, open the Xbox Game Bar once more and activate the Record button. To end the recording process, press the Stop button on the recording display.
If you are an avid gamer, relying on Xbox Game Bar may be enough for usual screen recording purposes. However, we recommend using a third-party tool if you want a screen recorder capable of more advanced features and options.
Compatibility: macOS 10.12 and later versions.
If you are looking for a reliable background recorder for Mac computers, a third-party option is the most advisable due to the limited features that the default QuickTime recorder only offers. In this case, AnyMP4 Screen Recorder for Mac is the best selection for users who want to screen record in the background.
To start, the program's nature as a third-party tool makes it capable of screen recording without the software's knowledge. This makes it a capable recorder even for software designed with privacy protection. The feature to schedule recordings is also available in the program.
Moreover, AnyMP4 Screen Recorder for Mac also supports versatile recording options. Its users can choose among the versatile recording modes, which include system sound recording, microphone recording, and webcam capture. These features are all supported with unlimited recording duration and watermark-free captures.
Finally, the program's versatile recording output is also highly commendable. The wide range of recording options, including MP4, MOV, WMV, MKV, F4V, WebM, MPEG-TS, and GIF, offers much-needed versatility for users.
For a detailed guide about the capabilities of the software, we have provided its pros, cons, and a quick guide on how to use the tool’s screen recording option.
PROS
CONS
For an easier time following our guide, we recommend downloading AnyMP4 Screen Recorder for Mac using the link provided below.
Secure Download
Secure Download
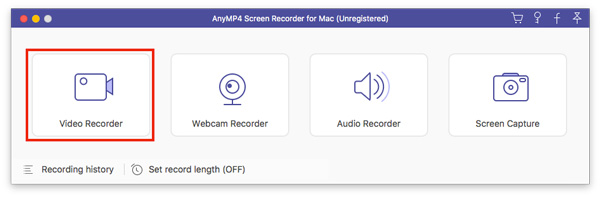
1. Open AnyMP4 Screen Recorder for Mac on your Mac computer. Then, select the Video Recorder mode to use the program’s screen recording option.
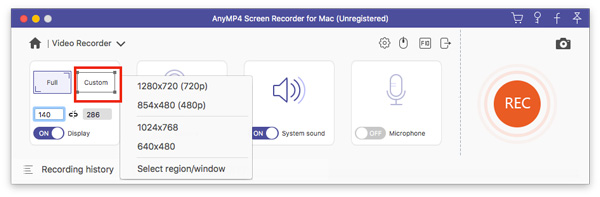
Then, select the region of the screen that you want to capture by choosing either Full Screen mode or one of the Custom resolution options.
2. Next, select the audio capture mode to determine whether your screen recording will capture System Sound, Microphone audio, or both. Simply toggle the On/Off button on each audio capture option.
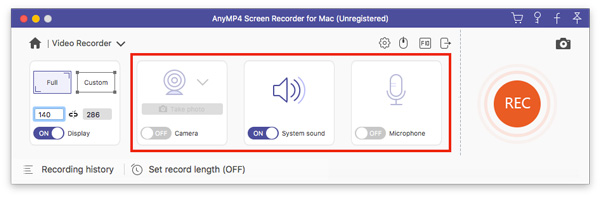
3. Now that you have selected the portion of the screen that will be recorded and the audio capture mode of your screen recording, you can start the recording process by clicking on the REC button.

By following this quick guide, we hope that you have learned how to screen record in the background on Mac computers by running the screen recording tool as a background process. AnyMP4 Screen Recorder's reliability makes it one of the best video recorder software programs for Mac and PC.
With the help of this article guide, we hope that you can now record your screen from the background, no matter what operating system your computer is running. Whether you are using Windows or Mac, we highly recommend using AnyMP4 Screen Recorder due to its compatibility with both platforms.
Secure Download
Secure Download
 Posted by Riley Mitchell to Record Video
Related Articles
 3 Proven Ways to Record FaceTime on Mac and iPhone XR/XS/X or Earlier
In this article we show you how to record a FaceTime call on your iPhone, iPad or Mac. With our guide, you can save important video conversations simply.
 Top 9 Phone Call Recording Apps for Android Phones and Tablets
Phone call recorder apps have a variety of uses, but this feature is not found natively on Android. Here are top 9 phone call recorder apps for Android users.
 A Comprehensive Guide: How to Record Video on Mac
Learn how to record video on Mac computer using third-party and built-in tools. Capture screen activities, record yourself, and create engaging videos.
 3 Ways to Record/Capture Screen on Windows 11/10/8/7
Learn how to record screens on Windows with ease. Follow our comprehensive guide to capture screens using built-in features and third-party tools.