AnyMP4 DVD Creator, the best and powerful DVD burning software, can help users to convert WMV video to DVD, and create DVD folder, DVD ISO file or DVD disc at your fingertips. Before burning DVD, you can edit the videos with multiple editing functions. This guide is for you to introduce how to create DVD with WMV video.
WMV is a video compression format for several proprietary codecs developed by Microsoft. The original video format, known as WMV, was originally designed for Internet applications, as a competitor to RealVideo. The other formats, such as WMV Screen and WMV Image, cater for specialized content.
Secure Download
Secure Download
You can download the versatile AnyMP4 DVD Creator from our website and install it. After the installation, the software should be ready for you to operate.
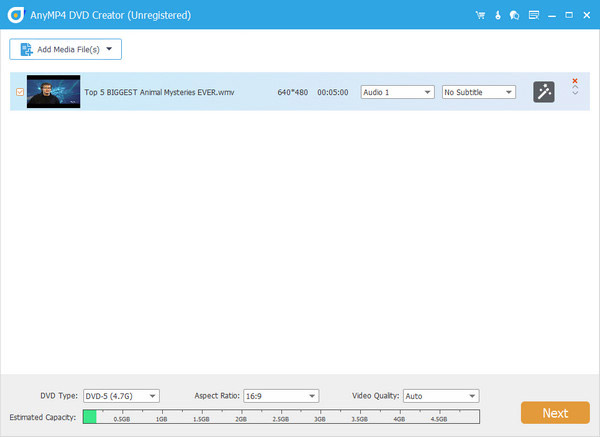
Click the "Add Files" button on the toolbar to load your original WMV video to the program. If you need to add more than one video file, you can select "File > Add Folder".
If you want to create DVD with AVI files, just import the AVI files into this software.
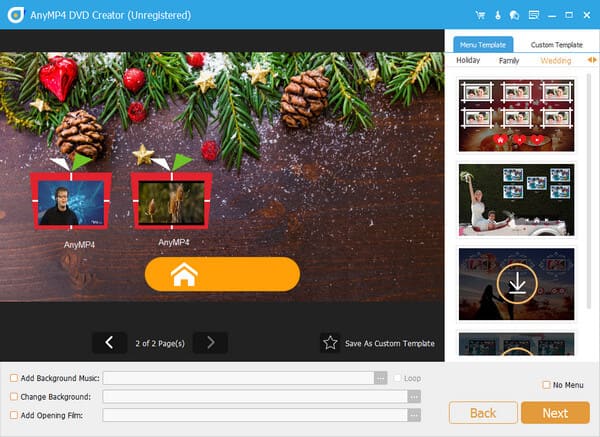
Click "Next" button in the main interface and open the following window, there are multiple templates for you to choose, and you can change the menu frame, menu button and menu text as you like. And then you would select the background music, picture and opening film for your DVD in the "Edit Menu" interface.
In the main interface, you can click the "Audio Track" or "Subtitle" button to open the "Edit Audio/Subtitle" window, and then add your favorite audio track and subtitle for your video. Of course, you can edit the original audio track and subtitle by adjusting the volume, language, latency, subtitle position and font size, etc.

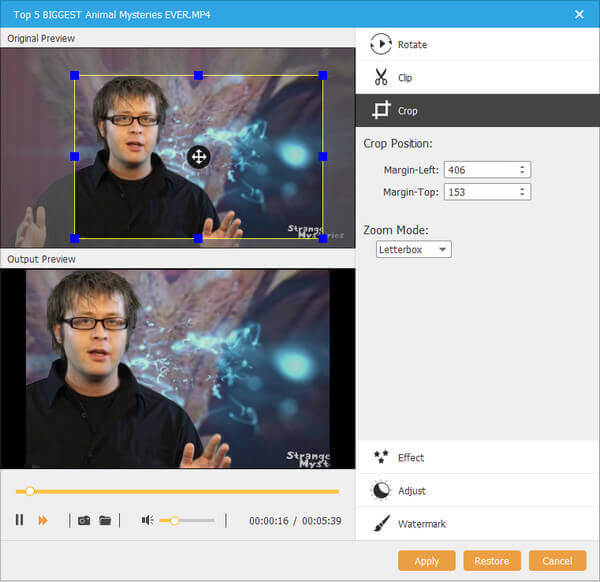
Click "Edit" button and open the "Edit" interface, now you can edit your videos at will, adjusting the video effect, trimming video length, cropping unwanted black edges and adding text or image watermark for your preference. At the same time, you can preview the original effect and output effect.
Back to the main interface after editing the video menu style, you can start to burn DVD with the personalized WMV video. Also, you would create DVD Folder, DVD ISO file, or DVD disc to your preference.

 Updated by Joan Aimee to Burn Blu-ray&DVD
Related Articles
 Best Ways to Play MP4 Video on Google Drive
This article gives you a detailed guide to store and play your MP4 files on Google Drive.
 How to Fix The Issue on VLC Won't Play DVD
How to fix the problems that VLC won't play DVD or VLC DVD player not working?
 Can You Play DVD on Wii with The Easiest Way
Get easiest methods to serve Wii as DVD player, to play DVD on Wii in 2 methods.
 How to Play MP4 on Windows Media Player
Still don't know how to play MP4 on Windows Media Player? You can read this article.