How to Convert MOV to MP4/WMV with FFmpeg (Complete Guide)
Summary
- To convert MOV to MP4 and WMV, you can either use FFmpeg, which converts files on the command line, or the AnyMP4 Video Converter that works with a GUI.
- Method 1: FFmpeg
- 1. To convert in MP4: ffmpeg -i input.mov -c copy output.mp4
- 2. To convert in WMV: ffmpeg -i input.mov -c:v wmv2 -c:a wmav2 output.wmv
- Method 2: AnyMP4 Video Converter Ultimate
- 1. Open AnyMP4 Video Converter Ultimate and click + Add Files.
- 2. Select MP4 or WMV in the Output Format Picker under the Video category.
- 3. Enable Hardware Acceleration and click Convert.
FFmpeg is a free and open-source tool primarily used for command-line processing of video and audio files. It offers many useful features, including video playback, conversion, recording, and more. Most people prefer it for converting MOV files because MOV is an Apple QuickTime file format primarily used on macOS and iOS devices. On the other hand, MP4 is more compatible with Windows PCs, Android phones, smart TVs, web browsers, and social media sites. In this post, we will teach you how to use FFmpeg to convert MOV to MP4 and WMV. What's more, we will introduce you to a great FFmpeg alternative for better conversions. This alternative is ideal if you prefer a graphical interface with faster, hardware-accelerated conversion.

Why Use FFmpeg for MOV Conversions? (Pros & Cons)
PROS
- Available at no cost and maintained actively.
- Can convert multiple MOV files at once using scripts.
- -c copy repackage compatible stream without re-encoding.
CONS
- All operations require typed commands.
- No visual interface for editing the preview or checking the output settings.
- Must learn command syntax, codec settings, and troubleshooting techniques.
Convert MOV to MP4/WMV Using FFmpeg Commands
Basic Syntax for Quick Conversion
The basic command lines below help you easily convert MOV to MP4 in FFmpeg. This command instructs FFmpeg to encode the source to the target using the default settings.
ffmpeg -i input.mov output.mp4
Advanced Commands: Adjusting Quality & Bitrate
There are several advanced FFmpeg commands to manage output quality and size. The -crf (Constant Rate Factor) adjusts video quality: lower values (18-28 for H.264) ensure higher quality but larger file sizes. -preset manages the rate of encoding, which can be set anywhere between ultrafast and very slow. You can also use -c:v or -vcodec libx264 for H.264 or -vcodec libx265 for H.265/HEVC for better compression.
Here’s an example:
ffmpeg -i input.mov -c:v libx265 -crf 22 -preset slow -c:a aac -b:a 128k output.mp4
Batch Convert MOV to MP4 in a Folder
FFmpeg can automatically convert all MOV files in the same directory using a script. To batch convert MOV to MP4 in FFmpeg using Windows, create a .bat file that contains the following line:
for %%i in (*.mov) do ffmpeg -i "%%i" -c:v libx264 -crf 23 "%%~ni.mp4"
On Mac, save the following as a .sh script:
ffmpeg -i "$i" -c:v libx264 -crf 23 "${i%.mov}.mp4"
This script iterates over all MOV files in your directory using a simple bash loop. The script is careful about filenames containing spaces and replaces the file extension with MP4 using string manipulation.
Troubleshooting: Common FFmpeg Errors and How to Fix Them
- No such file or directory
This problem happens when FFmpeg is unable to locate the input file that you provided on the command line. You can solve this problem by ensuring you have entered the filename correctly and that you have changed the terminal's working directory to the folder containing the file.
- Codec not found
It means that when you compiled the FFmpeg, you did not include the encoder you are requesting. You can fix this by ensuring you spell the codec correctly, updating FFmpeg, or running ffmpeg -codecs to see a list of other options. Meanwhile, if your file is unplayable, check this guide: FFmpeg fix corrupted video.
- Missing Audio
In case your output file doesn’t have any sound, then there is a possibility that the output container selected by you doesn’t support the format of the audio in the input file. You can fix the FFmpeg MOV-to-MP4 no-audio issue by specifying a universally accepted audio codec.
- Incorrect File Paths
FFmpeg will fail to execute if your file paths contain unescaped spaces or special characters that confuse the command line interface. The simplest solution is to wrap your entire input and output file paths in quotation marks, such as C:\My Videos\input.mov.
- Unsupported Codecs in MP4
The MP4 file format offers strong interoperability. However, if you want to duplicate your file directly in WMV or ProRes format without transcoding, it won’t work. To get rid of this problem, you need to avoid using -c:v copy and use -c:v libx264 instead.
A Simpler Way: Convert MOV to MP4/WMV with an FFmpeg Alternative
If you are having trouble using commands or troubleshooting terminal errors, it is better to use an alternative. Unlike the FFmpeg MOV-to-MP4 command-line method, AnyMP4 Video Converter Ultimate offers an intuitive GUI. It uses the most advanced hardware-accelerated media processing to convert at 120× speed. It can convert HD and 4K MOV videos to MP4, WMV, and 500+ other media formats. It also supports batch conversion, letting you process hundreds of videos at once without lag and crashes.
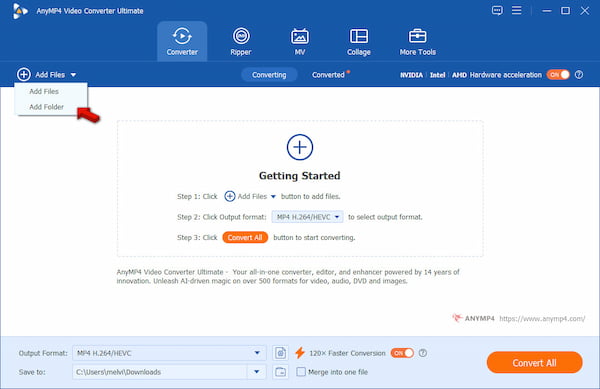
1. Download AnyMP4 Video Converter Ultimate and complete the setup process. After installation, it will launch automatically. Click +Add Files to add the MOV sources from your computer. If you have multiple MOVs saved in a single folder, use Add Folder instead.
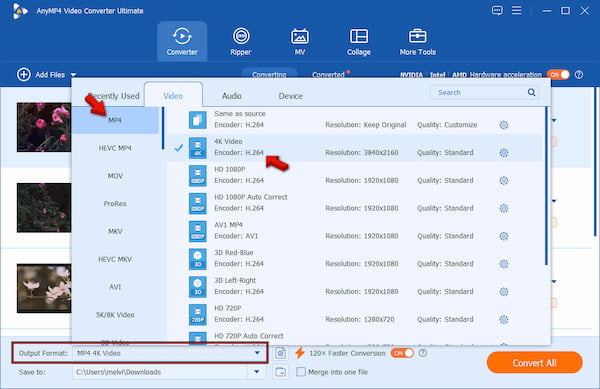
2. Click the Output Format picker and select MP4 in the Video category. Essentially, select a profile preset that matches the quality of your source file. For example, if your source MOV is 4K, then select the 4K Video preset.
3. Return to the main interface and toggle Hardware Acceleration. Also, enable the 120× Faster Conversion button to speed up the conversion. Go to Save To, set the output path, then click Convert All to encode MOV to MP4 to your selected profile preset.
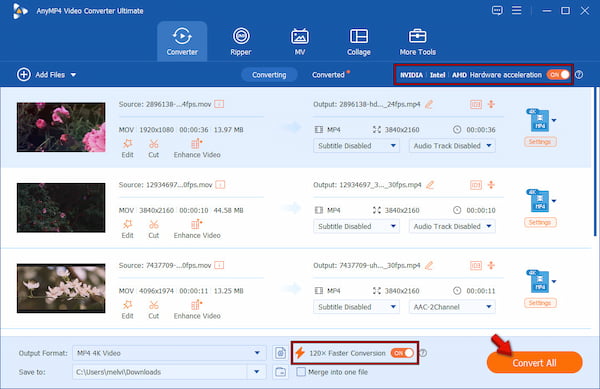
We put AnyMP4 to the test to assess its speed, batch conversion, and quality. In our test, we use 50 MOV videos, totaling 1.13 GB. It took only 2 minutes and 45 seconds to convert MOVs to MP4s using the 4K Video preset. In our video quality assessment, there is no degradation in the quality after the conversion since we used the same preset as the source.
Comparison Table: FFmpeg vs. AnyMP4 Video Converter Ultimate
| FFmpeg |
VS |
AnyMP4 Video Converter Ultimate |
| Command‑Line Interface (CLI) |
User Interface |
Graphical User Interface (GUI) |
| ❌ |
Video Preview |
✅ |
| ✅ Folder loops/scripts |
Batch Conversion |
✅ Native support |
| ✅ Manual configuration |
Hardware Acceleration |
✅ Built‑in GPU acceleration with automatic optimization |
| High learning curve |
Ease of Use |
One‑click conversion |
FAQs about MOV to MP4 Conversion
What is the exact FFmpeg command to convert MOV to MP4 without losing quality?
To convert MOV to MP4 without quality loss in FFmpeg, use ffmpeg -i input.mov -c copy -c:a aac output.mp4. This method uses stream copying (-c copy), which instantly repacks the media tracks without re-encoding them.
How to fix FFmpeg MOV to MP4 conversion showing no audio?
To fix the missing audio, use FFmpeg to re-encode the audio to AAC, which is well-suited for MP4 containers, with -c:a aac. Avoid -c copy if the audio codec used in your MOV file is not natively supported in MP4.
How to batch convert all MOV files in a folder to MP4 using FFmpeg on Windows?
Go to your CMD window, then navigate to the video folder and enter for %i in (*.mov) do ffmpeg -i "%i" -c:v libx264 -c:a aac -pix_fmt yuv420p "%~ni.mp4". This command will re-encode the files to H.264 and AAC.
Is FFmpeg better than HandBrake for MOV to WMV conversion?
Yes, FFmpeg is clearly a much better option for converting MOV to WMV. HandBrake does not support WMV output. It can only output MP4, MKV, and WebM formats.
How to speed up MOV to MP4 conversion in FFmpeg using GPU acceleration (NVIDIA)?
To accelerate the conversion of MOV files to MP4 with an NVIDIA graphics card, use the video encoders h264_nvenc or hevc_nvenc with the -hwaccel cuda parameter. It makes the entire decoding/encoding process run on the hardware.
Why is my MOV file so large, and how can FFmpeg compress it to MP4?
MOV files tend to be large because they contain high-bitrate video and uncompressed or lossless audio. To compress video in FFmpeg when converting it to MP4, use: ffmpeg -i input.mov -c:v libx264 -crf 23 -preset medium -c:a aac -b:a 128k output.mp4.
Conclusion
You now have everything you need on how to convert MOV to MP4 with FFmpeg and FFmpeg MOV to WMV via both basic and advanced command lines. FFmpeg is a great option for those who need full control over their media files. However, it is also quite difficult for newcomers due to its command-line interface and troubleshooting. However, if you need a simpler solution, you should consider AnyMP4 Video Converter Ultimate. It provides you with an intuitive interface, batch conversion, and GPU acceleration.






 Add your comments to join the discussion here