There are many reasons why someone might want to slow down a video: perhaps to highlight a scene, study motion in detail, or simply create a more dramatic effect. QuickTime Player makes it easy to slow down videos without requiring advanced video editing software. However, many users aren’t aware of how to access or utilize this feature. This post will guide you through the basic steps to use slow motion in QuickTime Movies. We will show you how to adjust playback speed and preview the results effortlessly. By the end, you’ll understand how to use QuickTime’s built-in tools to slow down your clips easily.

QuickTime Player is Mac's built-in tool for viewing and performing basic video editing. You can slow down a video in QuickTime to analyze details or create a cinematic scene. However, slow-motion playback only works if your original video was recorded at a high frame rate.
Here’s how to use slow motion in QuickTime movies:
1. In QuickTime Player, open the video you want to slow down. Click the Play button in the playback controls to start the video before making adjustments.
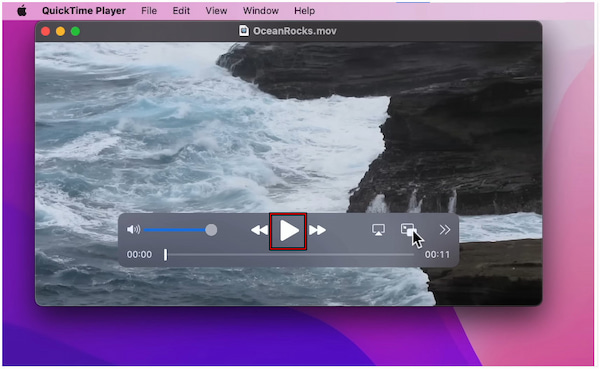
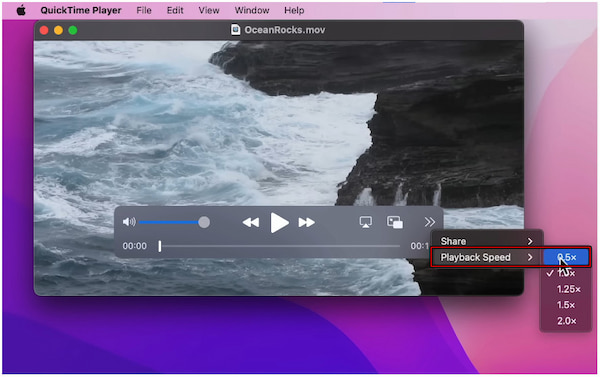
2. Navigate to the menu bar and click the double arrow pointing right. Click Playback Speed and select 0.5× to make your video play at half speed.
QuickTime Player offers a simple method to adjust video speed and play it in slow motion. However, if you open a 30fps video, the slow-motion options won’t be available because there aren’t enough frames to display smooth motion.
The A/V Controls feature allows you to slow down part of a video in QuickTime. It brings up a slider where you can adjust the playback speed to less than 1.0×. However, lowering playback speed for low-frame-rate videos may result in choppy or uneven motion.
Here’s how to slow down a movie in QuickTime:
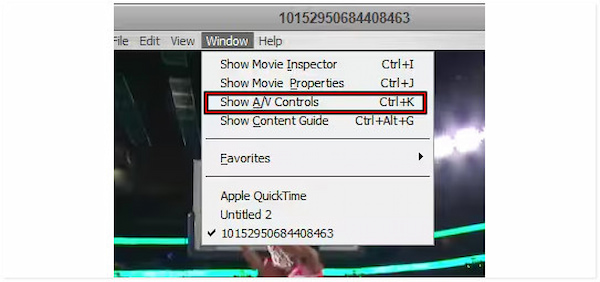
1. Open the video you want to change the playback speed in QuickTime. When the video starts playing, pause it and navigate to the Window tab. Select the Show A/V Controls option or press Ctrl/Cmd+K to open the A/V controls window.
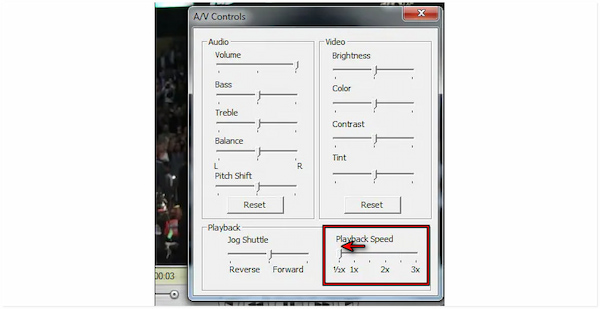
2. In the A/V Controls window, locate the Playback Speed slider. Drag the slider to the half-speed option to reduce playback speed. Close the A/V Controls window and play to preview your video in slow motion. If the clip was originally low FPS, the motion may appear choppy.
Important Note: Remember, QuickTime only changes the playback speed, not the actual file. To edit QuickTime video and create a permanent, smooth, and exported slow-motion file from a standard 30fps clip, you need dedicated editing software.
QuickTime’s slow-motion feature only works properly on videos recorded at a high frame rate. If your video was recorded at 30fps or lower, the slow-motion control may not appear. Use a high-frame-rate video or convert your clip for smoother results.
If the slow-motion controls are missing, you can manually adjust the playback speed. In the A/V Controls panel, drag the Playback Speed slider left to reduce speed. This manual control works even for standard frame-rate videos, although playback may appear laggy or uneven.
Slow playback can also occur if your computer is running too many background processes. Close unused applications to free up RAM and CPU. Also, try playing the video from your local drive instead of an external device or network.
QuickTime struggles with certain video codecs and formats. Convert your video to a compatible format, like .mov or .mp4. Then reopen it in QuickTime and retest the playback speed. If QuickTime still fails to produce the desired slow-motion results, consider using alternatives.
QuickTime movie slow motion is not permanent. If you want to create and export smooth slow-motion videos at custom speeds, AnyMP4 Video Converter Ultimate is an excellent tool. It is an all-in-one media software bundle compatible with Windows and Mac. In addition to its primary function, it offers a professional Video Speed Controller. It lets you slow down videos to 0.75×, 0.5×, 0.25×, or 0.125×. It also includes a preview window for you to see the video effects of each option. You can import over 500+ media inputs, including QuickTime Movie or MOV format. By then, you can export the slowed-down video in MP4, MOV, WMV, AVI, MKV, and GIF formats.
Here’s how to save movie in slower speed in QuickTime alternative:
1. First things first, secure the free download of AnyMP4 Video Converter Ultimate. Install the QuickTime slow-motion creator and complete the setup process. Once finished, run the software to initiate the video speed adjustment process.
Secure Download
Secure Download
2. As soon as it opens, you’ll be headed to the Converter tab by default. To access the video speed controller, switch to the More Tools tab and locate the Video Speed Controller tool. Click it to import the QuickTime movie you want to slow down.
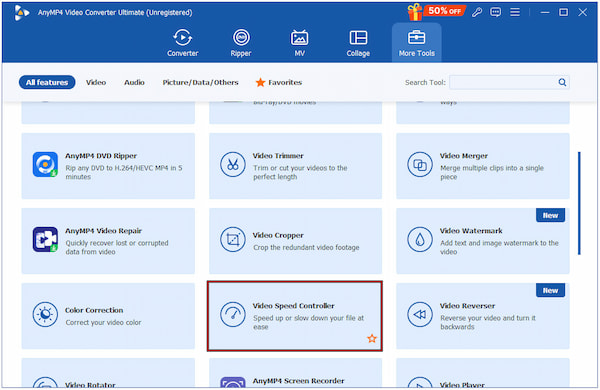
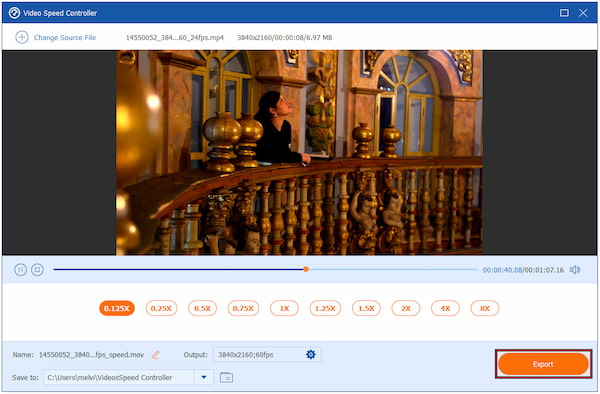
3. In the Video Speed Controller window, you’ll see a range of playback speed options. Select the desired slow-motion preset that matches your creative goal. You can choose from 0.125×, 0.25×, 0.50×, and 0.75×, depending on how much speed you want to reduce.
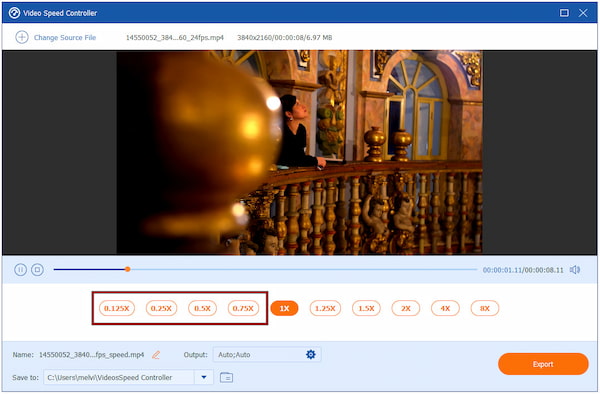
4. Use the Preview Window to watch how the video looks at different speeds. If needed, click the Output selector to adjust video and audio settings for a more customized result. Once you’re satisfied, click Export to render and save your new slow-motion video.
AnyMP4 Video Converter Ultimate offers flexible speed options for slow-motion video. You can easily adjust playback speed from 0.125× up to 0.75× and preview changes in real-time. Beyond just slowing down videos, it provides over 20 editing tools, including MV Maker and Converter.
Which FPS is best for slow-motion video?
The best frame rate for slow-motion videos is 60fps or higher. For example, a 120fps clip can be reduced to half or even a quarter of its original speed while maintaining natural, fluid motion.
Can I change the frame rate in QuickTime?
No, QuickTime Player does not allow you to change a video’s frame rate. It can only adjust playback speed, meaning the video will play faster or slower temporarily.
Is 30 or 60 fps better for slow motion?
60fps is much better than 30fps for slow motion. A higher frame rate captures twice as many frames in the same amount of time. This allows for smoother playback when slowed down.
Mastering how to use slow motion in QuickTime Movies is an effective way to emphasize details or analyze motion in your videos. With QuickTime Player’s playback controls, you can easily change the speed of your video playback. However, QuickTime’s slow-motion feature is limited to temporary playback. Additionally, it doesn’t allow you to export or customize slow-motion effects permanently. For a more advanced and flexible solution, try AnyMP4 Video Converter Ultimate. It lets you slow down videos from 0.125× to 0.75× and export them in various formats.
Secure Download
Secure Download
 Updated by Mark Cristobal to Edit Video
More readings
 2 Easy Ways to Speed Up Video in QuickTime for Faster Playback
You can learn two ways with detailed steps to speed up videos in QuickTime easily, which will save time when watching long videos, tutorials, meetings, etc.
 How to Loop Video in QuickTime Player: Step-by-Step Tutorial
Do you want to learn how to use QuickTime to loop videos? Read this article to learn how to loop a video on Quicktime Player and discover its limitations.
 Actionable Tutorial to Slow down a Video in iMovie on iPhone/Mac
To change the speed of a clip in iMovie on an iPhone or a Mac computer, start by reading our concrete guide and following the steps to get what you want.
 Slow Down a Video on Instagram Using Built-in & Editing Tool
Want to slow down a video on Instagram but don’t know how? Check our guidepost to learn how to use Instagram’s slow-motion features and using third-party tools.