Freezing a frame has become a popular editing technique to create visual pauses in videos. Many editors often ask, How do you create a freeze frame? especially when working in professional software like DaVinci Resolve. In this post, we’ll guide you through the process of creating a freeze frame in DaVinci Resolve. We’ll cover multiple methods to suit different editing needs and skill levels. Our goal is to provide you with clear, practical instructions. This way, you can confidently apply this effect to your own projects, regardless of your purpose.

A freeze frame is a single still image from a video clip in your timeline. It is much like taking a screenshot and using that frame as a static image within your edit. In DaVinci Resolve, you can extend this frame in the timeline to hold a specific moment for as long as needed. For example, you might use it to apply effects, add motion graphics, or layer compositing elements. It’s also valuable in color grading, allowing you to isolate and reference a frame while making adjustments.
Why Need to Freeze Frame:
The simplest and most versatile method to freeze frames is through the Retime Controls feature. It lets you capture a still moment and speed up or slow down the surrounding clip. If you want to achieve stylistic effects in your projects, this technique can add professional results.
Here’s how to freeze frame in Davinci Resolve:
1. In the Edit tab, right-click the clip you want to freeze a frame and choose Retime Controls. Alternatively, press Cmd/Ctrl + R keys to quickly enable Retime Controls.

2. Once activated, you’ll see a series of blue arrows and a black arrow in your clip. Click the Black Arrow to reveal options for changing speed, speed ramping, and more.
3. Move the playhead to the exact frame you want to freeze to turn it into a still image. From the black arrow menu, select Freeze Frame to insert a still frame at the playhead position.
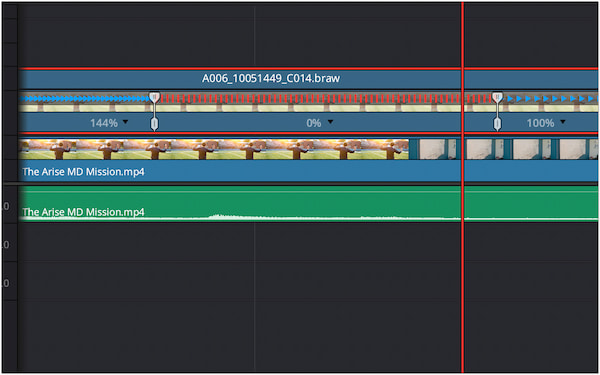
This is how you can make a freeze frame in DaVinci Resolve. The frozen frame will be highlighted in red in the timeline, indicating it is a static image. For users who only want a quick still without speed adjustments, this method may feel more complex.
Exporting a still frame in DaVinci Resolve is another effective method. This approach creates a permanent image file that can be reused across projects. It involves a few more steps compared to simpler methods.
Here’s how to create a freeze frame in Davinci Resolve:
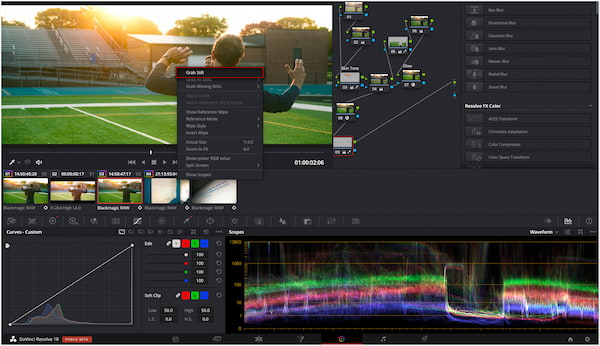
1. Move your playhead to the exact frame you want to freeze in your timeline. Click the Color tab in the lower section to switch to the Color Workspace.
2. Right-click directly on your footage preview and select Grab Still to capture the frame. Click the Gallery button to open your stills collection and locate your captured frame here.
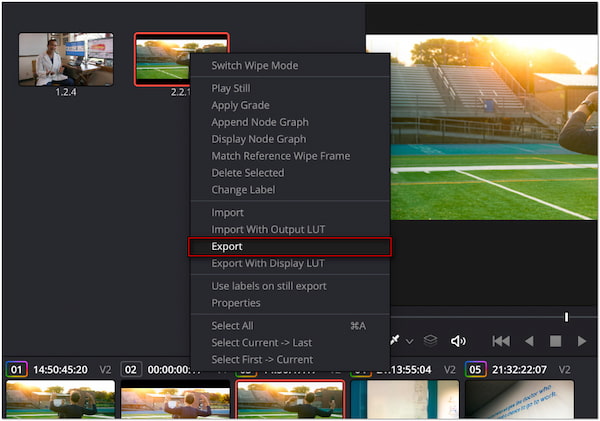
3. Right-click the still image and choose Export from the menu to save it as an image file. You can also use it as a reference frame or import it back for a permanent freeze frame.
This method allows you to add a freeze frame in DaVinci Resolve by exporting a still image. In addition to freezing a clip, it creates a permanent, high-quality image file. This process is a bit more time-consuming than in-timeline freeze methods.
DaVinci Resolve offers professional tools for creating freeze frames. However, its complexity can make it overwhelming for non-professional users. A simpler, more beginner-friendly option is AnyMP4 Video Converter Ultimate. It is compatible with both Windows and Mac operating systems. It lets you easily freeze a specific video frame by combining a paused video moment with a still image. You can then export your final video in over 500 formats, including MP4, MOV, AVI, etc. Additionally, it allows you to adjust the frame rate, resolution, quality, and download location.
Here’s how to make a freeze frame in DaVinci Resolve alternative:
1. Start by downloading the AnyMP4 Video Converter Ultimate for free. Install the freeze frame editor on your Windows or Mac and complete the installation process. Once finished, run the software to start creating your freeze-frame effect.
Secure Download
Secure Download
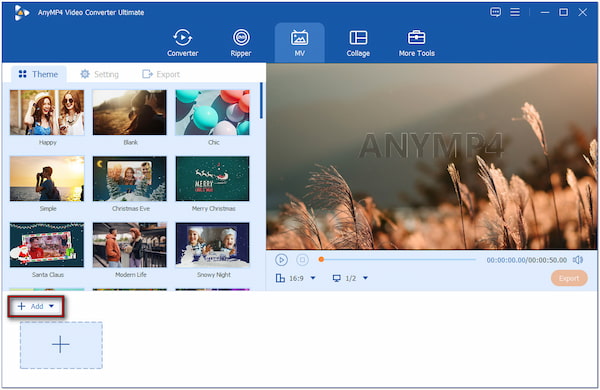
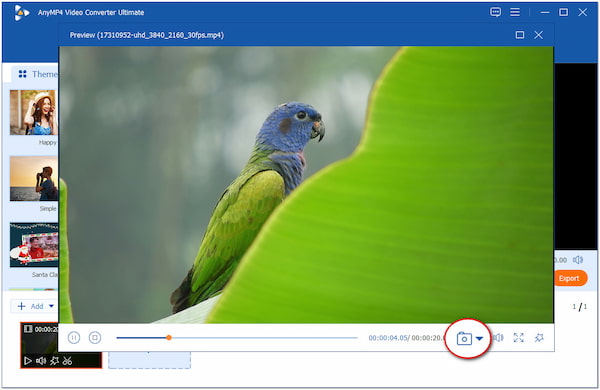
2. When the program launches, it will open in the Converter tab by default. To access the freeze-frame features, switch to the MV tab. Click Add to import your video clip for editing. In the preview window, play your video and pause it precisely at the frame you wish to freeze.
Important Note: Before capturing the freeze frame, trim the clip so that only the segment of the video before the desired freeze point remains. This ensures accurate placement of the freeze frame effect in your video.
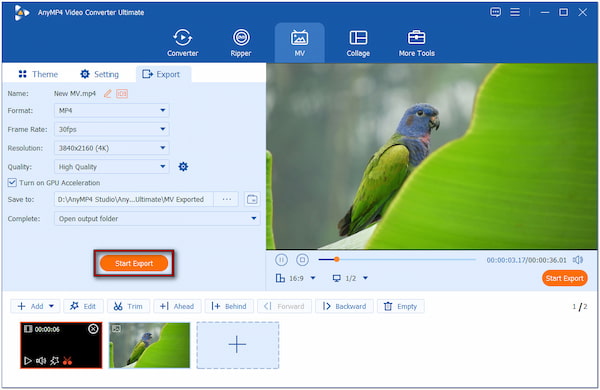
3. With the video paused at your chosen frame, click the Snapshot tool to capture a still image. Once captured, click the + button beside your video clip to import this still image into the MV editor. Select the still image in the timeline and click on the Clock button to adjust its duration, extending the freeze-frame effect as needed.
4. Switch to the Export tab to configure your output settings. Select the desired format, frame rate, resolution, and quality, and specify your download folder in the Save To field. Click Start Export to render and save your video with the freeze frame applied.
AnyMP4 Video Converter Ultimate offers a much simpler approach to creating a freeze-frame video effect. It allows you to pause at the exact frame, capture it as a still image, and extend its duration to create the desired effect. Although DaVinci Resolve is one of the best free editing software options, its technicalities cause users to seek more user-friendly tools.
Creating a freeze frame in DaVinci Resolve is a versatile technique that can enhance your videos. Whether you use Retime Controls, export a still frame, or select third-party solutions, you have the tools to achieve professional results. For a faster or more beginner-friendly alternative, AnyMP4 Video Converter Ultimate is also available. It offers an intuitive workflow for freezing frames, exporting in multiple formats, and customizing output settings with ease.
 Posted by Mark Cristobal to Edit Video
More readings
 5 Easiest Ways of Turning a Clip Into Loop Video
Want to make a looping video to get noticed on social media? But don't know how and where? Learn here different approaches on how to loop a video successfully.
 How to Edit Videos on Windows 7/8/10/11 [Detailed Guide]
If you are a beginner exploring video editing on Windows, you are certainly in the right place! Discover the best Windows video editor here and how they work.
 VLC Rotate Video Temporarily and Permanently
Are you wondering how to rotate a video in VLC Media Player? Is it possible? Everything you need to know is here. Check it out!
 How to go Viral on Instagram
Struggling to gain popularity on Instagram? Want to learn how you go viral on Instagram? Discover the best tips and tricks we have listed in this post.