Color plays a very important role in our videos. Color grading and color enhancement are features that help videos achieve better visual effects and emotional expression. In the past, due to technological limitations, we could only rely on adjusting the lighting color grading at the time of shooting. Nowadays, many tools can help with color grading, and DaVinci Resolve is one of the popular ones. This article will introduce DaVinci Resolve color grading. Keep reading to learn more!
Color grading is a method of enhancing and changing the color of a video to achieve a desired aesthetic or to convey a specific mood, tone, or feeling. It stylizes the footage and allows the editor to emphasize certain elements or tones in the footage to help make the viewer know what kind of feelings are being generated when they see the scene. In DaVinci Resolve, color grading allows filmmakers or editors to manipulate color, contrast, and brightness to create visually stunning footage.
DaVinci Resolve is a top-tier video editing software that combines professional tools with a user-friendly design. It’s especially known for its powerful color grading features, used in major film productions. Whether you're a beginner or a seasoned editor, DaVinci Resolve delivers precision, flexibility, and cinematic results.
The DaVinci Resolve Color Page is where you perform color correction and color grading on your video footage. It uses a node-based workflow, which is a powerful and flexible way to apply and manage effects. Here's a breakdown of the key elements:
• Viewer: The viewer is the main display area where you see your footage. It's not just a simple playback window; it's a real-time preview of your color adjustments. As you make changes to a clip, the viewer immediately updates to show you the result. You can also use it to compare shots, view different versions of a grade, or use tools like the Power Window to mask specific areas for localized adjustments.
• Scopes: Scopes help you check your video’s color and brightness using graphs and charts. They give you accurate info that your eyes might miss, especially if your screen isn’t perfect. Common scopes include ones that show brightness levels, color balance, and how strong the colors are. They help make sure your video looks right on any screen.
• Nodes: Nodes are like building blocks for color changes. Each one handles a different tweak—like brightness, contrast, or skin tones. They’re laid out like a flowchart, so you can keep changes separate and easy to adjust without messing up the rest of your work.
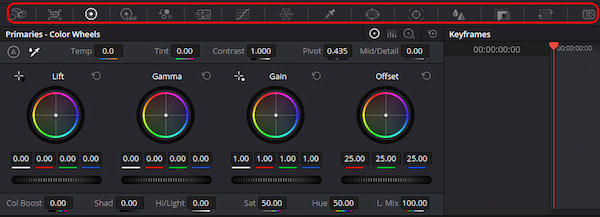
• Color Wheels: Color wheels let you change the look of your video by adjusting shadows, mid-tones, and highlights. You move a dot around the wheel to shift the color, and you can also brighten or darken each part. It’s a powerful way to fine-tune how your video feels and looks.
Color grade is critical in storytelling because it can evoke emotion, set the tone, and unify the visual style of the video project. As DaVinci Resolve is a professional program and has a complex function, we will introduce how to color grade in DaVinci Resolve.
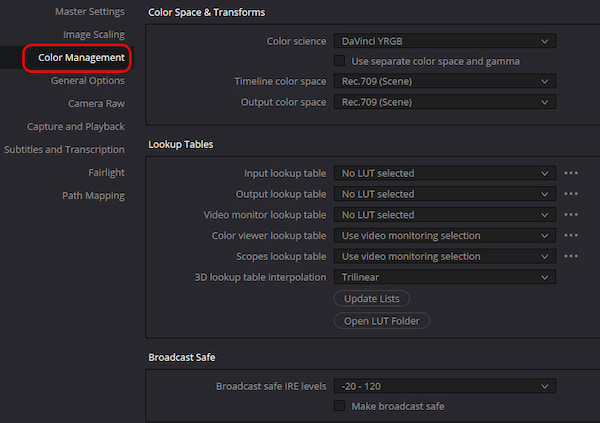
1. Import your footage into DaVinci Resolve. And click the setting gear button.

2. After entering the settings, choose the Color Management part; these options enable you to set various settings that will influence how DaVinci Resolve handles your footage.
3. To start editing, drag your clips into the timeline. Then, navigate to the Color Workspace located at the bottom of the interface to access the color grading tools.
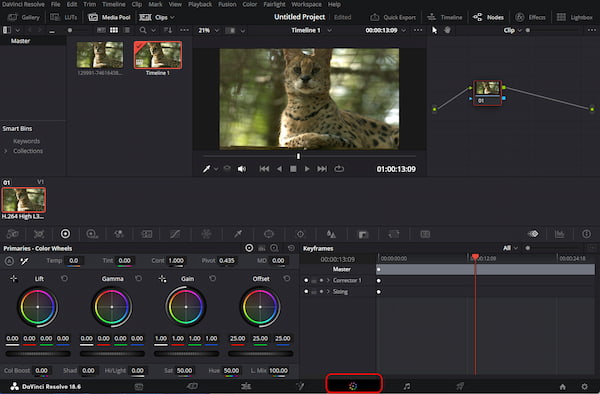
4. You can choose from many color grade options, so adjust your video color according to your needs.
DaVinci Resolve’s color grading is super powerful and gives us lots of control over how our videos look. We can tweak shadows, highlights, and tones to get the exact mood we want, and the results always look sharp and professional. The downside is that it takes time to learn color grade video and needs a strong computer to run smoothly. But once you get the hang of it, it will become one of your favorite tools for making your videos stand out.
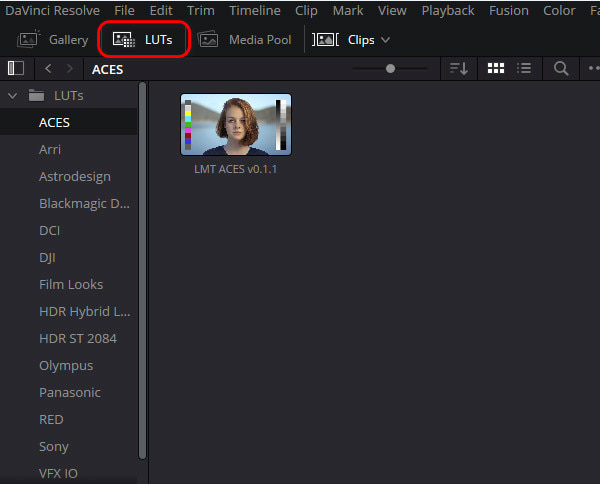
If you are looking for a more advanced DaVinci Resolve color correction function, you can access the LUTs part and utilize LUTs to quickly attain a desired aesthetic. DaVinci Resolve offers a range of LUTs that can replicate film stocks or help craft unique, stylized appearances.
To make your editing easier, let’s follow us to learn some tips and tricks.
LUTs: A LUT is a file that contains a set of instructions for mapping color values. Think of it as a pre-packaged color grade or preset. Instead of manually adjusting color wheels and curves to achieve a certain look, you can apply a LUT to instantly transform your footage. There are two main types: technical LUTs and creative LUTs. LUTs are a great starting point, but they often require further finessing with your grading tools.
Node Tree Structure: While you can put all your adjustments on a single node, a more organized and professional approach is to use a structured node tree. A common best practice is to separate your workflow into different nodes for specific purposes. A good flow might look like this:
• Node 1: Correction: This is for your primary adjustments. You'll perform your initial color correction here, fixing things like exposure, white balance, and contrast to get a neutral, balanced image.
• Node 2: Look: Once the shot is corrected, you add the creative grade here. This is where you apply your stylistic choices, such as adding a specific color tone, a subtle glow, or a film-like aesthetic.
• Node 3: Secondary: Use this node for any localized adjustments. If you need to brighten a face, isolate a specific color, or add a vignette, this is the place to do it.
This structure helps you easily revisit and adjust a specific part of your grade without affecting the others.
Matching Clips: Achieving a consistent look across multiple clips in a sequence is crucial. Fortunately, Resolve has a built-in feature to make this easy. To match clips, you can use the Color Match tool or simply copy and paste a grade. A common workflow is to:
1. Find the best-looking shot in your sequence and grade it to perfection.
2. With that clip selected in the timeline, right-click on the clip you want to match.
3. Select 'Shot Match to This Clip' from the context menu.
Resolve will analyze the two clips and automatically adjust the color, contrast, and brightness of the new clip to match the reference. You can then fine-tune the grade with manual adjustments. For scenes with similar lighting, you can also copy the grade from one clip and paste it to others using the middle mouse button.
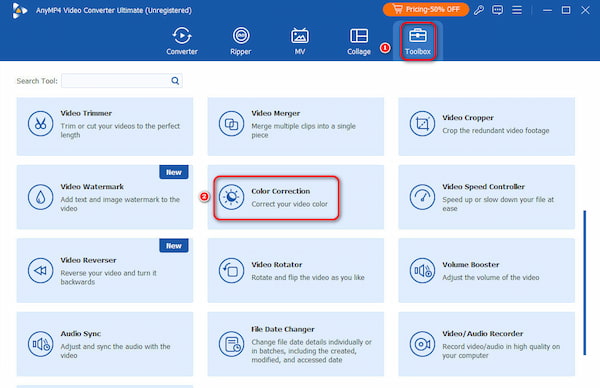
Further, we are going to introduce you to a DaVinci Resolve alternative, AnyMP4 Video Converter Ultimate, for color grading videos. The software has an easy and clear interface, allowing you to easily master its usage. It has a professional Color Correction tool for you to adjust video colors via Contrast, Saturation, Brightness, and Hue. With just a several clicks, you can make your video more colorful, and you can see the effects in the preview window. What's more, it supports a wide range of video and audio input and output formats, including almost all common and uncommon formats. It also includes many types of video editing tools, like video enhancer, video reverser, etc., which you can make your videos perfect using this one tool. Try it on Mac and Windows!
Recommendation
The guide on how to use it to grade videos is as follows.
1. Download this program and run it on your desktop; click the Toolbox section. Choose Color Correction.
Secure Download
Secure Download
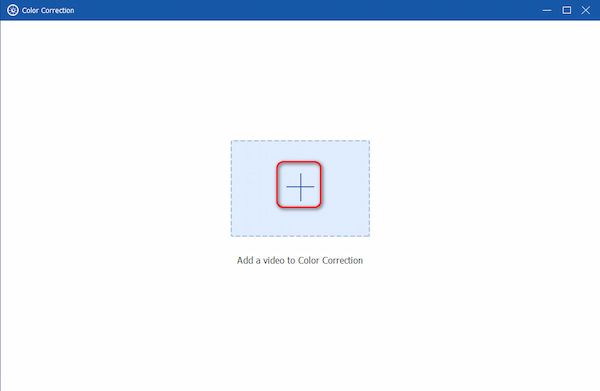
2. After entering this magic tool, add a video you want to correct the color. Click on the plus button to import the video you want to adjust the color of.
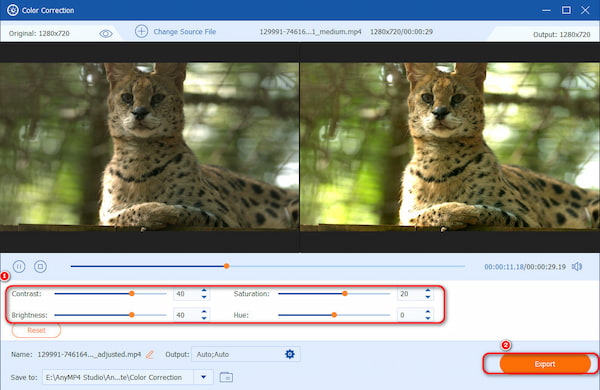
3. This function allows you to adjust the Contract, Brightness, Saturation, and Hue of your video. When you have achieved the ideal setting, click Export to save your work.
This software is easy to use and provides a clear layout, which enables us to easily locate and navigate to the desired function. Though the trial version is limited, you can try it first to decide whether to subscribe to it or not. Go ahead.
The color correction function can help you make your video more beautiful and attractive. It is also a comprehensive video converter. Give it a try, and you will never get rid of this convenient tool.
Is DaVinci Resolve Free for color grading?
Yes, the free version of DaVinci Resolve offers an extensive suite of professional color grading tools.
What is a 'node' in DaVinci Resolve?
A node is one part of the color fixing process in DaVinci Resolve. Think of it like a step or layer where you make a change, and then pass the video along to the next step. These steps are linked together like a flowchart, helping you build up your final look piece by piece.
What does Ctrl + B do in DaVinci Resolve?
In the Edit page, Ctrl + B (or Cmd + B on Mac) is a shortcut to "razor" or cut a clip at the playhead.
All in all, this article provides detailed and effective steps for DaVinci Resolve color grading. With this article, you can easily use DaVinci Resolve to adjust the video color to make it more attractive. Moreover, we offer AnyMP4 Video Converter Ultimate as an easy alternative to color-grading videos, which is suitable for casual users. If you are posting videos to social media, try these effective video editing tools to make them more eye-catching!
 Updated by Mark Cristobal to Edit Video
More readings
 Color Grading in Premiere Pro to Fix Video Visual Effect
Check this and learn the secrets of color grading in Premiere Pro with this guide. Elevate your editing skills and create visually captivating content.
 Invert Colors on iPhone – Save Your Eyes from a Bright iPhone Screen
How do you use the invert color on your iPhone to protect eyes and save the battery? Here is how to invert colors on iPhone or enable dark mode with ease.
 How to Reverse a Video in DaVinci Resolve: Complete Guide
Do you want to learn how to play a clip in reverse in DaVinci Resolve? Read this article for a complete guide on how to apply this effect using two options.
 3 Best Methods to Sync Audio and Video in DaVinci Resolve
Get into this post and learn our easy-to-follow guides to sync audio and video in DaVinci Resolve. Also, discover troubleshooting tips when sync fails.