In video editing, precisely synced audio and video are essential for delivering a polished project. Unaligned sound distracts viewers and diminishes the quality of your work. DaVinci Resolve is renowned for its robust editing tools, available in both a free edition and a feature-packed Studio version. DaVinci Resolve offers several methods for achieving reliable audio-video synchronization. In this post, you’ll discover proven techniques to sync audio and video in DaVinci Resolve, effective troubleshooting strategies, and expert tips to ensure your projects always sound as sharp as they look.
DaVinci Resolve 18 includes an Auto Sync Audio feature that quickly aligns separate audio and video recordings. By using it, you let the software analyze your media and automatically match the correct audio to the corresponding video clips. This saves time and improves editing accuracy.
Here’s how to auto-sync video and audio in DaVinci Resolve:
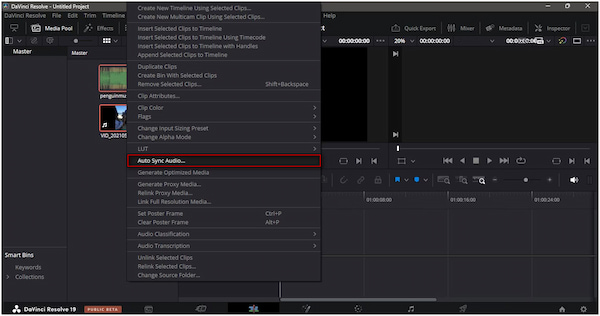
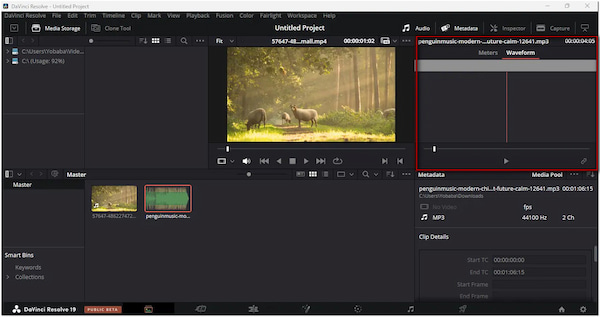
1. In the Media Pool, add the video and separate audio files. Hold Ctrl/Cmd and select the video and its corresponding audio clip. Right-click the selection and select Auto Sync Audio.
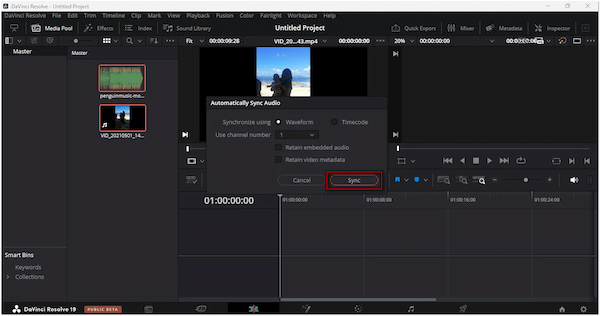
2. In the Auto Sync Audio options, choose Based on Waveform or Based on Timecode. Click Sync to apply, and then drag the synced clip from the Media Pool to your timeline.
Auto Sync Audio efficiently matches separately recorded audio to video footage. Waveform- or timecode-based syncing enables exact synchronization. However, waveform syncing can be inconsistent if the reference audio lacks clarity.
Though the auto-syncing feature is convenient, there are situations where manual syncing is necessary. Manual syncing allows you to precisely align external audio with video. It works by identifying a clear sync point in both files and linking them together.
Here’s how to sync audio and video in DaVinci Resolve manually:
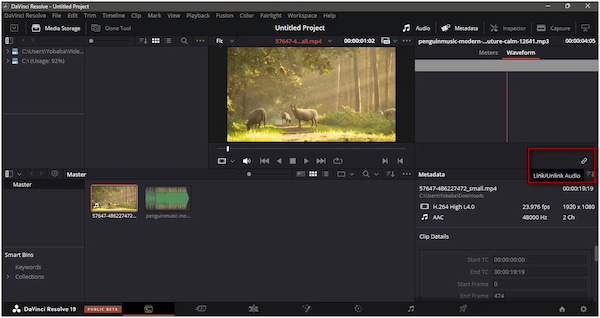
1. In the Media tab, double-click the video clip to open it in the preview window. Scrub through the footage to find a recognizable sync point.
2. Double-click the audio clip to open it in the preview panel. In the Audio Window, select Waveform and use the slider to locate the matching sync point in your audio file.
3. Click back the video clip in the Media tab. In the Audio Window, click the Link/Unlink Audio button. This will link the external audio to the video based on your selected sync points.
Manual syncing is a dependable method for aligning video and audio when automatic syncing isn’t possible. It allows you to align clips with precision based on both visual and audio cues, regardless of the recording conditions. However, it requires skill and attention to detail to ensure perfect alignment.
DaVinci Resolve Editor lets you combine multiple media elements into a unified, continuous clip. This streamlines your project timeline and makes editing more manageable. It also keeps related clips grouped during further edits.
Here’s how to merge audio and video in DaVinci Resolve:
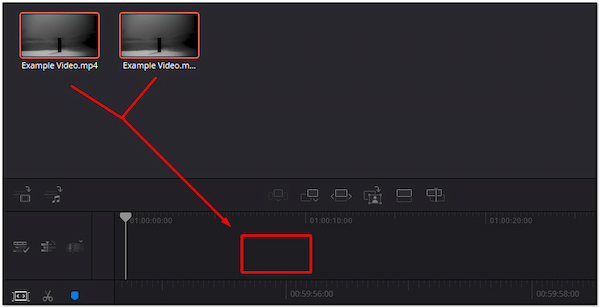
1. Import all the audio and video clips you want to merge into the Media Pool. Select the desired clips and drag them to the timeline, arranging them in the correct order.
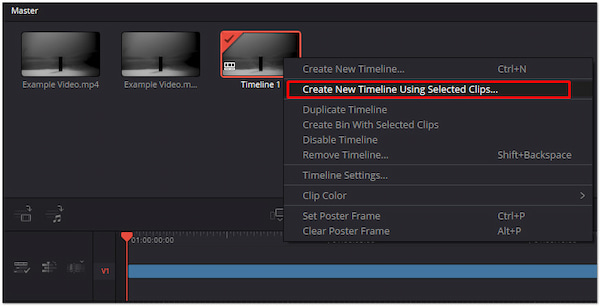
2. In the Media Pool, right-click on the timeline you just created. Select Create New Timeline Using Selected Clips. Open the newly created timeline to view all your selected clips merged into a single, continuous video clip.
Merging audio and video clips effectively consolidates multiple media sources. This reduces the likelihood of sync issues downstream. However, if you need to make changes, revert to the original, unmerged clips.
Audio syncing in DaVinci Resolve can sometimes fail or yield poor results. Troubleshooting preserves perfect alignment, upholds professional standards, and prevents editing delays.
Auto Sync Audio fails because the video has no recorded audio to match against. Use Manual Syncing instead. Find a visual sync point in the video and match it with the corresponding point in the external audio waveform.
Auto Sync struggles to align clips when the reference audio is noisy, muffled, or distorted. Try cleaning up the reference audio in an external audio editor before syncing. Use waveform-based syncing only when the sound is clear enough to be accurately detected.
Audio slowly drifts out of sync over time. This usually happens when audio and video were recorded at mismatched sample rates. Convert your audio to the correct sample rate in an audio editor before importing it into DaVinci Resolve.
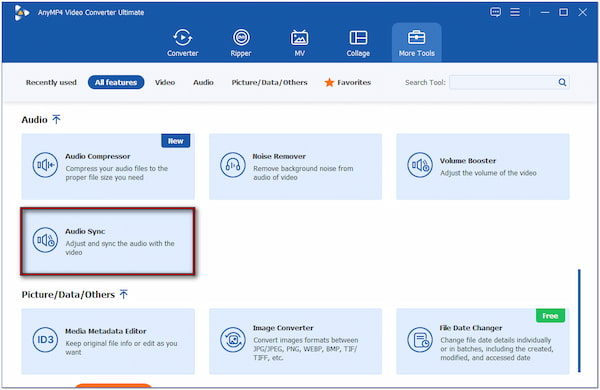
If you prefer a much simpler alternative to DaVinci Resolve's synchronized audio and video feature, AnyMP4 Video Converter Ultimate is worth considering. Beyond media conversion, it comes with a Toolbox kit featuring over 20+ editing tools. This includes a dedicated Audio Sync feature. Unlike DaVinci Resolve’s more technical process, this tool simplifies audio and video synchronization. It only requires adjusting the Delay slider to perfectly match the audio with the visuals. This software makes it ideal for anyone who wants quick, accurate results without navigating a complex editing interface.
Here’s how to sync audio and video in DaVinci Resolve alternative
1. First, download the free AnyMP4 Video Converter Ultimate. Install the audio and video sync software, then wait for the installation process to complete. Once completed, run the software on your system to begin the synchronization process.
download link below, and test its video editing tools for your creative projects.Secure Download
Secure Download
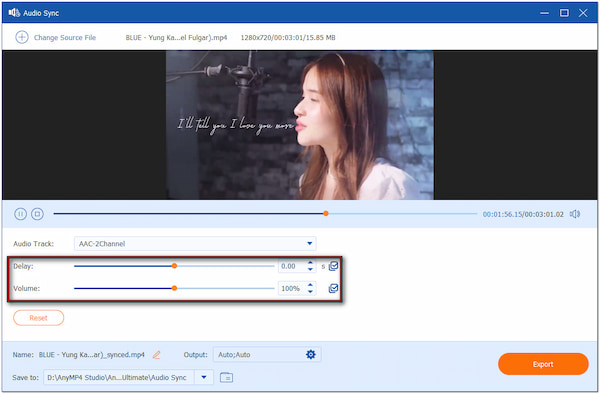
2. Upon launching it, you will be taken to the Converter tab by default. Proceed to the More Tools tab and select Audio Sync from the list of tools. In the Audio Sync window, click + to import the video clip you want to sync.
3. Adjust the Delay slider to shift the audio track forward or backward until it aligns perfectly with the video. You can also fine-tune the Volume slider to balance audio levels. Once the audio and video are in sync, click Export to save your final project.
AnyMP4 Video Converter Ultimate offers a streamlined tool for syncing audio and video. Rather than navigating multiple tabs, you simply move one Delay slider until the audio and video align. This makes it ideal for cases when you don’t require the advanced editing of DaVinci Resolve 19.
This post introduces several effective methods to sync audio and video in DaVinci Resolve. We explore Auto Syncing, Manual Syncing, and even merging clips. Each approach plays a vital role in achieving flawless synchronization. Perfect audio-video sync is a creative necessity that can make or break the impact of your project. If you’re seeking a more beginner-friendly solution, consider AnyMP4 Video Converter Ultimate. With its Audio Sync tool, you can align audio and video in seconds using the Delay slider. Get it today and experience effortless syncing for your next project..
 Posted by Angelica Liwanag to Edit Video, Edit Audio
More readings
 2 Methods of How to Use DaVinci Resolve Color Grading Simply
Wondering how to use DaVinci Resolve color grading? No worries, this is a guide to color correcting and grading in DaVinci Resolve. Keep reading to learn more!
 Workable: How to Record Audio in Davinci Resolve Easily
DaVinci Resolve has a powerful video editing function; However, many people overlook Davinci Resolve's recording audio features. Read this article to learn!
 How to Change Playback Speed in DaVinci Resolve Speed Editor
If you want to change your clip’s playback speed, look no further. Discover the DaVinci Resolve speed editor and learn how to adjust your clip’s playback speed.
 How to Add Text in DaVinci Resolve [Easy-to-Follow Guides]
If you want to add text in DaVinci Resolve and don’t know how to accomplish it, don’t stress. Check our post and learn a simple guide for adding text to videos.