Adjusting a clip’s speed powerfully shapes the pacing and mood of a video. Whether you accelerate or decelerate footage, speed changes can dramatically alter a scene’s impact. Today, mastering clip speed manipulation is a crucial skill for video editors. This guide explains proven methods for modifying video clip speed with DaVinci Resolve’s Speed Editor. We equip you to implement basic speed changes and advanced techniques, including speed ramping. Our goal is to clarify this process and make it straightforward to apply.
DaVinci Resolve integrates comprehensive video editing tools within a unified timeline. The Change Clip Speed feature lets you rapidly increase a clip’s speed by setting a higher percentage value or frame rate. The Speed Ramp tool enables intricate timing shifts. Retime Controls provide markers to divide a clip, letting you modify each segment’s speed independently.
DaVinci Resolve Speed Editor enables swift, efficient playback timing adjustments. It allows you to precisely accelerate or decelerate footage, creating seamless speed changes. This tool fine-tunes both video and audio synchronization.
Recommendation
Modifying clip speed injects energy and sharpens the pacing of the video. While animated transitions can be striking, adjusting clip speed is often the most effective storytelling device. Editors use it to bridge scenes, highlight key actions, or synchronize to music.
Here’s how to speed up a clip in DaVinci Resolve:
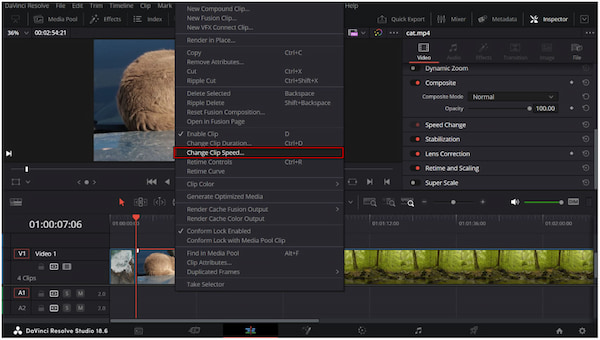
1. Right-click on the clip you placed into the timeline from the Media Pool. Select Change Clip Speed to bring up the settings window on your screen.
2. In the Speed % selector, increase the percentage above 100% to make the clip play faster. You can also adjust the Frames per Second setting instead of the speed percentage.
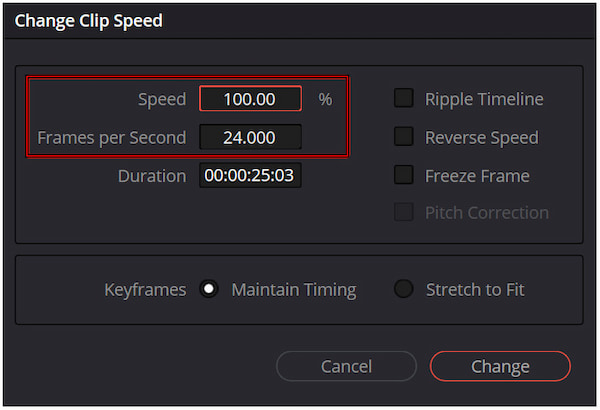
Check the Duration display to see the new length of the clip after the speed change.
3. If your clip has keyframes, you can use the Stretch to Fit option to adjust them. Once your speed adjustments are set, click OK. It will now play at the new speed on your timeline.
Mastering how to speed up a video in DaVinci Resolve can influence the pacing, energy, and storytelling of your project. However, changing a clip’s speed affects its audio unless you take steps to preserve it. Learn here how to separate audio from video in DaVinci Resolve for editing.
DaVinci Resolve Speed Ramp is a dynamic editing method that fluidly blends different playback speeds. Instead of switching instantly from standard speed to fast or slow motion, it smoothly transitions between them.
1. Right-click the clip, select Retime Controls, and click the triangle next to the speed percentage. Select Add Speed Point to create keyframes where you want the speed change to occur.
2. Click and drag the top handle of the second speed point to alter the speed in the previous section. Dragging to the left will speed it up, while dragging it to the right will slow it down.
Important Note: The bottom handle only moves the speed point’s position without altering playback speed.
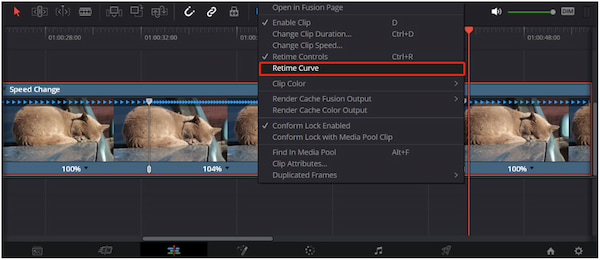
3. Right-click the clip again and choose Retime Curve. Click the first speed point and select the Curve button to convert it into a curve keyframe. Drag the curve handles to adjust the transition shape to control how gradually the speed changes occur.
Knowing how to speed ramp in DaVinci Resolve lets you control where and how your speed changes. Repeat the same process for your second speed point to complete the ramp. Besides video clips, you can also edit audio in DaVinci Resolve.
Can I Speed Up a Title in DaVinci Resolve 18?
Yes, you can speed up a title in DaVinci Resolve 18. However, the method depends on whether it’s a basic text element or a Fusion title.
Is DaVinci Resolve Speed Editor wireless?
Yes, the DaVinci Resolve Speed Editor is wireless on supported models. It connects to your computer via Bluetooth for cable-free operation.
Does DaVinci Resolve Speed Editor include Studio?
Yes, the DaVinci Resolve Speed Editor is bundled with a license for DaVinci Resolve Studio. This bundled license adds extra value, as DaVinci Resolve Studio is normally sold separately.
While DaVinci Resolve provides robust speed-editing features, its complexity can overwhelm beginners. If you need a more accessible solution, AnyMP4 Video Converter Ultimate is a standout option. This versatile software features a Toolbox with over 20 editing tools, including Video Speed Controller. Unlike DaVinci Resolve Speed Editor, it is exceptionally user-friendly. You can select playback speeds ranging from 0.125× (slowest) to 8× (fastest). Speed adjustments require no navigation of complicated menus.
1. Get the free download of AnyMP4 Video Converter Ultimate on your system. Install the video speed changer and allow the installation process to complete. Once finished, launch the software to begin the video speed-changing process.
Secure Download
Secure Download
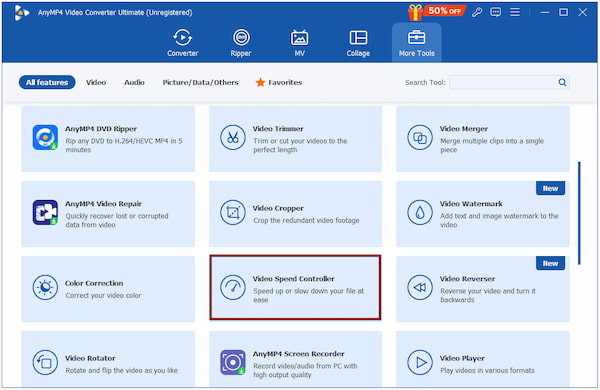
2. As soon as it opens, you will be taken into the Converter tab by default. Switch to the More Tools tab and look for the Video Speed Controller tool. Click it, then click the + button to import the video clip you want to adjust.
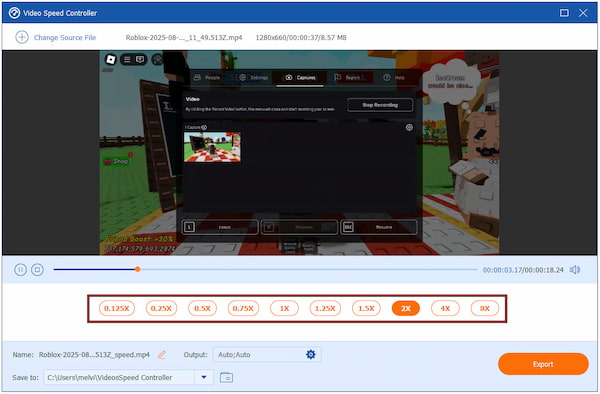
3. Choose your desired speed from the list of presets. 0.125× is the slowest, ideal for extending dramatic moments. Meanwhile, 8× is the fastest, perfect for creating time-lapse effects. Adjust video settings if needed, then click Export to save the final video.
AnyMP4 Video Converter Ultimate provides a direct approach to adjusting video speed. Its minimal steps make it an appealing alternative to DaVinci Resolve Editor’s complexity. Besides video clips, it lets you import audio files as well.
DaVinci Resolve Speed Editor delivers extensive, professional-grade clip speed control. However, its complexity and workflow demands better suit seasoned editors. In contrast, AnyMP4 Video Converter Ultimate offers a more accessible, approachable solution. Its Video Speed Controller enables rapid speed modifications, from 0.125× slow motion to 8× fast motion, in a few straightforward steps, making it ideal for casual users.
 Posted by Mark Cristobal to Edit Video
More readings
 Quick Fix Guide: Resolving Audio Issues in DaVinci Resolve
This guide effectively solves common audio issues in DaVinci Resolve. By reading it, you will better understand DaVinci's Resolve editing.
 2 Methods of How to Use DaVinci Resolve Color Grading Simply
Wondering how to use DaVinci Resolve color grading? No worries, this is a guide to color correcting and grading in DaVinci Resolve. Keep reading to learn more!
 Workable: How to Record Audio in Davinci Resolve Easily
DaVinci Resolve has a powerful video editing function; However, many people overlook Davinci Resolve's recording audio features. Read this article to learn!
 How to Change Playback Speed in DaVinci Resolve Speed Editor
If you want to change your clip’s playback speed, look no further. Discover the DaVinci Resolve speed editor and learn how to adjust your clip’s playback speed.