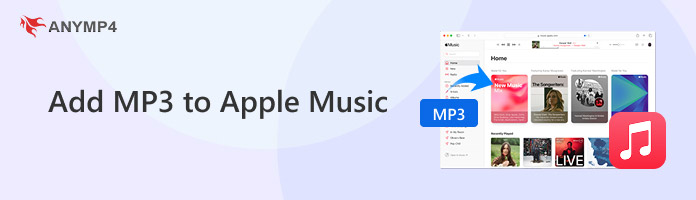
How to Add MP3 to Apple Music for a Limitless Library
At a Glance:
- File Preparation: Clean your ID3 tags (Artist, Album, Art) and use 320kbps Constant Bit Rate (CBR) to ensure seamless cloud matching.
- Desktop Import: Use File > Import on Mac or the new Apple Music App/iTunes on Windows. Always check Copy files to Music Media folder to avoid broken file links.
- The iTunes Sync Trap: Manual syncing via iTunes/Finder risks wiping existing media on your iPhone.
- The Pro Toolkit: Use AnyMP4 Video Converter Ultimate to repair variable bitrates/corrupt headers, and use AnyMP4 iPhone Transfer Pro to safely drag-and-drop tracks directly to your iPhone without data loss.
You pay a monthly premium for Apple Music, giving you access to roughly 100 million songs. Yet, despite this massive catalog, the platform is still missing your music. Maybe it’s a rare live recording of Daft Punk, or a massive folder of video game OSTs you ripped from CDs a decade ago. Whatever it is, you want those local MP3s sitting right next to your curated Apple Music playlists. You don't want to juggle two different media players just to listen to your favorite tracks.
Adding MP3s to Apple Music isn’t just possible; it’s the absolute best way to build a truly personalized, limitless music library. In this guide, we will show you the full steps to sync local MP3 to Appel Music on computer and mobile phone.
Prepare Your MP3s for a Flawless Sync
If you drag a folder of poorly labeled files into Apple Music, you are going to create a chaotic mess of Unknown Artist and Track_01.mp3 that will haunt your library forever. Apple Music's matching algorithm thrives on precision. If your file hygiene is trash, your sync will be trash.
Fix Your Metadata First
Metadata (specifically ID3 tags) is the DNA of your audio file. It tells Apple Music where to place the song. Before importing anything, ensure these fields are locked in:
- • Song Name & Track Number: Crucial for correct album sequencing.
- • Unified Album Artist: This is the #1 reason mixtapes split into a dozen separate albums. Ensure the Album Artist field is completely identical for all tracks in an album (e.g., set to Various Artists for compilations).
- • Cover Art: Nobody wants to stare at a generic grey music note. Embed a clean, square JPEG (ideally 500x500 or 1000x1000) directly into the file.
Tip
Do your metadata tagging BEFORE you import. Once a track with broken tags gets uploaded to iCloud, changing the data later can trigger incredibly annoying sync loops across your devices.
The 320kbps CBR Standard
Apple Music natively uses the AAC format at 256kbps, but it handles MP3s perfectly, if they are encoded right. The absolute sweet spot for your local MP3s is 320kbps Constant Bit Rate (CBR). Avoid Variable Bit Rate (VBR) files like the plague. From my experience, Apple’s iCloud matching system occasionally chokes on VBR files, resulting in random playback errors or clipped track lengths. Furthermore, Apple Music does not support FLAC; if you have high-res lossless files, they must be converted before moving forward.
Way 1. How to Add MP3 to Apple Music on Mac (macOS Monterey & Later)
Since Apple killed off iTunes for Mac back in macOS Catalina, the dedicated Music app is your hub. The interface is cleaner, but the underlying mechanics of how it handles local files remain mostly the same.
1. Import MP3 to Music App
Launch the Music app from your Dock or Launchpad. Ensure you are logged into the exact same Apple ID that you use on your iPhone.
You technically can drag and drop an MP3 directly into the open app window, but I strongly advise against it for large batches. The drag-and-drop method often skips over files if there’s a slight read error.
Instead, do this:
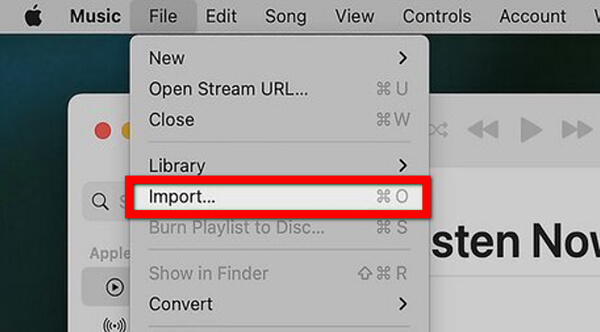
1. Go to the top menu bar and click File.
2. Select Import (or press Cmd + O).
3. Navigate to the folder containing your pristine MP3s.
4. Select the files or the whole folder and click Open.
2. Consolidate Files to the Media Folder
Here is a secret that saves lives (or at least, music libraries). By default, Apple Music might just link to the MP3 file where it currently sits (like your Downloads folder). If you delete that file from your Downloads later, Apple Music will give you the dreaded Original File Cannot Be Found exclamation mark.
To fix this:
1. Go to Music > Settings (or Preferences) in the top menu bar.
2. Click the Files tab.
3. Check the box that says: Copy files to Music Media folder when adding to library.
4. Check the box for Keep Music Media folder organized.
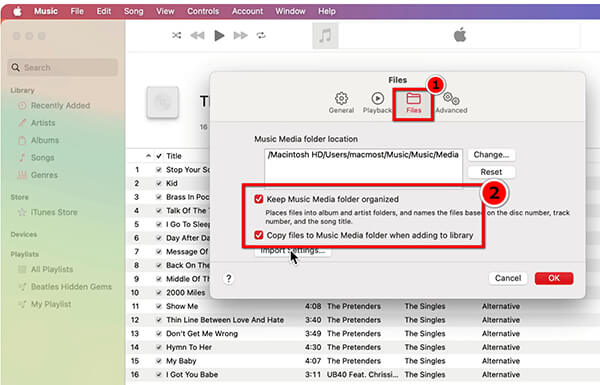
Now, when you import an MP3, Apple makes a safe copy inside its own dedicated folder. You can safely delete the original from your Desktop or Downloads.
Way 2. How to Add MP3 to Apple Music on Windows (iTunes & The New Apple Music App)
Windows users, you are in an interesting transitional phase right now. Depending on what version of Windows you are running, you might be using the classic iTunes, or the brand-new standalone Apple Music app. Let's cover both.
Use the New Apple Music App for Windows
1. Open the Apple Music app on your PC.
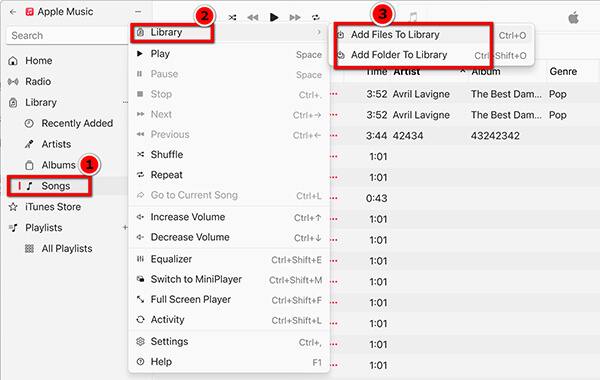
2. In the sidebar, click on Songs under the Library section.
3. Click the three dots (...) at the top of the sidebar or go to the top-left menu.
4. Select Library > Add File To Library or Add Folder To Library.
5. Browse for your MP3 files or the entire folder and hit Open.
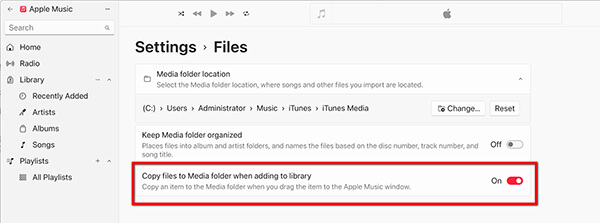
6. Just like on the Mac, go to Settings > Files and ensure Copy files to Media folder when adding to library is checked so your library is self-contained.
The Legacy iTunes Method (Still relevant for older OS versions)
If you're on Windows 10 or just refuse to let go of classic iTunes, the old reliable method still works flawlessly. iTunes not only supports transferring music from iPhone to iTunes, but also moves songs from iTunes to iPhone.
1. Open iTunes. Click on File in the top left corner. Select Add File to Library (for individual tracks) or Add Folder to Library (for bulk imports).
2. Select your MP3s and click Select Folder.
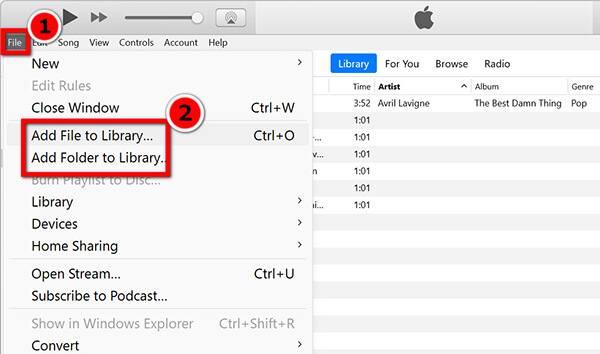
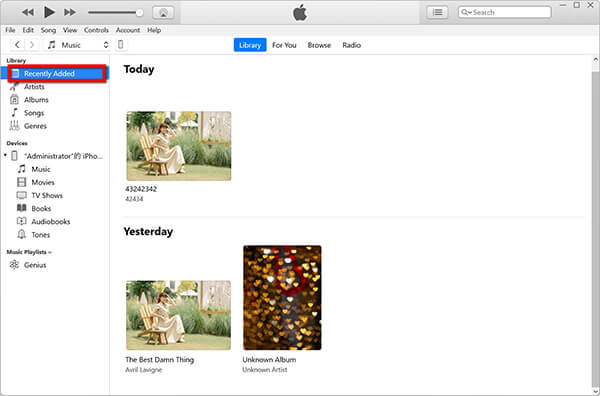
3. The tracks will appear under your Recently Added tab.
Tip
If you just added a folder in iTunes and nothing showed up, it usually means your MP3 files lack ID3 metadata. iTunes imported them, but categorized them under Unknown Artist and Unknown Album. Scroll down to the U section of your library, and you'll likely find your rogue files hiding there.
Bonus: The Pro Secret for Stubborn Audio Files
What happens when you do everything right, but Apple Music flat-out refuses to play your file, or it sounds like a garbled mess?
The Problem: The internet is the wild west. You might download an MP3 that actually has an OGG Vorbis wrapper, a corrupted header, or a variable bitrate that throws off Apple’s cloud matching algorithms. Or, you might have massive FLAC/WAV files that Apple Music simply rejects.
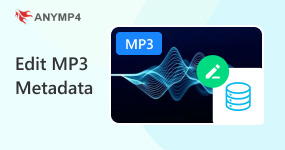
The Solution: You need a digital middleman to clean, compress, and standardize your audio before it ever touches Apple Music. This is where AnyMP4 Video Converter Ultimate comes in as an absolute lifesaver. Don't let the word Video fool you; its audio processing engine is top-tier. It serves as an all-in-one library prep station that can batch-convert over 500 weird formats into pristine, Apple-friendly 320kbps MP3s or AACs in seconds, shrink bloated files without sacrificing that studio feel, and let you inject missing album art or correct artist tags using its built-in metadata editor before you hit import.
Steps for metadata editing and MP3 parameter setting in AnyMP4:
1. Load your files
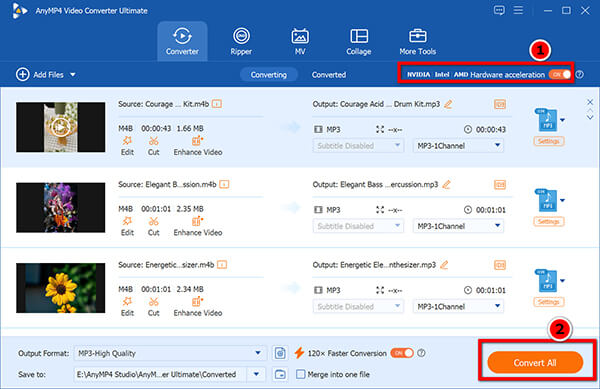
Open AnyMP4 Video Converter Ultimate and drag your problematic audio files into the main interface.
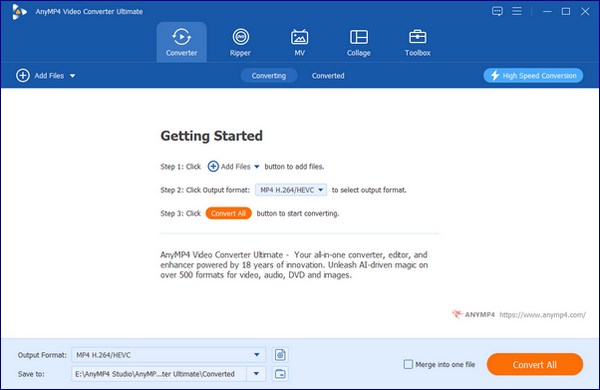
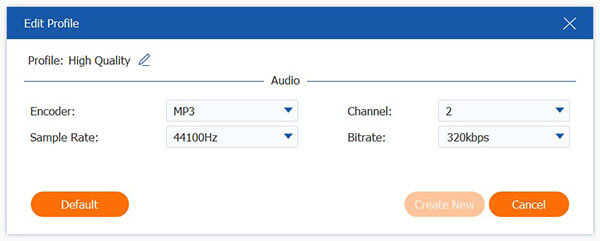
2. Set the MP3 Parameters
Click the output format dropdown on the right. Select the Audio tab, and choose MP3.
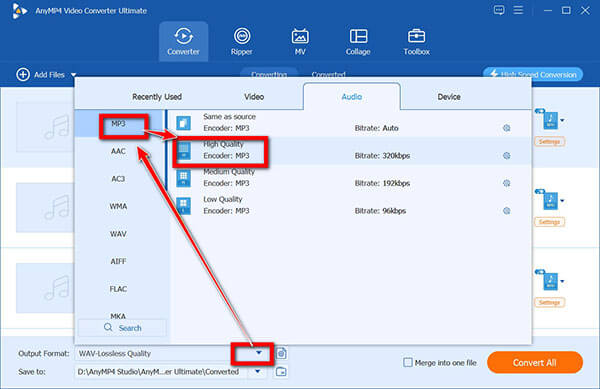
Click the gear icon to create a custom profile, set your Encoder to MP3, your Sample Rate to 44100 Hz, and your Audio Bitrate to a solid 320 kbps.
3. Convert
Hit the Convert All button. In moments, you’ll have a squeaky-clean, perfectly tagged MP3 ready for Apple Music.
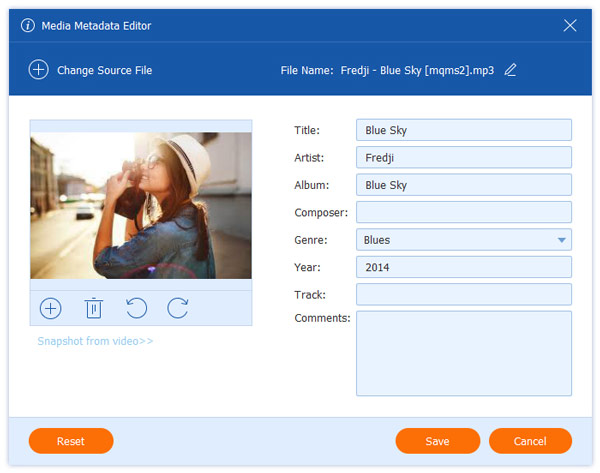
4. Edit the Metadata
Click on the Toolbox tab at the top and select Media Metadata Editor. Add your file. Here, you can easily upload a sharp album cover, fix the Year, Genre, and Artist fields. Click Save.
The above are the steps to convert WMA, OGG, FLAC to MP3, because Apple Music does not support those formats.
Sync Your MP3s to iPhone and iPad
Getting tracks onto your desktop is only half the battle. The real goal is walking out the door, putting in your AirPods, and streaming your rare collection from your phone. How you do this depends entirely on whether you pay for a monthly subscription.
Wireless Syncing via Cloud (For Apple Music Subscribers)
If you subscribe to Apple Music, you have access to the iCloud Music Library. This feature automatically scans your local desktop MP3s and uploads them to Apple’s cloud servers.
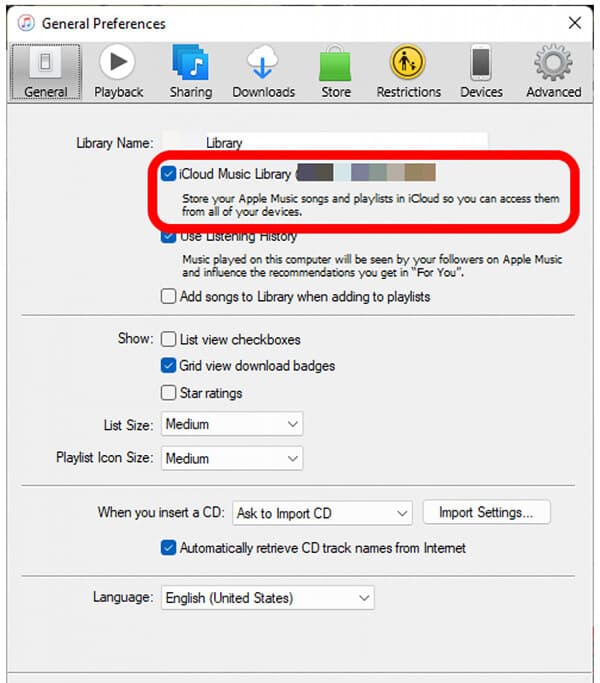
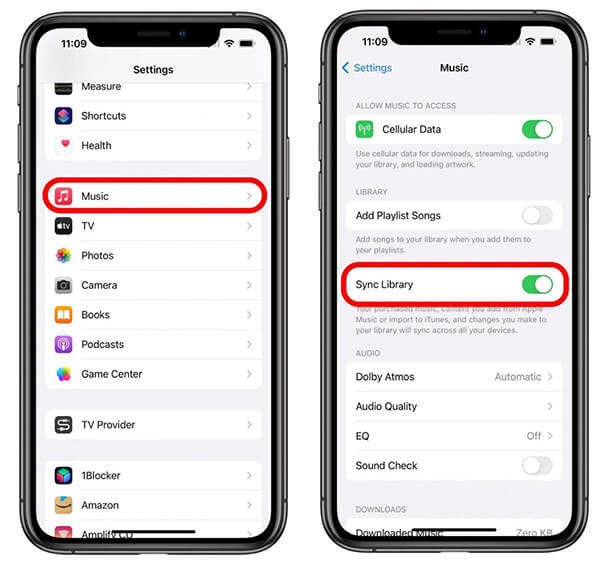
1. On your Mac/PC: Go to Settings/Preferences and toggle on iCloud Music Library.
2. On your iPhone: Go to Settings > Music and turn on Sync Library.
Once enabled, leave your computer on and connected to Wi-Fi. It takes time for your desktop app to upload your local files to the cloud. Do not close the app until the loading icons vanish.
The Standard Manual Sync (For Non-Subscribers)
If you don't subscribe to Apple Music, you cannot use the cloud. You have to wire it up manually.
1. Connect your iPhone to your computer via USB.
2. Open Finder (Mac) or the Apple Devices app (Windows).
3. Select your iPhone in the sidebar, go to the Music tab, and check Sync music onto iPhone.
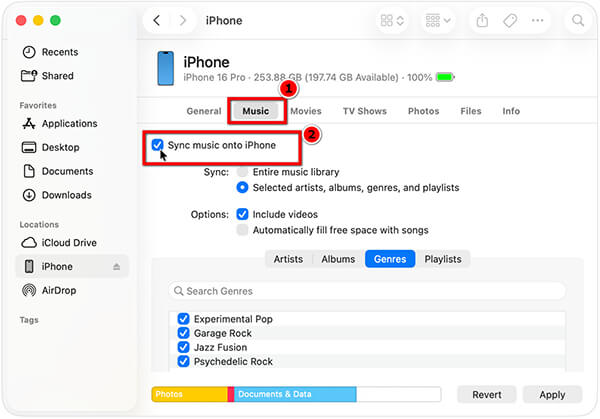
The Big Catch: Be terrified of this method. iTunes/Finder manual syncing operates on an all-or-nothing rule. If your iPhone already contains media from another computer or a different library, syncing via iTunes will completely wipe and erase your existing mobile library. It’s clunky, risky, and outdated.
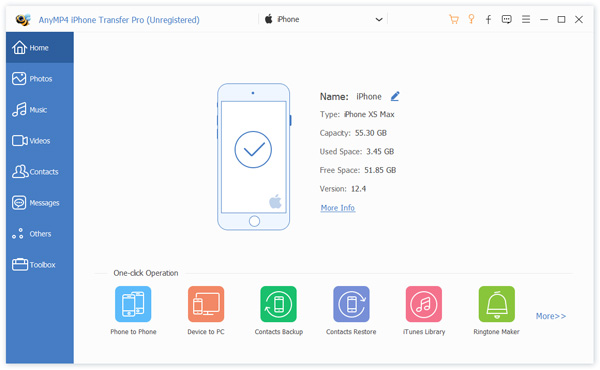
The Better, Safer Alternative: AnyMP4 iPhone Transfer Pro
If you want to completely bypass the iTunes headache and eliminate the risk of data loss, AnyMP4 iPhone Transfer Pro is the ultimate shortcut. Instead of dealing with restrictive cloud matching or risky sync loops, this tool treats your iPhone like a smart external drive. It lets you safely drag-and-drop local MP3s directly into your iOS device alongside your existing library with zero risk of erasure, while automatically converting unsupported audio formats on the fly.
Here is exactly how to do it in less than two minutes:
1. Connect Your iPhone to PC or Mac
Launch AnyMP4 iPhone Transfer Pro on your desktop and plug in your iPhone using a USB cable. Tap Trust on your phone screen if prompted to establish a secure connection.
Note
While running this software, do not run iTunes or Apple Music app on your computer. Otherwise, the software will conflict.
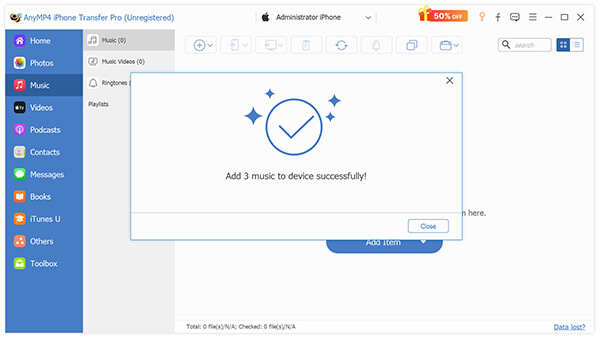
2. Import Your MP3s Instantly
Click on the Music tab in the left-hand sidebar menu. The software will instantly load and display your iPhone's entire existing music library.
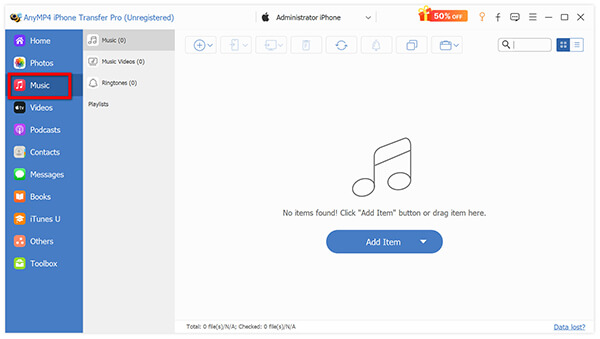
Click the Add button (the plus icon) at the top of the interface. Select Add File(s) or Add Folder, choose the prepped 320kbps MP3s from your hard drive, and click Open.
Troubleshooting iCloud Sync Statuses
If you are using the cloud method and a track gets stuck, right-click the column headers in your desktop Music app and enable the Cloud Status column to diagnose the issue:
- • Waiting (Dotted Cloud): The upload is queued. Go to File > Library > Update Cloud Library to force it.
- • Ineligible (Cloud with a Slash): The file is either too large (over 200MB), too long (over 2 hours), or its bitrate is under 96kbps. Run it through AnyMP4 Video Converter Ultimate to normalize it.
- • Removed (Cloud with an X): The track was deleted from another synced device. Re-import the original file to your desktop.
FAQs
Why is my MP3 greyed out in Apple Music?
A greyed-out track usually means the file was added to your library, but the actual source file on your hard drive was moved, renamed, or deleted before it could finish uploading to iCloud. It's a ghost file. Alternatively, if you are looking at your phone, it means the file is on your computer but hasn't finished uploading to the cloud yet. Open your computer, connect to Wi-Fi, and let it sync.
Can I add MP3s to Apple Music without a subscription?
Yes, absolutely. The Apple Music app (and iTunes) doubles as a free local media player. You can import as many MP3s as your hard drive can hold. However, without a subscription, you cannot use Sync Library (the cloud). You must physically plug your phone into your computer via USB to transfer the tracks.
Will adding MP3s take up my iCloud storage?
No. This is a massive misconception. If you are an Apple Music subscriber, your uploaded MP3s do not count against your standard iCloud Drive storage quota (the 5GB, 50GB, or 2TB plans you buy for photos and backups). Apple Music gives you a separate, invisible allocation for up to 100,000 personal songs.
What is the best format for Apple Music if not MP3?
The native, optimal format for Apple Music is AAC (.m4a) at 256kbps. This is the exact format Apple uses for their streaming catalog. It is vastly superior to MP3 in terms of compression efficiency, meaning a 256kbps AAC file sounds better than a 256kbps MP3, and roughly equals a 320kbps MP3 while taking up less hard drive space. You can easily convert your files to AAC using the AnyMP4 converter mentioned earlier.
Conclusion
Your music library shouldn't be split between what streaming platforms offer and what you've personally collected. Adding your local MP3s to Apple Music is the absolute best way to build a unified, limitless listening experience where your rare live cuts sit right next to today's top hits.
By taking a few minutes to prep your files correctly and choosing the right transfer methods, you ensure your offline collection is never left behind. Don't let unsupported audio formats, messy metadata, or the fear of an iTunes data-wipe stop your groove.