VLC Media Player is among the most popular free media players available. It is known for its ability to play almost any media stream format. However, beyond simply playing media, it also features a handy screenshot function. VLC screenshot allows you to capture still frames directly from your videos. It is useful to save memorable scenes, create a thumbnail, or capture details for reference. In this post, we’ll show you the different ways to take screenshots with VLC. Also, we will explain where to find those screenshots once they are saved. Our aim is to help you make the most of VLC’s built-in snapshot tool. This way, you can quickly and easily capture the moments you want from any video.

VLC is well-known for being a versatile tool for playing various types of media files. In addition to its playback support, it includes a handy feature for taking screenshots directly from a video. The VLC Player screenshot feature allows you to capture still images from movies or any video you are playing. However, it can only take snapshots of the video currently playing inside the player. In other words, VLC cannot capture other parts of your screen or applications.
1. In VLC, navigate to the Media tab and select Open File to load the video. Play the video, then pause it at the exact frame you want to capture.
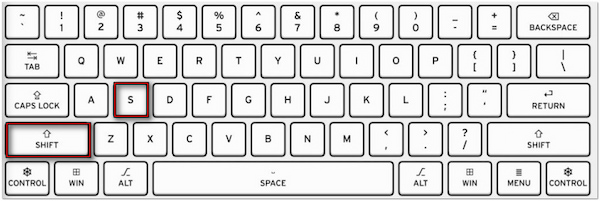
2. Press the Shift + S key combination to instantly take a screenshot. A small thumbnail will briefly pop up at the top of the VLC window, confirming that the capture was successful.
1. How do I take a batch screenshot in VLC? Open VLC, play the video, and pause it on the desired frame. Press the E key to advance frame by frame until you reach the perfect spot.
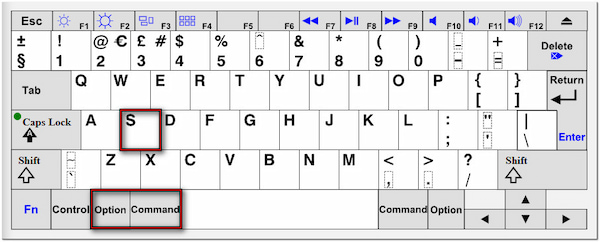
2. Press the Command + Option + S on your keyboard to instantly capture the frame. You can press this hotkey multiple times to capture several frames simultaneously.
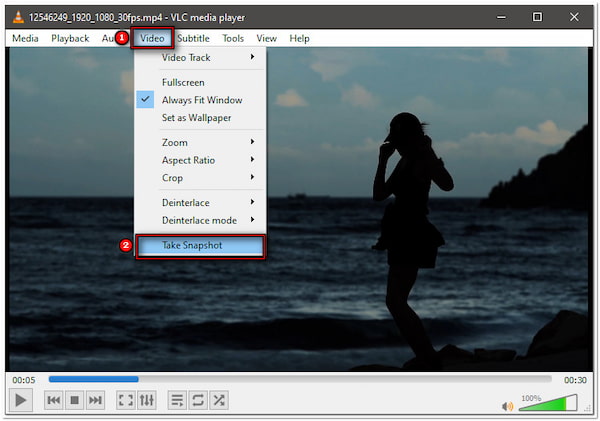
1. On VLC, click the Media tab and select Open File to import the video. Play the video until you reach the desired frame to capture. Press Spacebar to pause at the exact moment.
2. Proceed to the Video tab and select the Take Snapshot option. VLC Media Player screenshots the frame instantly and saves it as an image.
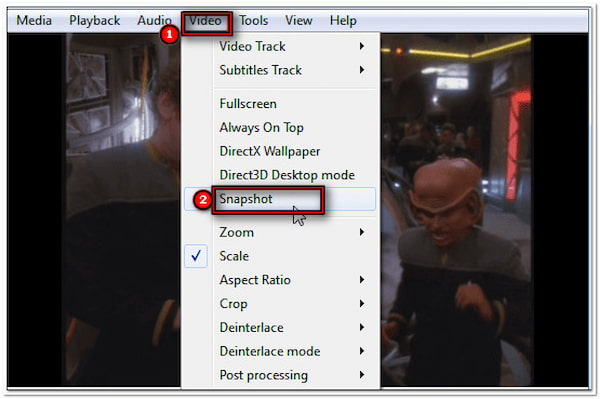
1. On Mac, launch VLC and open the video you want to capture by dragging it into the player. Play the video until you reach the desired frame and press the Spacebar to pause.
2. From the top menu bar, click Video and select Snapshot from the pulldown menu. VLC will screen capture the frame immediately and save it as an image.
1. In VLC, switch to the View tab and select Advanced Controls from the pulldown menu. Click it to display the additional buttons above the play controls.
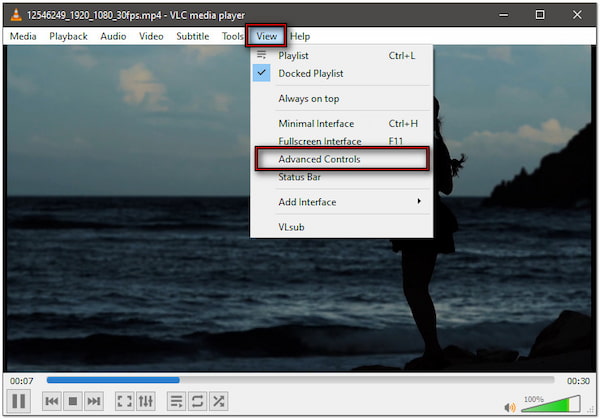
2. Play your video until you reach the desired scene and pause it. Click the Frame by Frame button to move forward one frame at a time.
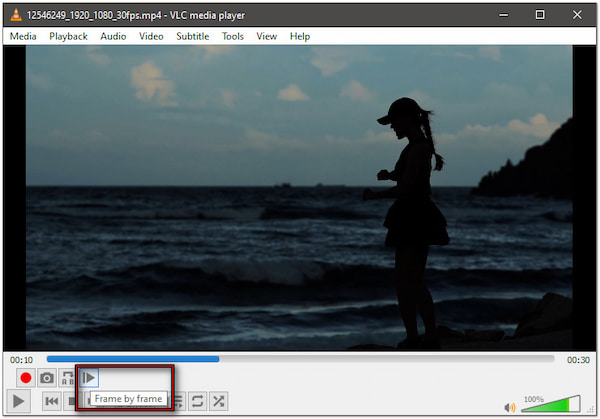
3. Once you have the exact frame visible, go to the Video tab and select Take Snapshot. Alternatively, you can still use the Shift + S shortcut if you prefer.
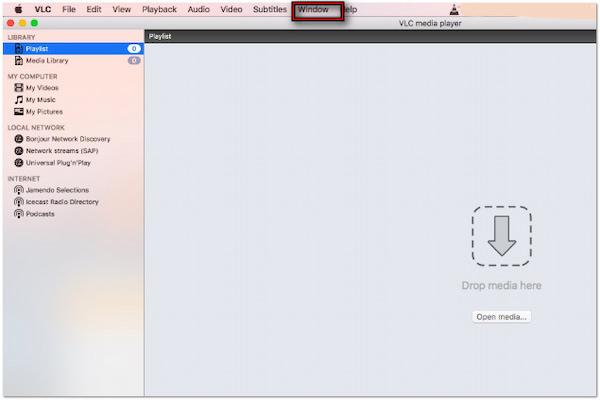
1. Load a video in VLC, proceed to the Window tab, and select Advanced Controls. A new row of buttons will appear above the regular play controls.
2. Play the video and pause it at the scene you want to capture. Select the Frame by Frame option to advance one frame at a time.
3. Once the exact frame is displayed, go to the Video menu and click Snapshot. Optionally, you can use the keyboard shortcut if you prefer.

Taking a screenshot in VLC Media Player is simple and flexible, with multiple methods available. You can use a quick keyboard shortcut, the Video menu, or the Advanced Controls. In addition to taking screenshots, you can also record your screen in VLC.
When you take a screenshot in VLC, the image is saved automatically to your local drive. However, many users wonder where to find it. By default, VLC stores these snapshots in a specific folder without asking you each time.
1. By default, VLC saves screenshots in the Pictures folder of your Windows user account. To find it, open File Explorer and navigate to the This PC section. Look for image files named with a timestamp, usually in PNG format.
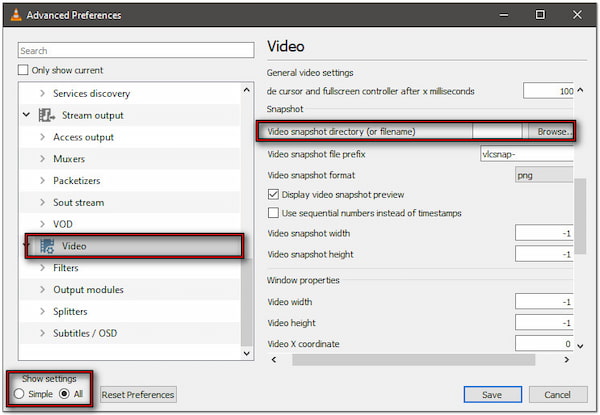
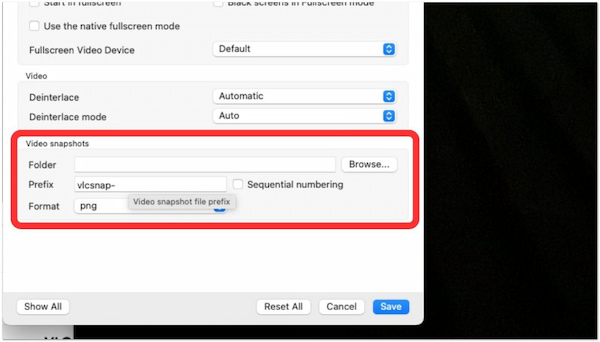
2. If you want your screenshots to be stored elsewhere, open VLC Media Player. Click the Tools tab and select the Preferences option from the pulldown menu. Proceed to the Show Settings and select the All option.

3. Look for the Video option and scroll down through the Snapshot section. In the Video Snapshot Directory (or Filename), click Browse to specify your preferred directory. Click Save to apply changes. The next time you take a screenshot, it will be saved directly in the folder you chose.
1. VLC places screenshots automatically in your Pictures folder. To get there quickly, Open Finder and select Pictures from the left sidebar. Your captured images will appear there, typically named with a timestamp and a .png file extension.
2. If you prefer a different location, click VLC from the menu bar and select Preferences. In the Video section, look for the Snapshot Directory field. Browse and choose your desired folder, then click Save. Any future snapshots will now be placed in the folder you selected.
Finding your VLC screenshots is simple once you know the default save location. On both Windows 10 and Mac, it automatically stores snapshots in the Pictures folder. However, you can change the destination folder to keep your screenshots organized.
While the VLC screenshot is convenient, it has limited flexibility and editing features. For more advanced screenshot functionalities beyond what VLC offers, AnyMP4 Screen Recorder is what you need. It is fully accessible on Windows (7 and above) and Mac (10.12 and later). It provides multiple capture modes, including Custom Capture, Scrolling Screenshot, Popup Menu Capture, and Full-Window Capture. Additionally, it provides real-time editing tools. Plus, you can save captured images in PNG, JPG/JPEG, BMP, GIF, and TIFF formats.
What to Expect With AnyMP4 Screen Recorder:
• Supports hotkeys for faster workflow with the option to customize them.
• Exports screenshots in PNG, JPG/JPEG, BMP, GIF, and TIFF formats.
• Provides seven different recording modes: Screen, Audio, Game, Webcam, etc.
• Draw with pens, markers, add arrows, shapes, insert text, overlay whiteboard, etc.
• Multiple capture modes: Custom, Scrolling Screenshot, Popup Menu, and Full-Window.
1. Get started by downloading the AnyMP4 Screen Recorder. Install the VLC Media Player screenshot alternative and complete the installation process. Once finished, open the software to begin taking screenshots.
Secure Download
Secure Download
2. Upon startup, it defaults to Screen Recorder mode. Click the Camera button and select your preferred capture mode. For this tutorial, we will use the Scrolling Screenshot. Alternatively, press the default hotkey to quickly activate this mode.
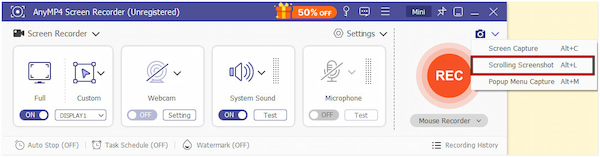
| Screen Capture | Alt + C |
| Scrolling Screenshot | Alt + L |
| Popup Menu Capture | Alt + M |
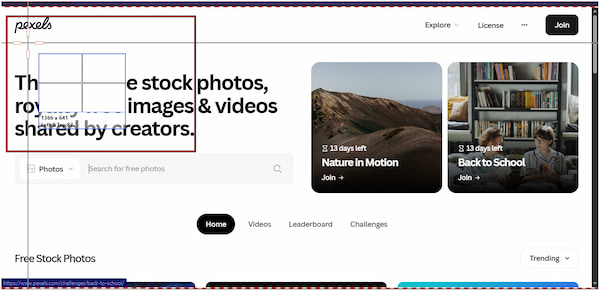
3. Move and resize the Screen Selector to align with the content you want to capture. Once it is in place, use your Mouse Wheel or the Spacebar to scroll through the page. Additionally, you can use the Left-Click to automatically capture the screen to the bottom.
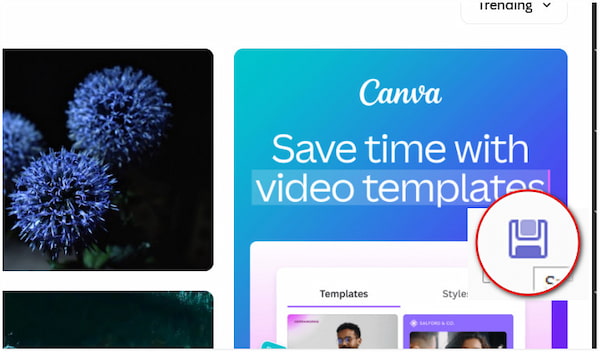
4. After reaching the end of the content, press the Esc key. You can enhance your screenshot using the annotation toolbox. Add shapes, arrows, highlights, text, callouts, etc. Click Save in the lower-right navigation to export the scrolling screenshot to your local drive.
AnyMP4 Screen Recorder provides a comprehensive solution for capturing screenshots on your screen. It allows you to capture any area on your screen, long web pages, and even dropdown menus. This variety gives you more flexibility than VLC’s single snapshot function.
Looking for the best free screen recorder, similar to VLC? Check them here!
VLC screenshot feature makes it easy to capture snapshots from your videos. It offers various methods for accomplishing this, including keyboard shortcuts, menu options, and advanced controls. You can also quickly locate your saved screenshots in the default folder or customize the destination to stay organized. However, if you’re looking for more advanced features, then AnyMP4 Screen Recorder is a powerful alternative worth trying. It supports scrolling screenshot capture, pop-up menu capture, and full-window capture.
 Posted by Alice Thorne to Screenshot
Related Articles
 [Solved] How to Record A Join.me Conference Call Efficiently
When you want to record a Join.me conference call to share with others or playback to learn more important points, you can learn 2 ways to take recordings here.
 Lifesize Record and Share - Record/Download/Share Lifesize
Can you record on lifesize? How do you share lifesize recordings? How do I download lifesize recordings? Get a detailed guide to make Lifesize record and share.
 5 Best Screen Recording Capture Extension for Chrome
Looking for the top Chrome screen recording capture extension? Explore our post to determine which tool offers the best performance, features, and usability.
 Top 3 Methods to Screenshot Google Maps on PC, iPhone and Android
People often need to screenshot Google Maps to help each other find some places. Here are 3 methods to do the job on your computer, iPhone and Android.