Capturing moments during FaceTime calls is a common desire for users seeking to preserve memories. Whether you’re using an iPhone or Mac, taking screenshots varies. Nowadays, the ability to freeze-frame these moments enhances the FaceTime experience. It allows users to relive shared laughter, conversations, and milestones. In this post, we will explore the diverse methods available to take screenshots on FaceTime, from the native functionalities of iPhones and Macs to versatile functionalities offered by third-party software. Continue reading for additional details!

Before we delve into the specifics, let us first answer the question. Certainly, you can take a screenshot and share a FaceTime screen during a FaceTime call. Both iOS and macOS allow users to capture screenshots. On iOS devices like iPhones, you can simultaneously press the side and volume up buttons to capture a screenshot. You can use key bindings or third-party software to take a screenshot on Mac.
However, taking screenshots during a FaceTime call may be subject to the privacy and security settings of the device/application. You should be mindful of ethical considerations and respect the privacy of others when using screenshot features. Additionally, local laws and regulations may restrict capturing and sharing images without consent. In other words, users should be aware of and adhere to relevant legal guidelines.
As mentioned, there are several ways to screenshot FaceTime calls. This section will provide a comprehensive guide, walking you through step-by-step demonstrations for each method. Whether using an iPhone or a Mac or exploring third-party screen recording tools, we’ve got you covered. Continue to read for a thorough understanding.
iPhone FaceTime screenshot can be performed using simple button combinations. This method relies on the built-in screenshot functionality of the iPhone. The button combination is intuitive and easy to remember, making quick captures during FaceTime calls convenient.
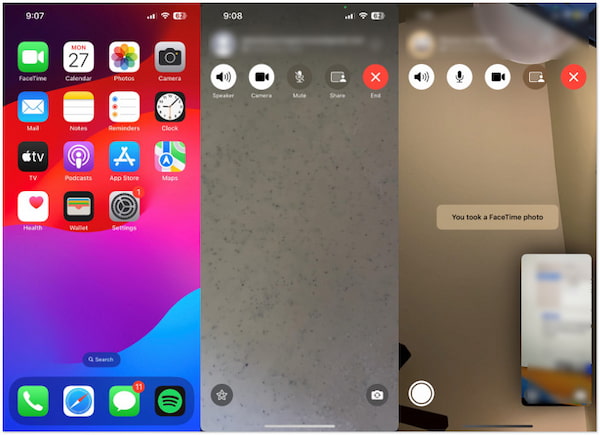
1 Start a FaceTime call as you normally would. Once the FaceTime call is in progress, and you want to capture a moment, locate the buttons on your iPhone.
2 Press the Power and Volume Up simultaneously on iPhones without a Home button. You will hear a shutter sound and see a brief flash on the screen.
3 You can view the screenshot immediately by tapping the Preview in the screen's bottom left corner.
iPhone’s button combination lets you capture FaceTime effortlessly. It eliminates the need for third-party apps or additional configurations. However, the built-in method does not offer advanced customization options, such as selecting specific areas of the screen, taking a long screenshot, and more.
On a Mac, capturing screenshots during a FaceTime call can be accomplished using convenient hotkey shortcuts. This method is built into the macOS system, eliminating the need for third-party applications. The hotkey shortcuts offer flexibility, allowing users to screenshot the entire screen or a specific portion.
1 Launch FaceTime on your Mac and start a FaceTime call. Adjust the FaceTime window to the desired position on your screen.
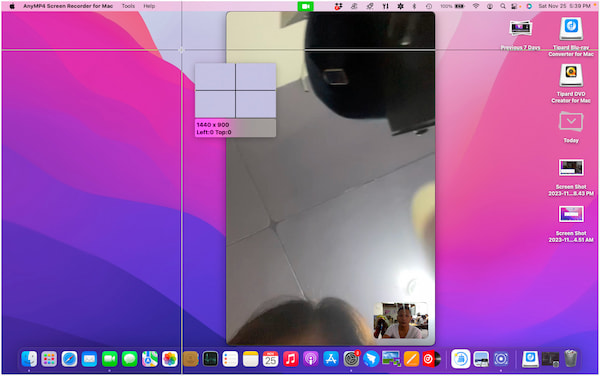
2 Press Command + Shift + 3 combinations to capture the entire screen. To capture a specific screen portion, press Command + Shift + 4.
3 For capturing selected portions, your cursor will turn into a crosshair. Click and drag to highlight the screen area you want to capture. Then, release the mouse button to the screenshot.
Mac key bindings for capturing FaceTime provide a convenient and versatile solution. The flexibility in capturing the entire screen or a specific portion caters to different needs. However, the native capture method does not focus on specific application windows.
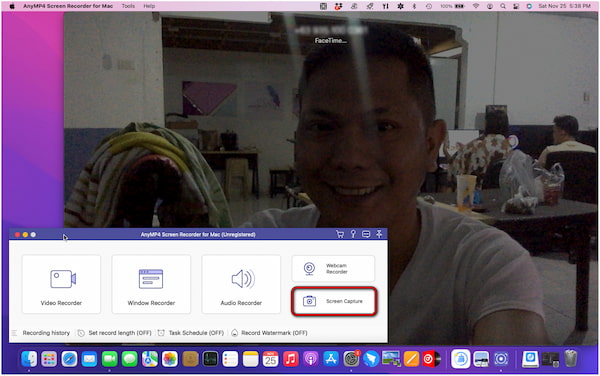
AnyMP4 Screen Recorder provides a versatile solution for capturing FaceTime without interrupting the call. It allows you to selectively capture the FaceTime window, providing flexibility in choosing the content to capture. Compared to the native method of Mac, AnyMP4 Screen Recorder comes with additional features.
For good measure, it provides annotation tools for adding shapes, lines, arrows, text, and callouts. Also, it includes brush, airbrush, and blur options. Beyond the Screen Capture feature, AnyMP4 Screen Recorder offers a Video Recorder, Window Recorder, and Webcam Recorder. These features are intended for your various recording needs.
1 Before initiating a FaceTime screenshot, ensure the software is installed on your Mac. If not yet, click the Free Download to obtain AnyMP4 Screen Recorder.
Secure Download
Secure Download
2 Install the software and ensure you complete the instructions. Once installed, run the AnyMP4 Screen Recorder on your Mac.
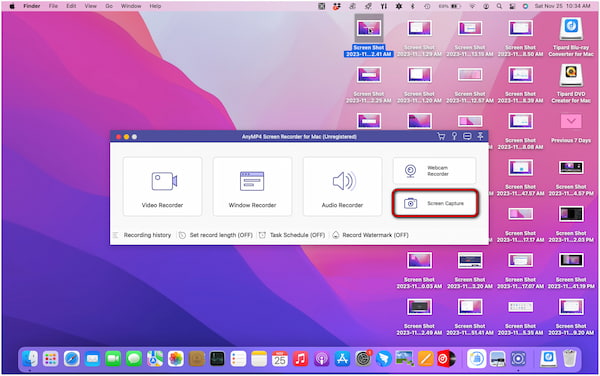
3 Within the main interface, navigate to the Screen Capture option. After clicking it, your cursor will turn into a crosshair.
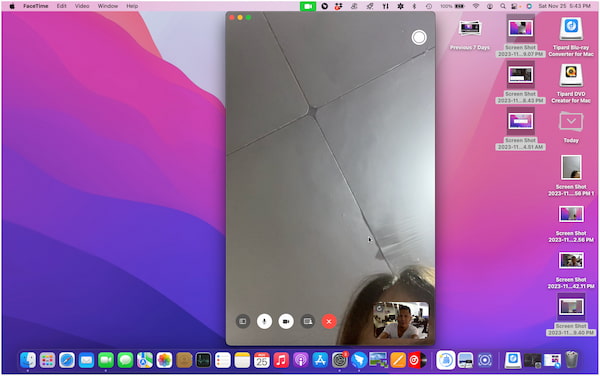
4 Left-click the area and drag the screenshot region to the area you want to capture. After selecting the area, release the mouse to perform the screenshot.
5 A screenshot preview will appear on your Mac screen. If needed, add annotations to your screenshot. Select a tool from the Toolbar to annotate your screenshot.
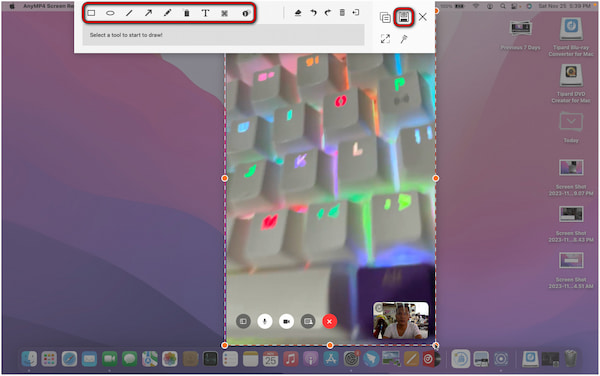
6 Once done, select the Disk icon to save the screenshot. Rename the screenshot within the Save As field, add a Tag, choose a path in the Where field, and select your Format.
AnyMP4 Screen Recorder is an ideal solution for taking FaceTime screenshots. It lets you capture FaceTime without interrupting the call and even without them knowing. Additionally, the several recording features are valuable for your various capturing needs.
Capturing moments during FaceTime calls can be achieved through various methods. But where do FaceTime screenshots go? It depends on the device you’re using. Understanding the destination of your screenshots is crucial for easy retrieval and sharing. Check them below:
iPhone: Screenshots on an iPhone are intuitively directed to the Screenshots album within the Photos app. This dedicated album ensures that your captured moments are organized, easily accessible, and stored alongside other screenshots on your device.
Mac: Where do Facetime screenshots go on Mac? By default, screenshot previews are saved to the desktop. Once you’ve captured a screenshot during a FaceTime call, you’ll find the image file on your desktop, conveniently labeled with the date and time of the capture.
AnyMP4 Screen Recorder: Being a third-party software, you can choose the destination path for your screenshots. This feature allows for a more personalized approach to managing screenshots. You can save your screenshots in a folder of your choice.
Does FaceTime notify screenshots?
YES! FaceTime will alert the person if you take a screenshot using the screen capture function. The notification pops up immediately after the screenshot is captured, providing transparency by indicating who took the screenshot.
Can you prevent someone from taking a screenshot on FaceTime?
Unfortunately, NO! There is no built-in feature to prevent someone from taking a screenshot during a FaceTime call. The screenshot functionality is a device-level feature and is not controllable within the FaceTime application.
Why can’t I screenshot on FaceTime?
Taking screenshots on FaceTime is generally allowed, but there could be instances where technical issues or restrictions prevent it. If you’re experiencing difficulties, consider checking your device’s settings. Alternatively, a third-party tool like AnyMP4 Screen Recorder offers a more flexible solution if you encounter challenges or wish for additional features.
How do I turn on FaceTime photo notifications?
To enable FaceTime photo notifications on iOS devices, go to Settings, select FaceTime, and toggle on FaceTime Live Photos. For Mac users, open FaceTime, go to FaceTime in the menu bar, select Settings, and enable Live Photos.
Simply put, knowing how to take screenshots on FaceTime adds a personal touch to your digital conversations. Also, it serves as a practical way to document and revisit memorable interactions. iPhone and Mac offer native methods for capturing FaceTime. However, if you require additional features for capturing FaceTime calls, AnyMP4 Screen Recorder is an excellent option. This software not only lets you screenshot FaceTime but also record all of your conversations.
 Posted by Angelica Liwanag to Screenshot
More readings
 Does Facebook Notify Screenshots? Learn the Truth!
Get facts about Facebook screenshot notifications. Discover if your online activity is being watched closely in this Does Facebook Notify Screenshots article.
 Does BeReal Notify Screenshots? Answer Explained Here!
Does BeReal notify screenshots? Find out the answer here! Explore BeReal’s notification policies and discover how to screenshot BeReal’s contents discreetly.
 How to Take Screenshot Minecraft Gameplay on Windows and Mac
Learn how to take screenshots of Minecraft gameplay by built-in settings, hotkeys, and third-party tools on Windows and Mac. Follow our easy-to-follow guides!
 3 Proven Ways to Record FaceTime on Mac and iPhone XR/XS/X or Earlier
In this article we show you how to record a FaceTime call on your iPhone, iPad or Mac. With our guide, you can save important video conversations simply.