Screenshots are one of the most practical additions to mobile devices and computers over the recent years. With the help of these quick-capture images, sharing information and important details becomes much more efficient. However, screenshot quality is also important to ensure that the intended information you want to share will be provided to the receiver. In this article, we will focus exclusively on providing solutions on how to take high-resolution screenshots across multiple platforms in Windows PC, Mac, Android, and iOS. We will provide a step-by-step guide for each featured option to help our readers learn how to use each tool.
Since screenshots are direct images of your device's current display, saving them in high resolution is crucial to ensure that the details in your images are sent with clarity. To make this possible, ensure the resolution is at least 1920x1080 for computers or 1080x1920 up to 4K for mobile devices, which is the standard in 2026. Additionally, the DPI of your images should be at least 300 DPI to ensure the color quality. Finally, the recommended format for these images is the PNG file.
This guide is designed for users who want to capture higher-quality screenshots on Windows computers, made possible by AnyMP4 Screen Recorder. Originally developed as a recording tool, this recording program for Windows 11/10/8/7, macOS 10.12 and above is equipped with a versatile Screen Capture mode that can add practical editing adjustments to images.
Although the Screen Capture mode is only one of the additional features in the program, it was developed to ensure that users who rely on it for screen captures will be able to apply additional adjustments to their images.
This is made possible by the editing tools and different saving options in the program, ranging from the Shape Tool, Draw Tool, Text Tool, Callouts, Blur Tool, Scrolling Screenshot, and Screen Pinning.
Additionally, screenshots using the program have all their resolutions fully customizable since it functions by using your cursor as the one that can select the screen capture region. You can use the program to capture full-screen or only a select region.
Finally, captured images can be saved in various formats, from PNG, JPG/JPEG, BMP, GIF, and TIFF. For improved image quality, we recommend using the PNG format.
To learn how to capture high-quality screenshots on AnyMP4 Screen Recorder, please follow our detailed guide. For an easier time following each step, make sure to download the tool using the link below.
Secure Download
Secure Download
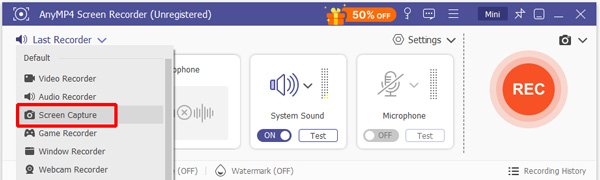
1. Open AnyMP4 Screen Recorder and select the drop-down menu beside the recording mode. Next, select the Screen Capture mode.
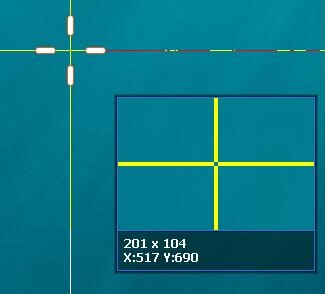
2. Selecting the mode will immediately activate the Screen Capture mode; your cursor will transform into a Cross-Shaped screen capture tool. You can now use it as a screenshot tool. With the screenshot cursor now active, click and drag your mouse to select the portion of the screen that will be screen captured.
3. With the screenshot now captured from your display, an editing menu will appear on your screen. You can now use the different editing options in it, located in the upper left portion of the menu. Otherwise, click on Save to import the screenshot to your computer.

Instead of relying on the standard Snipping Tool and Print Screen to learn how to take a high-resolution screenshot on Windows 10/11, AnyMP4 Video Converter Ultimate offers a superior alternative. It not only enhances the quality of screenshots but also provides editing tools for the images for added practicality. This alone makes it not only a good screen capture alternative but also one of the most versatile and among the best free screen recorder tools for Windows.
User Review
Since AnyMP4 Screen Recorder is known as a recording tool, most reviews about it focus on its recording function. However, the practicality and features of its Screen Capture mode are one of the most commended features in the program, with the most notable being its screen pinning function.
When looking for an option to learn how to take high-resolution screenshots on a Mac, OBS Studio is a safe choice. On top of being an open-source and free-to-use program, the software can capture and display from different sources, including your entire display, a specific window, an opened app, or more.
However, be mindful when using OBS Studio since the program is designed to be used as a broadcasting software for online streamers. With that in mind, using the software as a screenshot tool might be overkill due to the technical requirements that it needs to make use of the software effectively.
Despite its complexity, OBS Studio can still get the job done, especially when capturing screenshots from a different monitor or a specific window on your Mac computer.
To learn how to capture screenshots in the software, make sure to read our three-step guide below about screen capture in OBS Studio. Note that the guide below uses the Windows version of OBS Studio; however, the steps required to capture a screenshot on Mac remain the same.
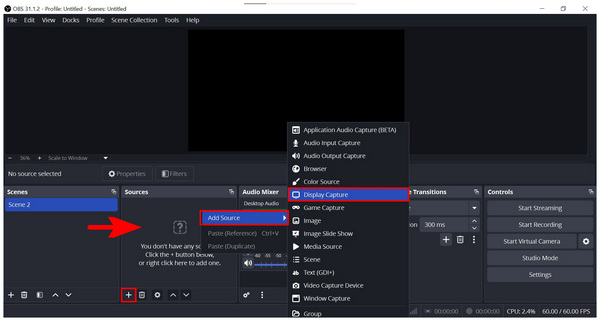
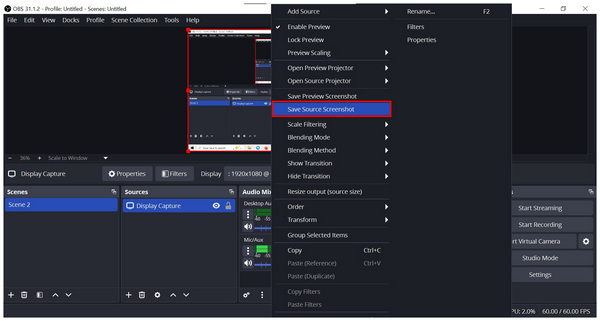
1. Open OBS Studio and then select the Add button on the Source tab. Alternatively, you can right-click on it and then hover over Add Source. Select the source you want to use. To select your computer’s display, select Display Capture.
2. After selecting the source you want to take a screenshot, it will now be displayed in the main display menu of OBS Studio. Right-click again on the display window and then select the Save Source Screenshot.
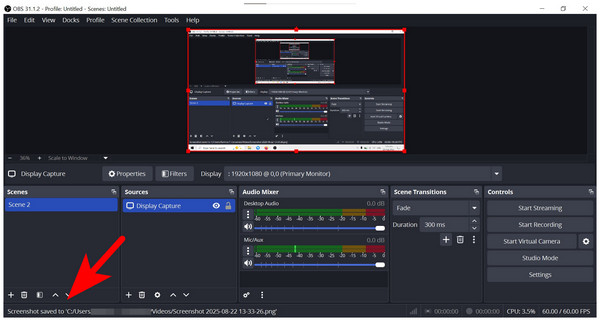
3. Immediately after selecting the screenshot option, a notification in the bottom part of OBS Studio will appear. It will show the location where the screen-captured image is saved.
Unlike a regular screen recording tool, the advanced design of OBS Studio makes even simple actions more complicated to do in the program. This includes learning how to take a high-resolution screenshot. Instead of the usual screenshot button or cursor, OBS Studio requires users to learn how to set up sources and other advanced technicalities in the program.
User Review
Since OBS Studio has a massive audience in the online streaming market, it is common for most user reviews to have their sentiments towards the broadcasting capabilities of the software. With that in mind, the high technical requirements of running the software effectively could be demanding for its users, especially for beginners. If you only want to use OBS Studio for screen captures, consider using more beginner-friendly options instead.
Although screenshots are a built-in feature on Android smartphones, users who are looking for an alternative screen recorder tool for Android could use AZ Screen Recorder. When it comes to screen capture, the program was designed to make screenshots accessible using the toolbox option in its overlay. This allows the app to capture screenshots within a few clicks in its overlay of tools.
However, the screenshot tool on AZ Screen Recorder requires a little setup to use. Once this setup is done, you have now learned how to take high-resolution screenshots on Android devices.
1. Open AZ Screen Recorder and wait for its Recording Overlay to appear on your screen. You should allow several permissions to the app to allow the menu to appear.
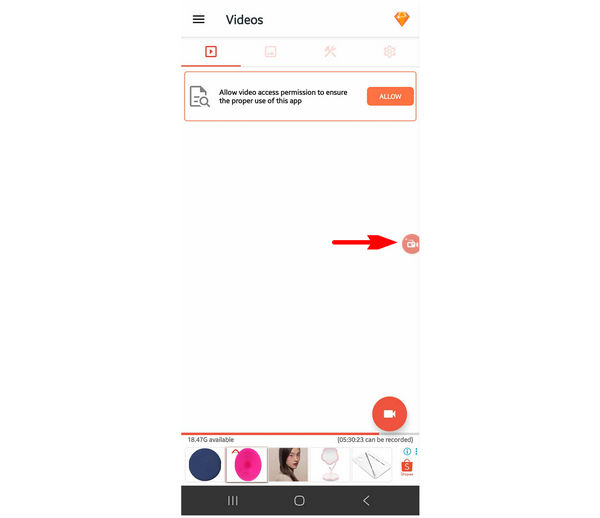
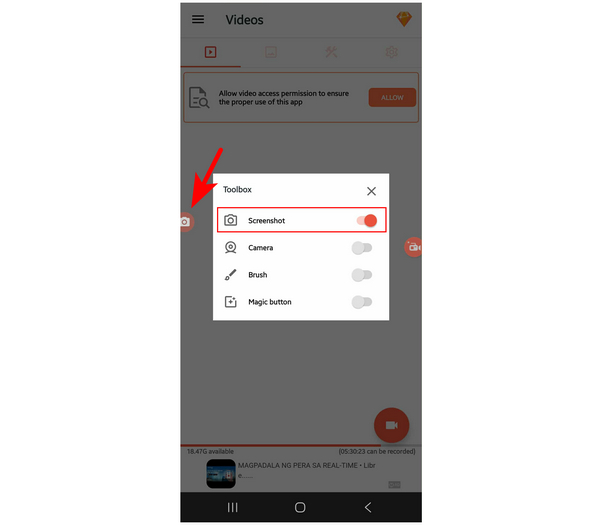
2. Tap on the recording overlay once it is active, then select the Toolbox option.
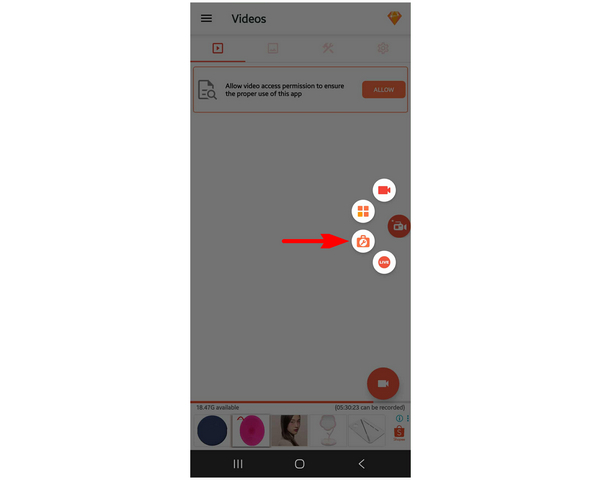
3. Among the tools available in AZ Screen Recorder, select Screenshot. A new overlay will now appear on the left side of your screen. Simply press the Screenshot overlay to take a screenshot with AZ Screen Recorder.
Since screenshots in Android devices require several button combinations to use, the one-click overlay of AZ Screen Recorder is also a good accessibility upgrade.
User Review
AZ Screen Recorder’s screenshot overlay is a welcome addition to Android devices. Although most of its users only use it for screen recording, the optional screenshot tool is a good backup option.
When it comes to iOS devices, the iPhone’s Built-in Screenshot option is more than enough if you want to learn how to take a screenshot with high resolution. This is because the display of iOS is already high-quality on its own. It is advisable for iPhone users to just rely on the built-in tool.
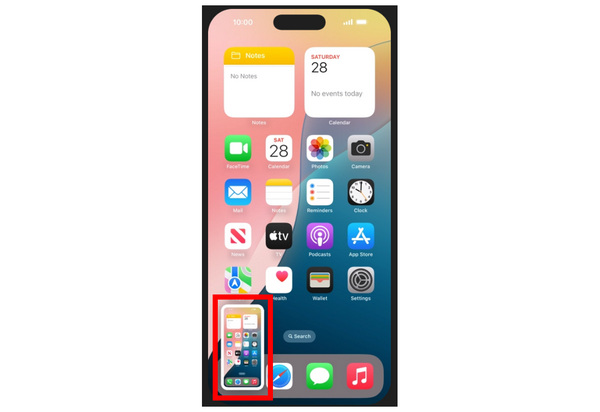
1. Press and quickly release your iPhone’s Side + Volume Up button.

2. On your iPhone’s screen, check if a notification pops up and stays in the lower left corner. Tap on it to preview your screenshot.
Although there are multiple options to take a screenshot on an iPhone, the Side Button + Volume Up button is the most common. You can also use third-party options such as DU Screen Recorder.
User Review
The default screenshot mode of the iPhone, which is good enough for high-resolution screenshots, gives it a good score for reliability. iOS users can now confidently user their device without relying on third-party options.
We hope that this article provided you with important information if you were looking for a reliable option to take high-quality screenshots. With that in mind, consider AnyMP4 Screen Recorder if you are using a PC or Mac desktop and need a reliable, high-quality screenshot tool.
Secure Download
Secure Download
 Posted by Riley Mitchell to Screenshot
Related Articles
 How to Take Scrolling Screenshots in Windows 11/10/8/7
Learn how to take scrolling screenshots in Windows with ease. This guide will walk you through the process using various Windows 7/8/10/11 tools.
 2 Ways to Take a Long Screenshot on iPhone
 Learn how to take a long screenshot on iPhone with this comprehensive guide. Discover the best methods to capture extensive content on your iPhone effortlessly.
 Mac Screenshot Shortcut Guide: Easy and Quickly
This article will present a Mac screenshot shortcut guide for you to quickly take different types of screenshots on Mac computers.
 How to Screenshot a Specific Area on Windows Like a Pro!
Want to learn how to screenshot a specific area on Windows? Then, learn the exact details you need with our step-by-step guide using three tools!