Taking screenshots will always be a practical addition to all kinds of modern hardware, ever since the development of smartphones highlighted the importance of screen captures. Long before that, Windows computers already provided screen capture services to their users. However, the Print Screen button is not present on all computers today, especially among modern keyboards designed for portability. In this article, we will provide a solution for this issue by highlighting three simple ways to change the command for Print Screen and help our readers learn how to customize the functionality of their hardware. We will feature the options with the screenshot app, keyboard remapping, and using third-party software.
Before proceeding to our guides, we will first provide a quick overview of the most common reasons why changing the command for print screen could be useful or practical for each user.
Whether you want to take screenshots as quickly as possible, or you want to use a button combination to prevent accidental screenshots, changing print screen commands is perfect for using your personal preference.
When using modern keyboards, the exclusive Print Screen button is often absent, especially on smaller mechanical keyboard setups. Since screenshots require button combinations among compact keyboards, one-button screenshots are perfect for screenshot accessibility.
Since one of the benefits of screenshots is sharing information more efficiently, ensuring that you print screen button can be used as simply as possible greatly improves workflow efficiency.
Although the Print Screen button is undeniably practical, its one-button screen shot condition is prone to accidental captures. If this is the case for you, we recommend changing the print screen command using a combination of two or more buttons.
Best Used For: Taking screenshots using different modes.
Windows Snipping Tool is the default screenshot software of Windows PCs. If you used the Windows screenshot shortcut on your keyboard, Snipping Tool will be the one that opens to give you access to taking screenshots.
However, you Snipping Tool itself has its own set of keyboard commands to take screenshots other than pressing the Print Screen button. To learn what it is, read our tutorial below.
Main Features:
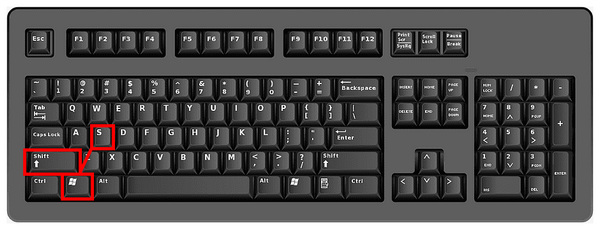
1. Press the button combination Shift + Windows Key + S to open the Snipping Tool.
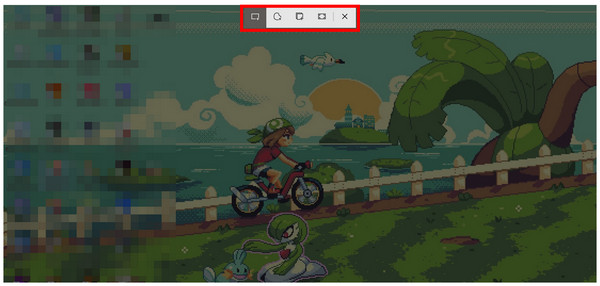
2. After pressing the button combination, the Snipping Tool overlay will appear on the screen. You can select to use the Rectangular Snip, Freeform Snip, Window Snip, or Full Screen Snip modes to capture your screenshot.
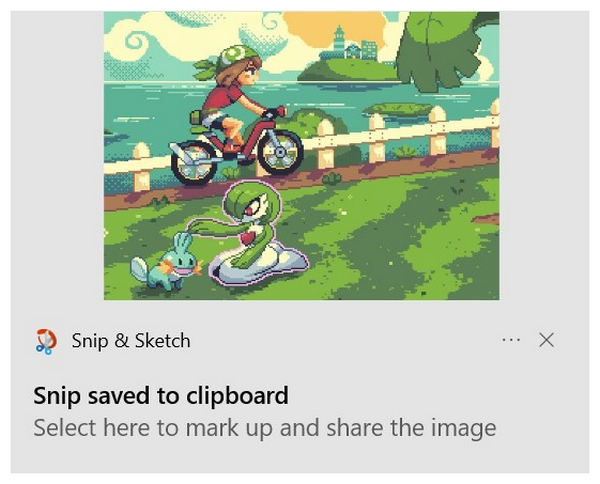
3. Once you are done taking a screenshot using the mode you selected, a Snipping Tool notification will appear on the lower right section of your screen. Click it to either save the screenshot or add minor adjustments to it.
Among Windows 10/11 computers, the Snipping Tool app is the software that will open when you use the Print Screen button. However, this built-in option still has its alternative command. If your keyboard does not have the Print Screen button, you can use the Shift + Windows Key + S command of Snipping Tool instead.
Best Used For: Changing keyboard combination for taking print screens.
As its name suggests, Microsoft PowerToy’s Keyboard Manager is a tool in the Windows utility software designed to remap keyboard button functions and the purpose of button combinations. Although trickier to set up, this option provides maximum customizability to adjust the screenshot tool on Windows.
To learn how to use it, please refer to our guide below.
Main Features:
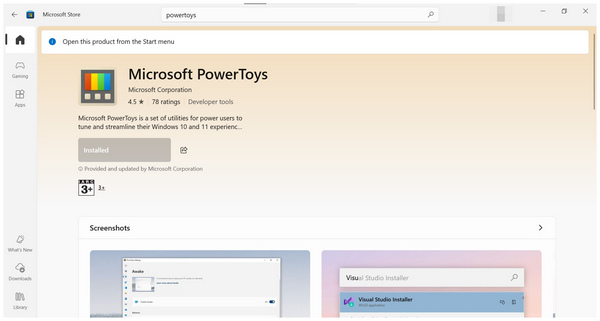
1. Open the Microsoft Store and download Microsoft PowerToys Windows Utility on your computer. Wait for it to be installed.
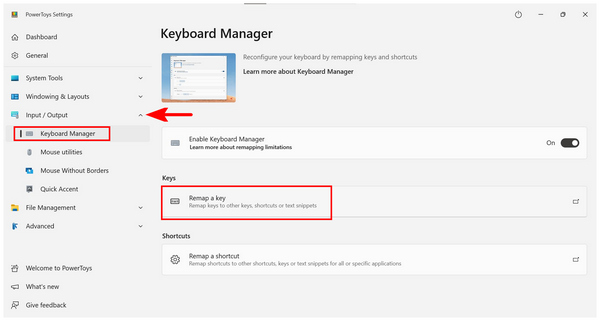
2. Once the software is installed, open it and click the dropdown menu of the Input/Output tab. Then, click on Keyboard Manager and choose the Remap a Key option.
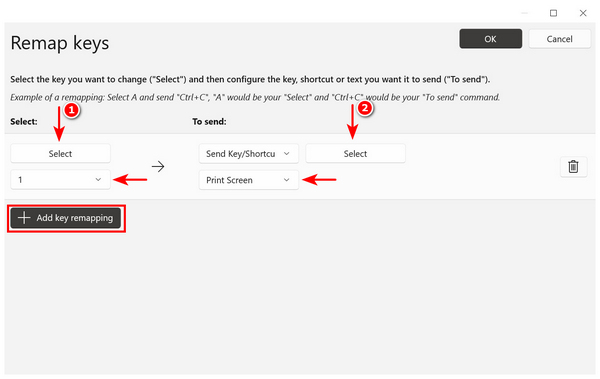
3. In the Remap a Key menu, select the Add Key Remapping option first. Next, click on Select under Select, then press the button you want to use for your command. Next, click on Select under To Send and press the Print Screen key or command button.
After adding the key remapping buttons that you set, you can now take screenshots using the newly selected button for taking print screens.
Best Used For: Capturing screenshots and pinning them on-screen.
Now that we have discussed the official options on Windows PC for taking screenshots, let us proceed to the more practical third-party alternative for changing the command of print screens with none other than AnyMP4 Screen Recorder.
Compatible with Windows 11, 10, 8, and 7 as well as Mac computers running macOS 10.12 and above, this screen recording software is fully equipped with a Screen Capture mode that can take high-quality screenshots within a few clicks.
Aside from regular screenshots, more advanced screen capture options are also accessible in the software, with the most practical being scrolling screenshots and pop-up menu capture. All of these modes may be captured by using customizable hotkeys for screen capture shortcuts.
Additionally, all of the screenshots taken by AnyMP4 Screen Recorder may be saved in multiple formats, including PNG, JPG/JPEG, BMP, GIF, or TIFF.
For additional practicality, all of the screenshots captured by the software may be pinned on the screen and saved into the clipboard for seamless copy and paste commands.
To learn more about AnyMP4 Screen Recorder, make sure to download the software now for an easier time following our provided tutorial below.
Secure Download
Secure Download
Main Features:
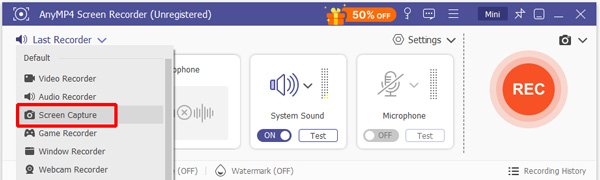
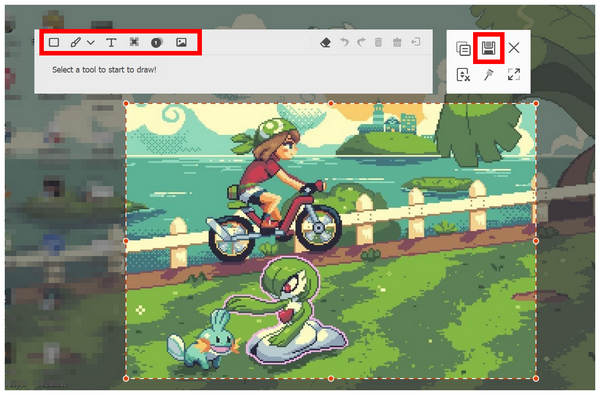
1. Open AnyMP4 Screen Recorder and then open the mode selection menu. Select the Screen Capture option.
2. After the Screen Capture mode was selected, your cursor will change into the screen capture mode. Select the portion of the screen you want to screenshot using the cursor.
3. With the screenshot now taken, you can use the annotation tools available in the software to apply adjustments to your screenshot. Otherwise, press the Save button to save the screenshot on your computer.
If you are looking for an alternative option for taking screenshots that is more flexible and offers more functions, AnyMP4 Screen Recorder is the best option for you. Aside from screen captures, the software is also one of the best free screen recorder tools on both Windows and Mac.
Now that we have provided you with different options to change the keyboard command for taking Print Screens, we hope that this article provides you with the option that you think will suit your needs and improve your work efficiency. If you want something even more practical than screenshots, make sure to check out AnyMP4 Screen Recorder.
Secure Download
Secure Download
 Posted by Riley Mitchell to Screenshot
Related Articles
 Mac Screenshot Shortcut Guide: Easy and Quickly
This article will present a Mac screenshot shortcut guide for you to quickly take different types of screenshots on Mac computers.
 Updated Windows Screenshot Shortcut: Easy and Intuitive
This article will list the Windows screenshot shortcuts so you can quickly get the screenshots on Windows computers. Please keep reading to get them.
 Troubleshoot iOS Screen Recording Not Working
What should you do if your iOS 27 beta/26/18/17/16/15/14/ screen recording not working, you can learn more about the best solutions to record iOS screen with ease here.
 4 Approaches to Record Xbox One Gameplay with The Best Quality
It's easier than ever to share your gameplay with the world. Here's how to record gameplay on Xbox One and Xbox 360 with a variety of different options.