5 Easy Ways to Screenshot on ASUS Laptop With the Best Tools
When it comes to PC gaming hardware, the ASUS brand is one of the most recognizable options, thanks to its flagship gaming laptops under the ASUS ROG and ASUS TUF brands. Due to their strategy of leaning towards gamers, the demand for a reliable screenshot tool available for ASUS laptops also increased. In this article, we will provide a complete guide to answer this demand by featuring a complete tutorial on how to screenshot on ASUS laptops using five of the most reliable screenshot options available on ASUS hardware. We will provide a step-by-step guide for each screen capture software, together with a short overview of what their users say. For a quick glimpse at the potential of each screenshot option that we will highlight, please refer to our comparison table below.
- Screenshot Tools
- Keyboard Shortcut
- AnyMP4 Screen Recorder
- Snipping Tool
- Xbox Game Bar
- Lightshot
| Ease of Use |
Screenshot Types |
Output Formats |
Editing Tools |
• Built-in option.
• Easy to use. |
• Rectangular snip.
• Freeform snip.
• Window snip.
• Fullscreen snip. |
• PNG |
• Touch writing.
• Ballpoint pen.
• Pencil.
• Highlighter.
• Eraser.
• Ruler.
• Image crop. |
• Easy to use.
• Instant access to editing tools. |
• Free-form.
• Fullscreen.
• Scrolling screenshot. |
• PNG
• JPEG
• BMP
• GIF
TIFF |
• Rectangle tool.
• Brush tool.
• Input text.
• Blur tool.
• Callouts.
• Add image. |
• Requires a simple setup.
• Slightly tricky compared to other tools. |
• Free-form snip.
• Rectangular snip.
• Window snip.
• Full-screen snip. |
• HTML
• PNG
• GIF
• JPEG |
• Touch writing.
• Ballpoint pen.
• Pencil.
• Highlighter.
• Eraser.
• Ruler.
• Image crop. |
• Requires keyboard shortcut knowledge to use.
• For intermediate users. |
• Fullscreen screenshot. |
• PNG |
• None |
• Runs from the taskbar's hidden icons.
• It might be inaccessible for beginners. |
• Fullscreen screenshot.
• Rectangle capture screenshot. |
• JPEG
PNG |
• Pen tool.
• Line tool.
• Arrow tool.
• Rectangle tool.
• Marker tool.
• Text input.
• Color tool. |
Method 1. Screenshot on an Asus Laptop with Keyboard Shortcuts (Easiest Way)
To help our readers learn how to screenshot on their ASUS laptop as simple as possible, we will start this guide by featuring the easiest way to screenshot with none other than the default Windows screenshot shortcut option.
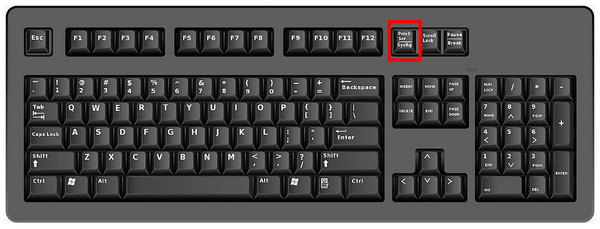
As its name suggests, the keyboard shortcut screen capture is the built-in screenshot option for ASUS laptops. It can be activated using the Print Screen button. This mode is simply the most straightforward option, and it can capture your screen’s full display or a region of your selection.
Unfortunately, it lacks the more advanced screen capture modes present in other options on this list. Specifically, the practical scrolling screenshot is highly convenient when saving browser webpages and online files.
Despite the lack of this feature, using the Print Screen keyboard shortcut still gets the job done. To learn how to use this option, please refer to our guide provided below.
1. Press the Print Screen button on your keyboard. It is usually labeled as Prt Sc and located in the upper right corner of your keyboard.
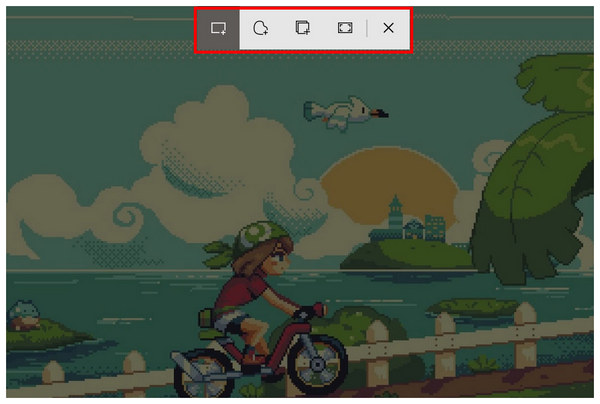
2. In the Print Screen interface, select one of the available screenshot modes: Rectangular Snip, Freeform Snip, Window Snip, or Fullscreen Snip. The simplest option is Rectangular Snip.
3. In the Print Screen interface, select one of the available screenshot modes: Rectangular Snip, Freeform Snip, Window Snip, or Fullscreen Snip. The simplest option is Rectangular Snip.

Among the options in this article, the default Print Screen keyboard shortcut is the easiest to use when learning how to take a screenshot on an ASUS laptop. Unfortunately, it is also the most limited when it comes to more advanced features.
What Users Say About Keyboard Shortcut Screenshot
Users of the Print Screen keyboard shortcut applaud its functionality and convenience. Unfortunately, its lack of editing tools severely hinders its potential. In older versions of Windows, the print screen button is limited to full-screen capture.
Method 2. Screenshot on an Asus Laptop with AnyMP4 Screen Recorder (Best Way)
After featuring the most beginner-friendly screenshot option, we can now move forward to the best way to screenshot on ASUS laptops. Expectedly, the best tool for this function is a third-party option, with none other than AnyMP4 Screen Recorder.
Highly compatible with Windows 11/10/8/7, the program's optimization to run on basically any computer running Windows is commendable already. In addition to this, the versatility of the tool’s screen capture mode is impressive as well. It can capture screenshots in a custom area, the full screen, or take a scrolling screenshot.
To support its versatile screenshot modes, the program also has a pop-up menu that provides instant editing options for the raw captured image. It also includes versatile saving options ranging from copying the screenshot to the clipboard, saving it as it is, or an option to pin the screenshot on your screen, acting as a virtual sticky note.
Finally, saved screenshots may be saved in multiple output formats, including PNG, JPG/JPEG, BMP, GIF, or TIFF. The versatility of the program is not only limited to its features but also to its output formats.
We highly recommend following our step-by-step guide to learn how to use AnyMP4 Screen Recorder as your go-to screen capture program. You can also download it using the free download link provided below.
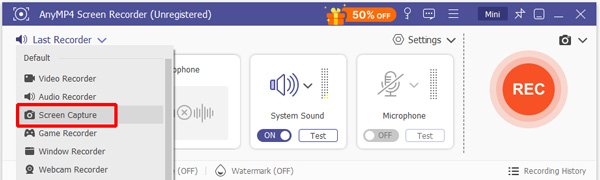
1. Open AnyMP4 Screen Recorder and then select the mode selection button to access the Screen Capture mode.
After selecting the Screen Capture mode, your cursor will automatically transform into the screen capture tool. Adjust the rectangular region that your cursor covers to indicate the portion of the screen that will be captured.

2. Once you have selected the portion of the screen to be screen captured, AnyMP4 Screen Recorder will now provide you with the editing tools to adjust the image. The editing tools available are the Rectangle tool, the Brush tool, the Input text, the Blur tool, Callouts, and Add image.

3. Once you have edited the raw screen-captured image, you can choose how to save it or select another screenshot mode. AnyMP4 Screen Recorder’s screen capture tool has multiple saving options and modes. You can save the image using the options copy to clipboard, save the image, or pin the screenshot to your screen. Alternatively, you can also use the scroll capture mode or full-screen screenshot in the same menu.

The combination of editing tools and versatile saving options in AnyMP4 Screen Recorder makes it the best screen capture program in this article. The screen pinning and scroll capture modes are the most commendable features. With that in mind, we hope that you can try using this software as your go-to screenshot program.
What Users Say About AnyMP4 Screen Recorder
Although most users of AnyMP4 Screen Recorder use it as a recording program, its versatile screen capture features are also well-received by its users. The practicality of the scrolling screenshot garners overwhelming approval.
Method 3. Screenshot on an Asus Laptop with Snipping Tool
The Snipping Tool is a new addition to the later versions of Windows. It is a dedicated screenshot software for Windows that is integrated with the Print Screen button. Although it works together with the Print Screen function, the Snipping Tool app may be used separately as a screenshot program.
If you want to use the print screen editor without relying on the print screen button on your keyboard, you can follow our guide provided below to learn how to screenshot on ASUS computers using the program.
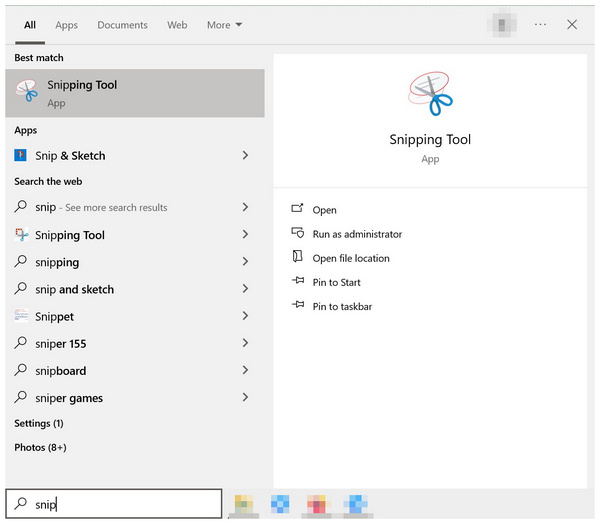
1. Open Snipping Tool by searching for it on your computer’s search bar. You must search for the program to access it since it is not available on your desktop by default.
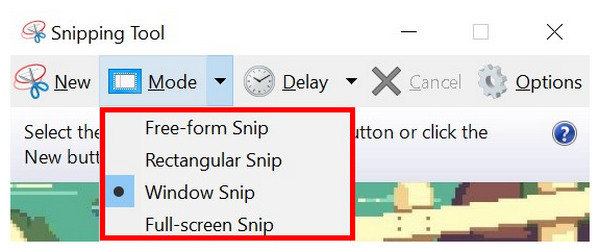
2. Once Snipping Tool is open, select the screenshot mode you want to use. After choosing the mode according to your needs, click on the New button to use the program to take a screenshot.
3. Immediately after clicking on the New button, the Snipping Tool will activate its screen capture mode by overlaying your screen. Use your cursor to select the portion of the screen that will be captured. The section that the program will take will be clear from the overlay that the Snipping Tool laid out.

What Users Say About Snipping Tool
Since the Snipping Tool is a program that supports the Print Screen button, using the program directly without relying on the Print Screen involves too many extra steps. Most snipping tool users only use the Print Screen shortcut.
Method 4. Screenshot on an Asus Laptop with Xbox Game Bar
Another recent addition to Windows computers is the Xbox Game Bar feature, which was designed to provide screen recording support for the PC gaming community. Due to its background as a screen recorder, the program also offers a much simpler screenshot option.
Unfortunately, Xbox Game Bar’s screen capture option only offers full-screen screenshots, which is a big disadvantage when compared to other options on this list. Despite that, Xbox Game Bar's convenience and ease of use still give it an edge over its competitor software.
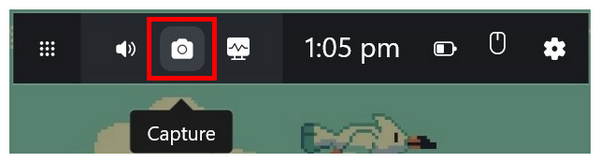
1. Open Xbox Game Bar by pressing the keyboard combination Windows + G. With the menu now open, select the Capture button.
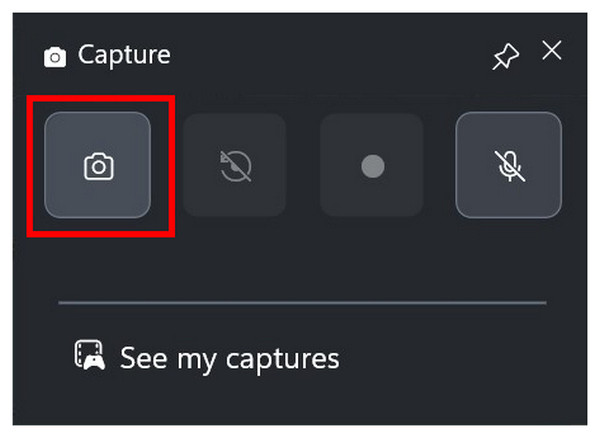
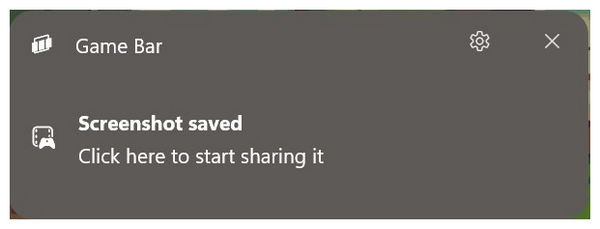
2. In the Capture menu that will open, select the Camera button to take a full-screen screenshot. Xbox Game Bar only offers a full-display screenshot.
3. After clicking on the Camera button, a notification menu will appear on the screen. Click on it to locate the screenshot that you have captured and saved in your file manager.
What Users Say About Xbox Game Bar
Xbox Game Bar users highly commend the software's accessibility for capturing gaming-related moments. However, the software's significant downside is the lack of editing options and capture limited to full-screen.
Method 5. Screenshot on an Asus Laptop with Lightshot
The fifth screenshot tool that can solve problems related to taking a screenshot on an ASUS laptop is Lightshot. This third-party screen capture software is also designed to provide users with a versatile tool.
However, the impractical way to access the program may hinder it from being a primary choice. The tool requires its users to set up a hotkey first to access the program's screen capture shortcut. If you do not have a set hotkey, activating Lightshot will be far from seamless.
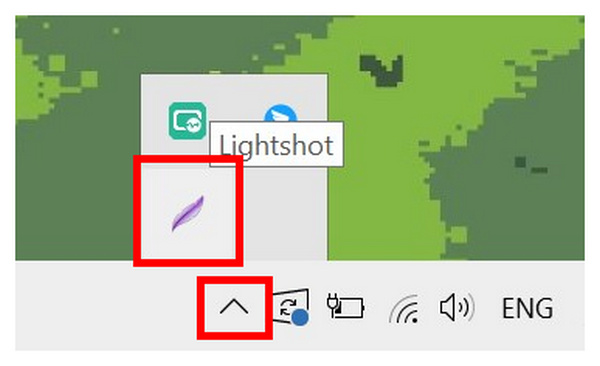
1. Search for Lightshot on your computer’s search bar. Click on it to open the software.

2. Once Lightshot is opened, it will run in your computer’s background. To use the tool, click on the Hidden Icons in your Taskbar, search for the Lightshot icon, and click on it.
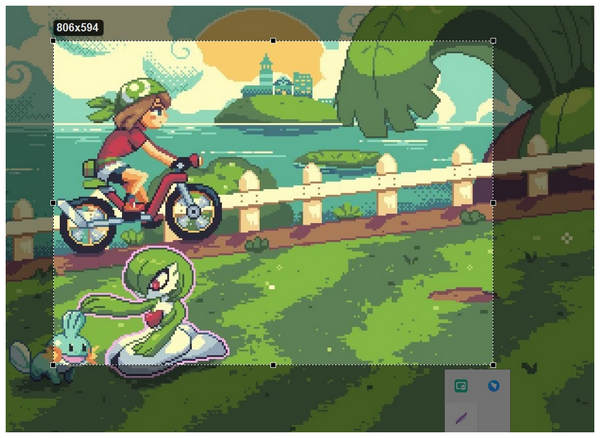
3. After clicking on Lightshot in your taskbar, the program will now enter its screen capture mode. Simply control your cursor to select the portion of the screen that you want to be taken as a screenshot.
What Users Say About Lightshot
Lightshot’s functionality and compact size make it a good screenshot software. Unfortunately, the lack of a dedicated hotkey makes it a bit tricky to set up.
Conclusion
Now that we have provided our readers with the best screenshot software for ASUS computers, we hope that this article has helped you decide which among them will be the best fit. According to your needs, hardware limitations, and technical skills. If you are still undecided, feel free to download the best screen recorder and capture tool in AnyMP4 Screen Recorder using the link below and try the most versatile software in this list.