Taking screenshots on Android smartphones has become an integral part of the convenience that these smart devices offer. Sharing information conveniently is the most practical benefit that screen captures can provide. With that in mind, this article aims to present a detailed tutorial for Android users who want to learn the different options for taking screenshots on Android. We will deliver multiple guides for the most common options for taking screenshots, different screenshot methods on various brands, learning how to screenshot using a digital assistant, and using third-party tools for taking screen captures.

The first screenshot method we will feature, if you want to learn how to take a screenshot on an Android phone, is the most universal option for taking screenshots on all Android devices, whether smartphones or tablets. It is the power button + volume down combination. Due to its availability on all Android devices, this method can still be considered the most popular screen capture method. Unfortunately, the button hardware of Android smartphones is one of the most commonly damaged parts of the device. Using this combination can also be challenging for some users with dexterity issues.
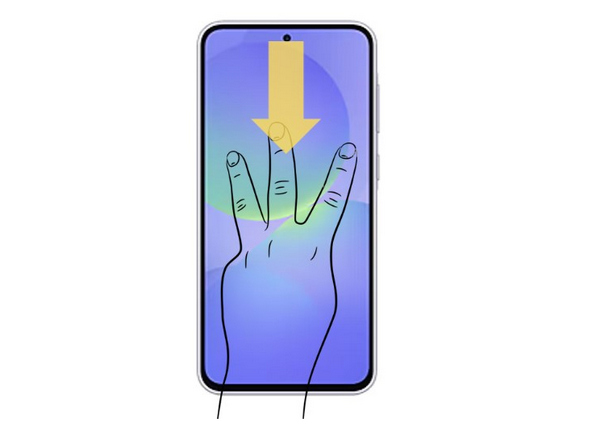
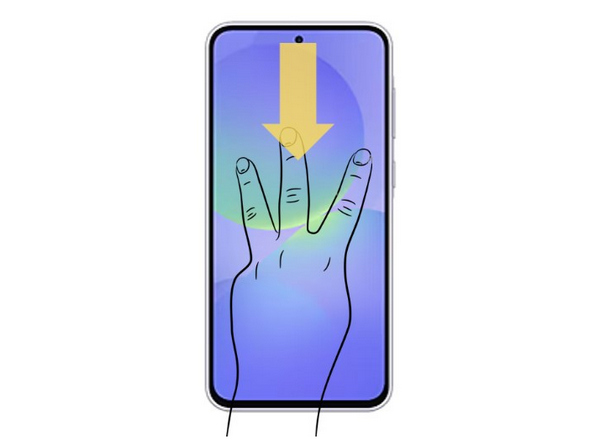
Perhaps the second most used screenshot method is the three-finger swipe down option, a touch-based command introduced by Oppo in 2015. Simply put, this option allows your Android device to take a screenshot if you swipe downwards using three fingers. This is a more accessible option for most users since it does not require them to press two buttons at once, and it can be done within the touchscreen surface itself.
The third option in the universal methods to capture screenshots on Android might be described as something similar to the AssistiveTouch feature of iOS devices. Much like the mentioned feature, the Quick Settings Menu, which needs to be enabled manually on Android devices, works similar to the AssistiveTouch feature of Apple's smartphones since it also involves a screen overlay that opens multiple functions, including screenshots, or a screen recorder for Android once it is opened.
Unfortunately, Quick Settings requires its users to enable it manually themselves since it is only an optional accessibility feature for most Android phones. Below is a detailed guide on how to enable the Quick Settings overlay.
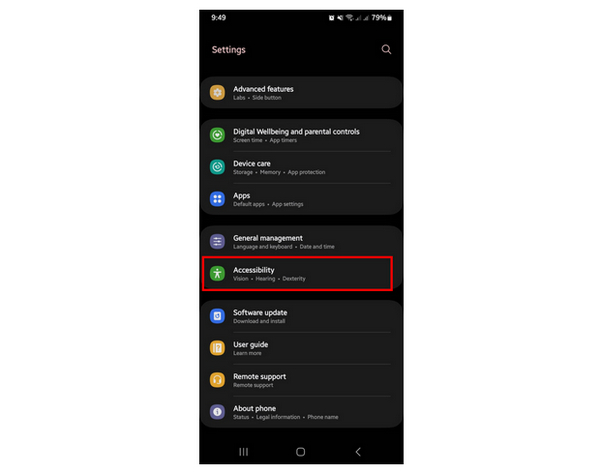
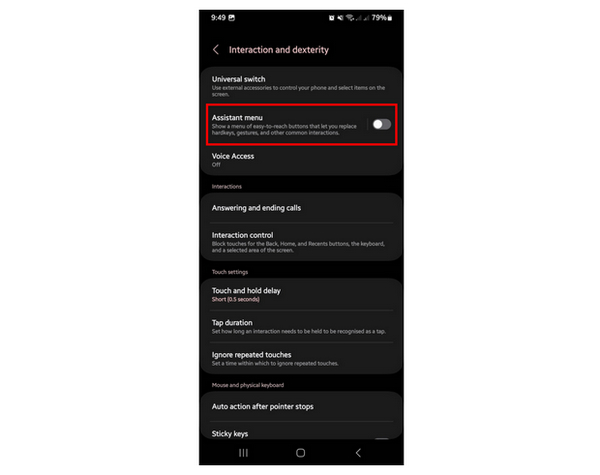
1. Open your device’s Settings menu and then scroll down to find the Accessibility option. Open it.
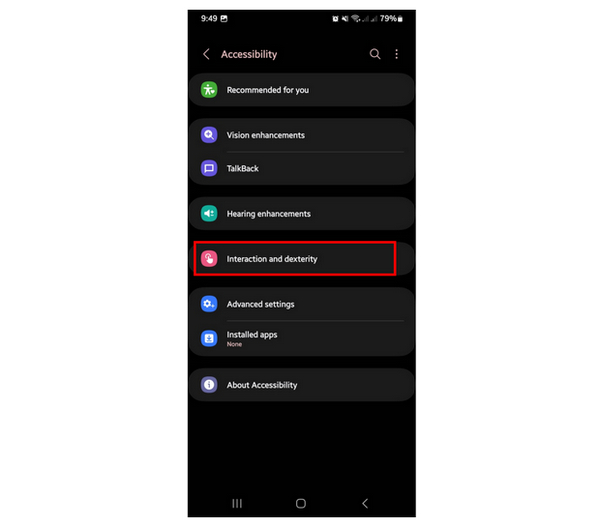
2. Inside the Accessibility menu, select the Interaction and Dexterity tab.
3. The Assistant Menu toggle is located at the top of the Interaction and Dexterity tab. Tap on it to turn it on.
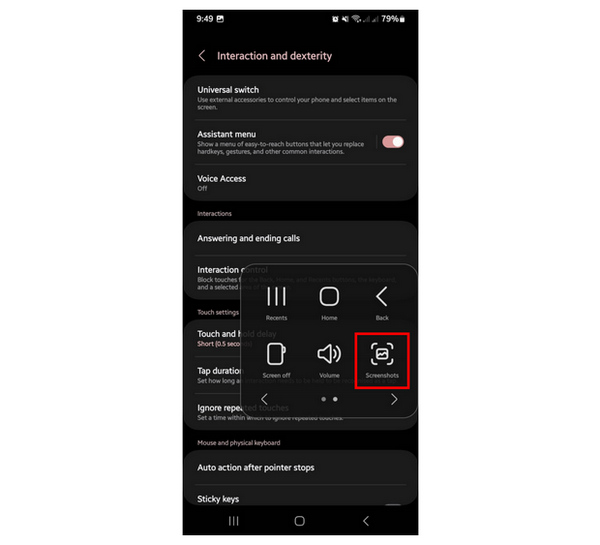
4. After turning on the Assistant Menu button, the Quick Settings overlay will appear on your screen.
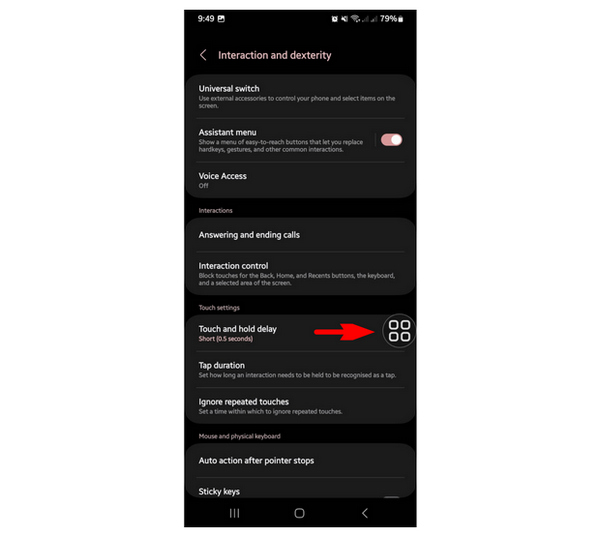
5. Tap on the Quick Settings overlay that just appeared. By default, the Screenshots option will be among the settings available in it.
Since Quick Settings is an added feature to provide accessibility, it is customizable with multiple options, such as volume down, open settings, and other advanced options. If you are using a Samsung smartphone, the step-by-step process shown above is the same as the steps that will allow your device to enable its Quick Settings overlay.
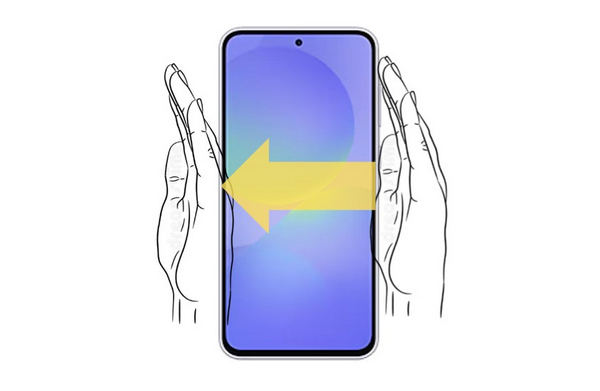
Moving forward to brand-centric screenshot options, we will first discuss the palm swipe gesture available on more advanced models of Samsung Galaxy devices. This option could be considered the more accessible version of the three-finger swipe down because it does not require that you touch the screen yourself. This gesture will allow you to take a screenshot by simply waving your palm on your screen sideways while allowing your device’s motion capture to detect your gesture.
Unfortunately, palm swipe is not available to all Samsung Galaxy devices. This feature is only accessible to more expensive models, from midrange to flagship releases, similar to the feature that can screen record Samsung devices.
Although a universal option today, the three-finger swipe down option was first exclusive to Oppo smartphones' Color OS. This makes the option a brand-specific screenshot option since it became a universal method during the late 2010s. The option to add a touch-based screenshot method is a superb addition to all Android devices at the time. However, the rapid development of Android releases made this option obsolete, with the palm swipe capture being an excellent example.
Despite that, Oppo’s three-finger swipe down still served as a trailblazer for Android developers to provide more accessibility options to their future and current releases. This is also a big plus for Motorola users since the gesture was also introduced early in their devices to support screen recordings in Motorola smartphones.
When it comes to Android devices, Google Pixel could be considered the top brand since it is the only line of Android smartphones officially supported by Google. To keep up with this reputation, Google Pixel smartphones are famous for their innovative features that improve users' quality of life.
One example of their innovative features is the smart usage of gesture bars, which also includes an option to capture screenshots. To learn how to capture screenshots using the gesture navigation of the Google Pixel, please continue reading our step-by-step guide below.
1. Open your Google Pixel smartphone and swipe up the device’s Navigation Bar.
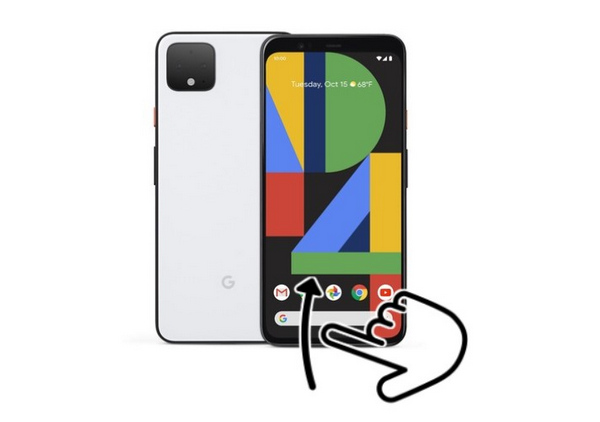
2. After swiping the Navigation Bar up, your smartphone will open the catalog of background apps currently active on the device. In the same menu, a screenshot option will also be available. Click on it to take a screenshot.
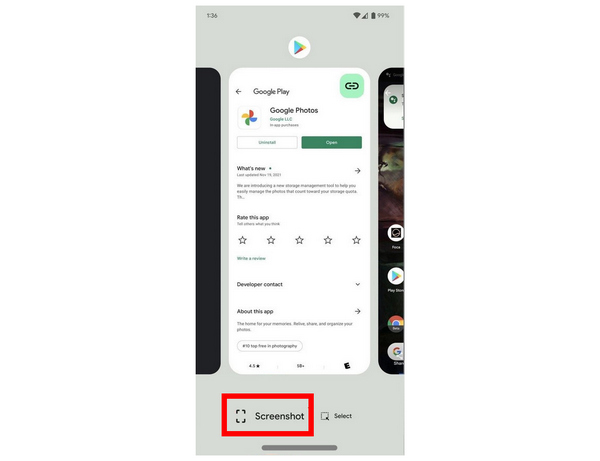
3. Tap on the Quick Settings overlay that just appeared. By default, the Screenshots option will be among the settings available in it.

Integrating a screenshot option in Pixel’s background app menu is a commendable addition. This is also a practical tool to give the additional option for users who want a screenshot method that can capture images with only two taps.
Looking forward to the more advanced features of modern Android smartphones, Google’s Gemini AI, formerly known as Google Assistant, can also answer inquiries such as how to take a screenshot on an Android. If used correctly, this option could compete with Pixel’s screenshot option in its background app button. However, the unpredictable variables of background noise and environment may render Google Gemini inconsistent.
To learn how to screenshot using a digital assistant on Android devices, please read our provided guide below.
1. Open the app that you want to take a screenshot of. Then, hold the Home button of your device and wait for it to vibrate.
2. The vibrating feedback indicates that Google Gemini is now active and is listening to your command. Give your command by saying “Take a screenshot,” or any combination of words that hold the same meaning.
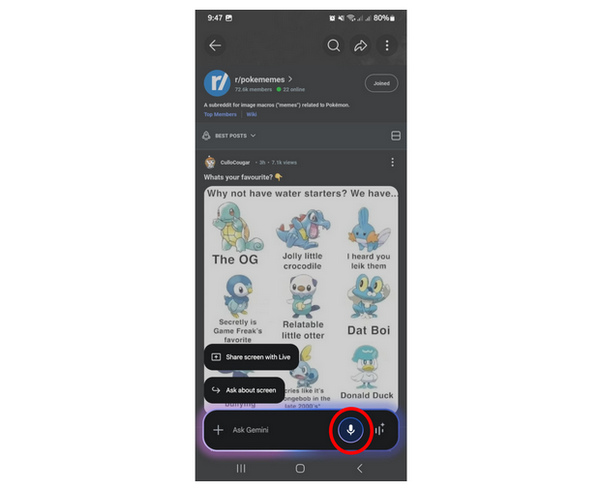
3. If Google Gemini captured your audible command, the digital assistant will do so and drop a line saying that it successfully took a screenshot after capturing your device’s display.
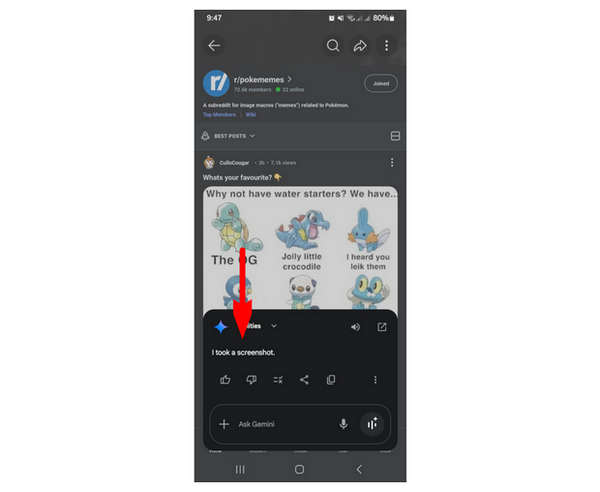
If you are in a controlled environment, using Google Gemini might be a good additional option for almost hands-free screenshot taking.
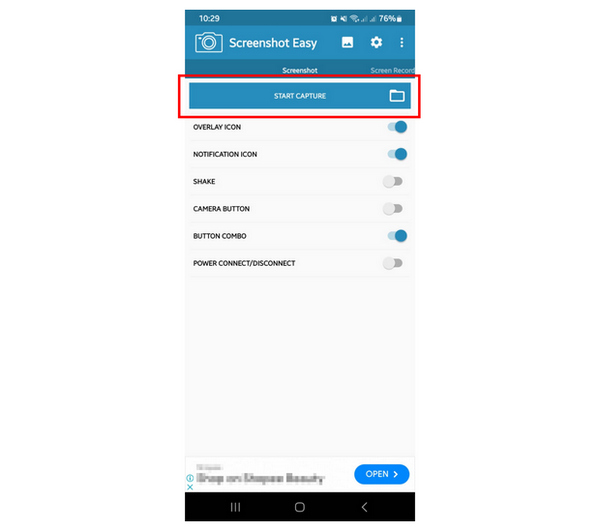
Screenshot Easy is a third-party application available for Android devices that serves as an alternative screenshot and screen recording tool for users who want a separate option for taking display images.
Third-party apps such as Screenshot Easy are good alternatives if your device has an internal issue that prevents you from taking screenshots regularly. We recommend using this third-party tool if that is the case.
Main Features:
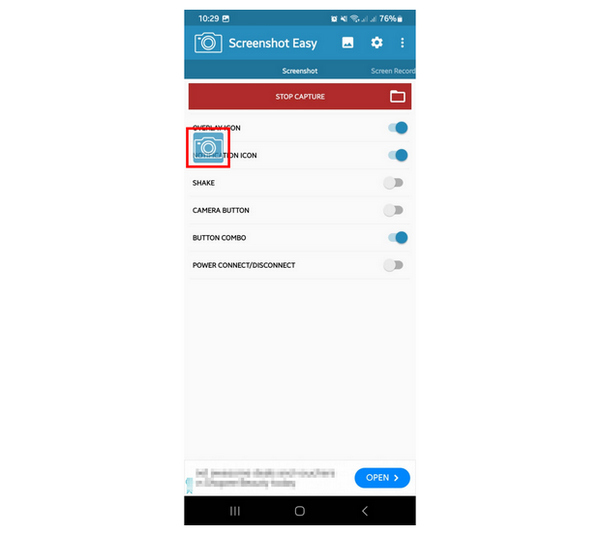
1. Open Screenshot Easy and then tap the Start Capture button.
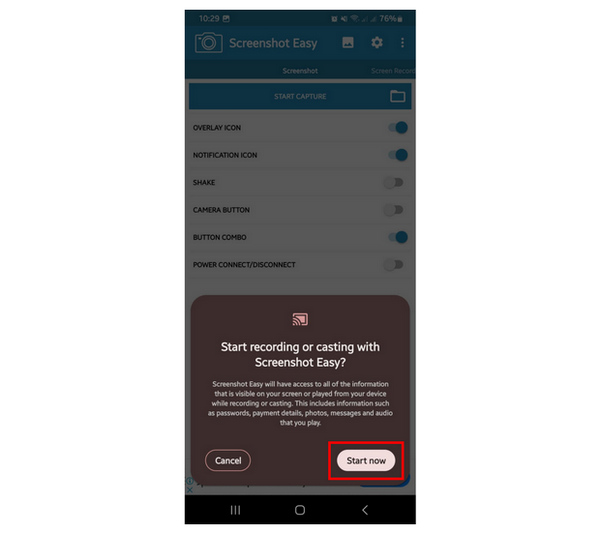
2. To allow the app to capture your screen, click on Start Now to give access to the app for your device’s display.
3. Once you have given Screenshot Easy permission, the screenshot overlay will appear on the screen. Tap it to take a screenshot.
Although Screenshot Easy is also an Android-based option, it can still get the job done to capture screenshots on your device, plus additional features that can be unlocked with their paid upgrade plans. However, the tool’s ad presence might hinder its users from experiencing a seamless screenshot process.
If you are looking to screenshot your Android device using a third-party software accessible from a separate device, like your computer, AnyMP4 Screen Recorder should be your number one pick.
Although its name suggests otherwise, this versatile tool is not only a screen recorder software but also capable of screen mirroring Android devices with the help of its Phone Recorder mode. Its external nature allows the software to take screenshots from applications that prohibit them and avoid sending notifications to apps that trigger privacy warnings when taking screenshots, like Snapchat.
As its name suggests, the Phone Recorder mode is also capable of screen recording your device alongside its feature to capture snapshots. Once you are done recording, video editing features are also accessible in the tool, allowing users to instantly apply adjustments to the recorded phone mirror.
Going back to external screen capture, AnyMP4 Screen Recorder’s Phone Recorder saves captured images in various formats, including PNG, JPG/JPEG, BMP, GIF, or TIFF. You can also adjust both the display resolution and output resolution of the screenshot or video that you will take.
The wide selection of output formats, editing features, and security bypass perfectly make AnyMP4 Screen Recorder the number one option if you are looking for a third-party screenshot tool for your Android smartphone.
To learn more about the software, we have provided its main features, which support Android screenshots, together with a detailed three-step tutorial that will help you understand how to use the tool after downloading it using the link provided below.
Secure Download
Secure Download
Main Features:
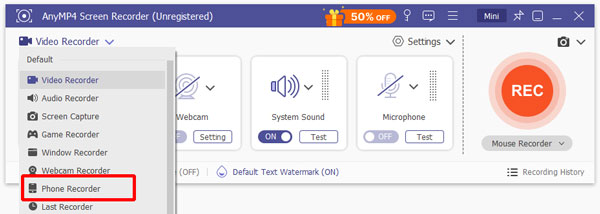
1. Open AnyMP4 Screen Recorder, click the mode selection button beside Video Recorder to change the recording mode, and then select Phone Recorder. After selecting Phone Recorder, select the Android Recorder option.
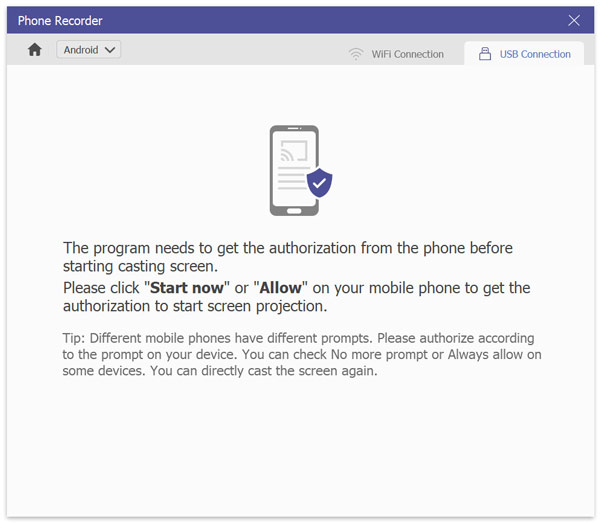
2. Connect your Android smartphone to your computer using a USB cable. This option is advised since it is more straightforward than the WiFi connection option. To allow AnyMP4 Screen Recorder to capture your device’s screen, select the Start Now or Allow button on your smartphone to permit the external recorder to access your display.
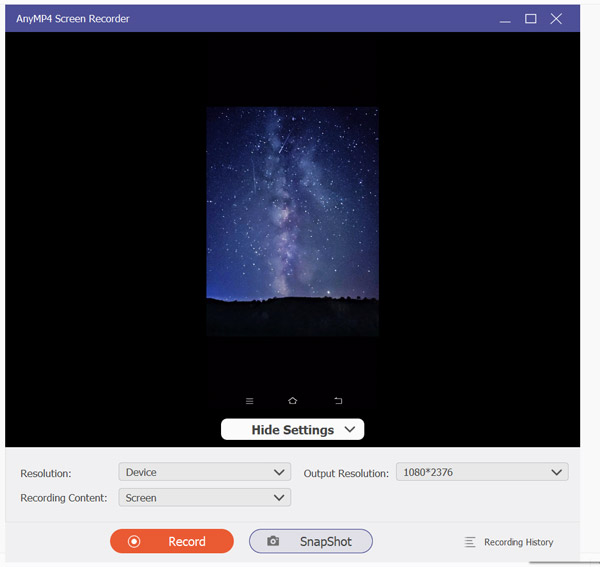
3. Once your Android device has been mirrored to AnyMP4 Screen Recorder, click on the Snapshot button on the phone mirroring display. This will immediately save a screenshot of your device's current display to your computer.
If you are not satisfied with the built-in screenshot tools on your Android phone, you should use an external recorder that can also capture screenshots. Fortunately, AnyMP4 Screen Recorder offers this feature and more, making it not only a third-party screenshot tool but also a convenient software to be used as a free screen recorder program.
With the numerous options to capture screenshots now highlighted in this article, we hope that you were able to select the best method according to your needs, the state of your device, and your technical skills. As a bonus tip, we highly recommend considering the versatility and secret recording features when choosing a screenshot software. With that, AnyMP4 Screen Recorder should be on top of the list of your considerations.
Secure Download
Secure Download
 Posted by Riley Mitchell to Screenshot
Related Articles
 A Step-by-step Guide to Screenshot on Alcatel Mobile Devices
Users can easily take screenshots on their smart phones, such as Alcatel One Touch screenshot. Read this article and then you will get at least three methods.
 3 Best Ways to Take a Screenshot on Mac
Do you want to learn to take screenshots on Mac computers? Read this article to learn how to use its default screen capture options and an alternative app.
 3 100% Working Ways to Screenshot on Toshiba in Various Situations
If you need to capture an image of your Toshiba laptop's desktop, you'd better read this guide since you can find multiple ways to do the task in various cases.
 3 Ways to Screenshot on HP Desktop and Laptop of Any Screen Size
This is the complete tutorial to screenshot on HP step by step. You can use both the tools to take a screenshot on all HP models and OS versions.