Learning how to screenshot on Google Pixel might be a bit tricky for some users, especially if they are not used to the advanced interface and firmware of Google Pixel devices. Fortunately, the flagship brand of Android-powered smartphones was developed to provide quality of life improvements to its users, even on simple features such as taking screenshots. In this article, we will highlight three of the most popular ways to take screen captures of Google Pixel displays: from basic button combinations, Pixel-exclusive gestures, and using a third-party screen capture software running on an external device. To learn the screenshot option that suits your needs, make sure to read the provided guides below.
The first option we will discuss will be using the buttons accessible in the Google Pixel hardware to screenshot the Google Pixel displays. This section of the article will feature the two options, which include the universal screenshot combination that has been a staple of Android devices since the early 2010s, alongside the newer addition of scrolling screenshots.
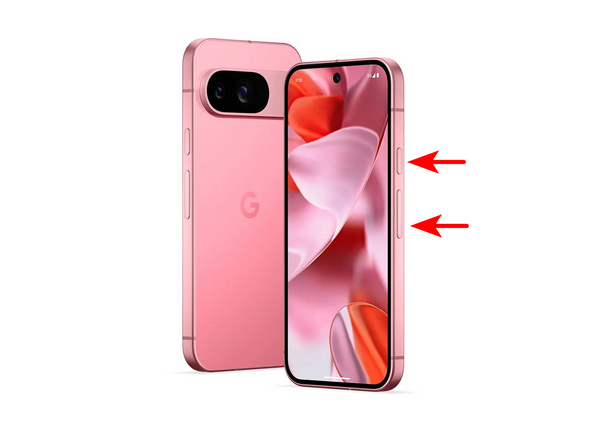
Although it is top of the line and its firmware is one of the best, especially in the Android market, Google Pixel Phones still run under the Android operating system. With that in mind, the default screenshot button combination of Power + Volume Down button will still work in different versions of the device, from Pixel 9 to Pixel’s original release, and regardless of variants from Pixel Pro, Pixel a, Pixel Fold, or Pixel Tablets.
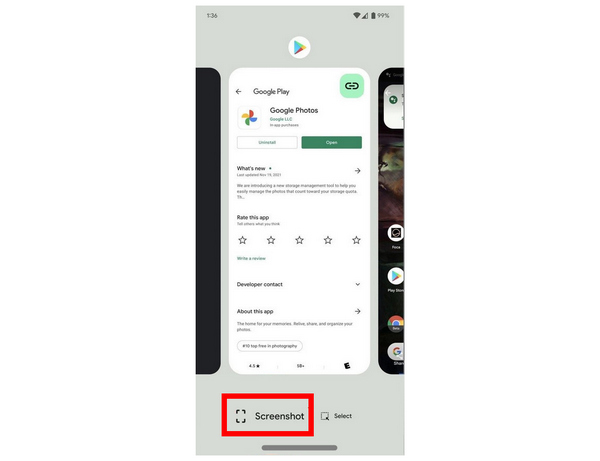
The old reliable button combinations of Power button + Volume Down can still be used to take a full-screen capture of your Google Pixel display.
Moving forward to the more recent version of screenshots, we will now proceed to the Scrolling Screenshot mode. This screenshot mode allows the user to capture a longer portion of the screen, such as web pages or social media feeds.
As its name suggests, scrolling screenshot is a specialized mode that serves its purpose in usually unconventional niches. Despite that, this mode is always highly practical if the situation requires it.
To learn how to capture scrolling screenshots on Android and Google Pixel devices, make sure to read our step-by-step guide below.
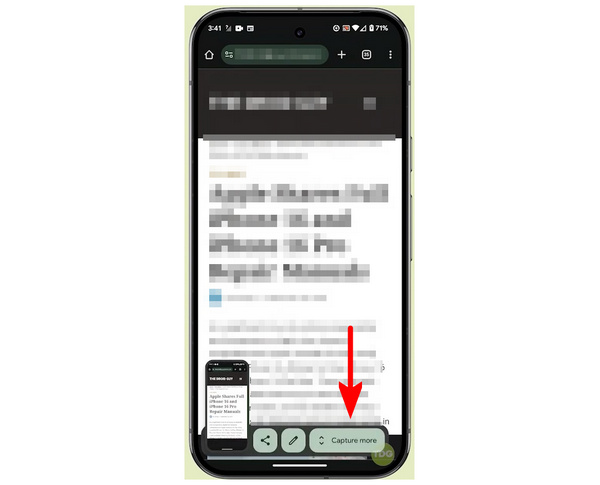
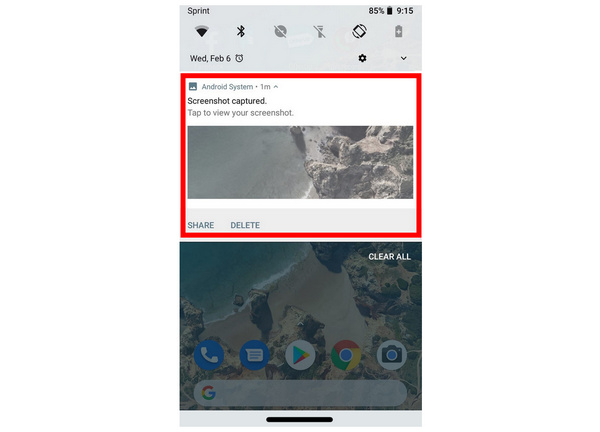
1. Take a regular screenshot of the display that you want to capture as a scrolling screenshot. Then, wait for the screenshot notification to pop up.
2. In the screenshot notification menu, select the Capture More option. This setting can capture an extended or scrolling screenshot.
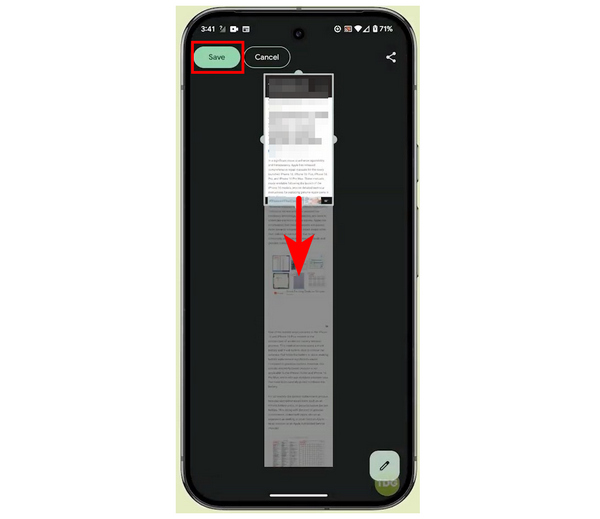
3. Finally, drag the screen capture selector downwards to select the section of the tab you want to capture as a scrolling screenshot. Once you are satisfied with the captured regions, tap the Save button to confirm your selected scrolling screenshot image.
Aside from capturing webpages, the Capture More option of Google Pixel, which allows you to capture scrolling screenshots, is also a solid option if you want to share a music streaming playlist, long conversations, or similar uses.
One of the top innovations in the Google Pixel is gestures, an advanced accessibility feature that is usually not present in most entry-level or even mid-range Android devices.
As its name suggests, Gestures utilizes the smartphone’s advanced gesture-capturing design, allowing its users to perform commands such as taking screenshots without using additional steps like pressing two buttons at once.
Refer to our guides below to learn how to use the Gesture Navigation and Quick Tap options to take screenshots on Google Pixel Phones.
1. Open your Google Pixel smartphone and swipe up the device’s Navigation Bar.
2. After swiping the Navigation Bar up, your smartphone will open the catalog of background apps currently active on the device. In the same menu, a screenshot option will also be available. Click on it to take a screenshot.
3. To ensure that your Google Pixel smartphone has successfully taken a screenshot, open your device’s notification menu to check if a screenshot has been saved.
The practicality of Gesture Navigation is a big plus for users who want to avoid additional steps to capture screenshots. This is a solid addition to the hardware’s practicality and convenience.
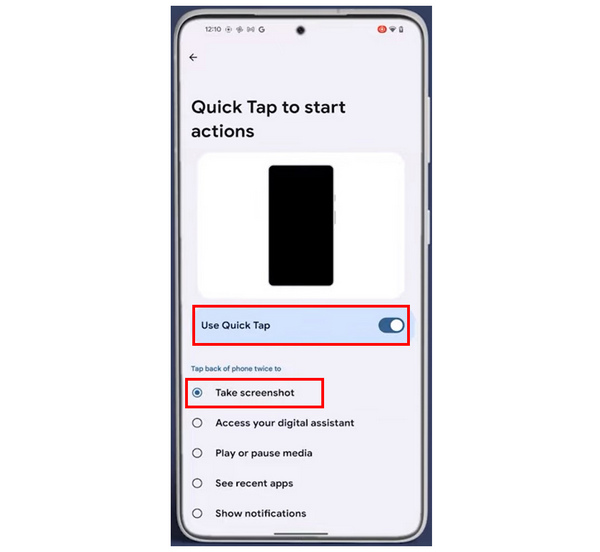
1. Open Google Pixel’s Settings and then scroll down to find the System tab. Select it.
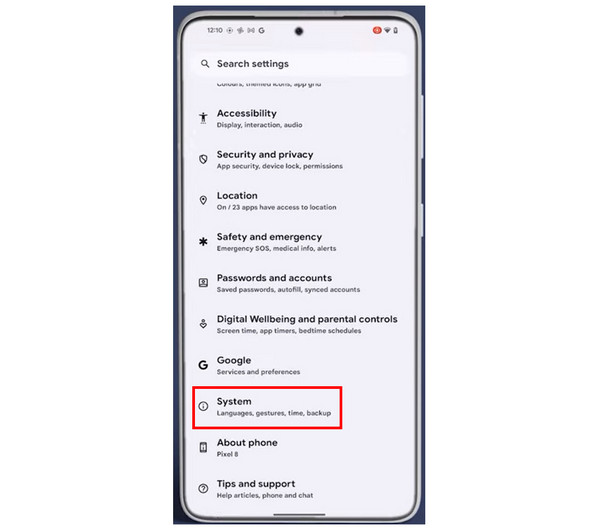
2. Inside the System settings, select the Gestures option.

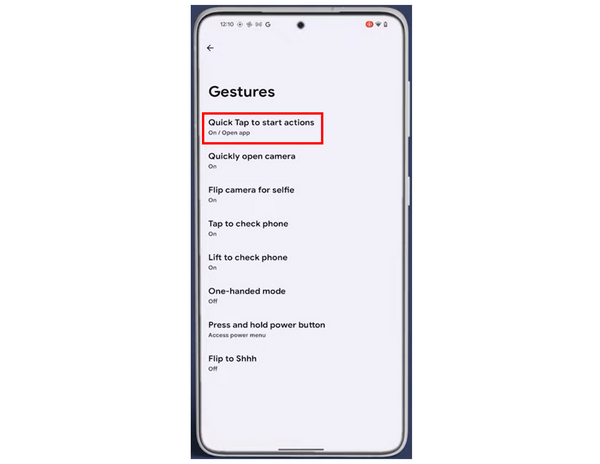
3. In the Gestures selection options, choose the Quick Tap to start actions. This is the section of the settings where you can choose the function of the Quick Tap gesture.
4. First, enable the Use Quick Tap toggle to activate the Quick Tap gesture. Among the available gestures, tap the Take Screenshot option to set the Quick Tap gesture to take a screenshot.
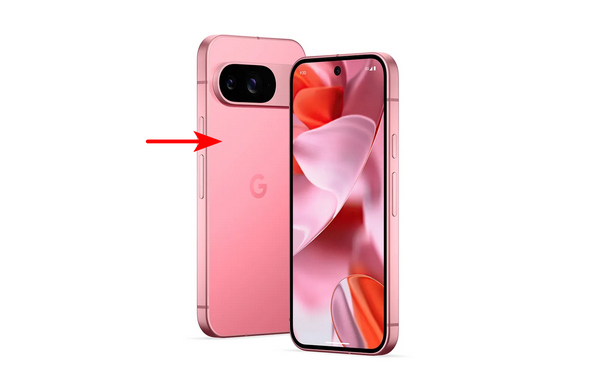
5. With the Quick Top gesture now active, you can now take a screenshot quickly by tapping on the back of your Google Pixel Smartphone twice. The region between the camera and the Google logo is the part of your smartphone’s back that triggers the Quick Tap gesture.
The Quick Tap feature of the Google Pixel is one of the most innovative features of the smartphone line. Introduced in Google Pixel 4a, the gesture immediately became an optional feature on all of the following releases of the program. It is a big plus that it can be used to take screenshots practically.
Although Google Pixel Phones' screenshot capabilities are top-of-the-line in practicality and convenience, third-party screenshot tools will always be unmatched in quality since they are specifically developed to capture screen displays. In this case, AnyMP4 Screen Recorder should be the number one option on your radar if you are looking for an upgrade from Google Pixel's default screenshot options.
The Phone Recorder mode of AnyMP4 Screen Recorder is designed to mirror Android devices, such as Google Pixel, to the computer where it is running. Once the mirror is active, the software will be able to take a screenshot of the display using a dedicated screenshot tool.
Due to the external nature of AnyMP4 Screen Recorder, privacy measures of several applications that prohibit screenshots will be able to be bypassed. Security notifications triggered by screen captures will also be avoided, especially on social media apps such as Snapchat.
In addition to its third-party screenshot capabilities, video editing features will also become available in captured screen recordings and screenshots of mirrored devices, making the program an all-in-one option for recording, screenshotting, and editing these media files.
Moving forward to output formats, AnyMP4 Screen Recorder ensures that your captured images will be compatible with whatever they are sent to, since the software may save them as PNG, JPG/JPEG, BMP, GIF, or TIFF.
Finally, display resolution and output resolution of the mirrored device may also be adjusted to ensure that your recordings and snapshots will have crystal clear quality and customizable resolution.
To better understand the capabilities of AnyMP4 Screen Recorder, we highly recommend downloading the program yourself using the download link provided below. Afterward, you can follow our step-by-step guide below to capture your own third-party screenshots.
Secure Download
Secure Download
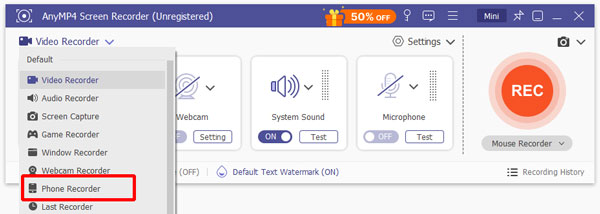
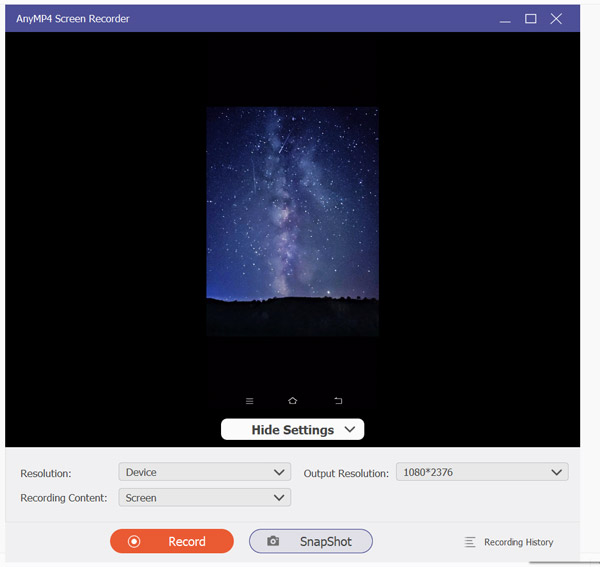
1. Open AnyMP4 Screen Recorder. Then, change the screen recorder mode by selecting the drop-down menu beside Video Recorder. Among the available options, choose the Phone Recorder mode. Once Phone Recorder has been selected, choose Android Recorder in the next menu.
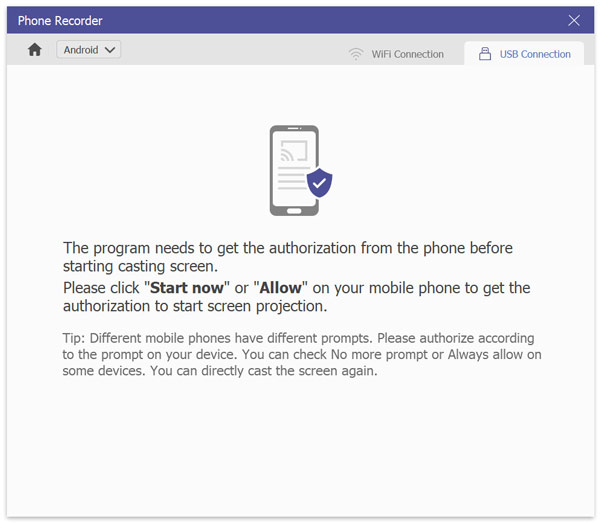
2. Connect your Android smartphone to your computer using WiFi or a USB cable, according to your preference. After connecting your Google Pixel device to your computer, select the Start Now or Allow button in the permission pop-up on your smartphone to permit AnyMP4 Screen Recorder to access your display.
3. With the phone mirroring now active on AnyMP4 Screen Recorder, click the Snapshot button on the phone mirroring display to capture a screenshot of your connected Google Pixel. It will then save the current display of your smartphone on your computer.
After a simple setup, AnyMP4 Screen Recorder can now capture any section of your device, regardless of the privacy measures that the app has embedded in it. As a screen recorder tool, you can also capture high-quality recordings within the same software. This program is a must-have if you enjoy convenience and practicality.
What Users Say About AnyMP4 Screen Recorder
AnyMP4 Screen Recorder receives overwhelmingly positive feedback from its users due to the program’s ability to bypass screenshot-prohibiting displays on commonly used apps. The software's screen recorder function is also a convenient bonus for most users.
We hope that this article has helped you decide which screenshot option you will be able to use depending on your needs and restrictions. If you are looking for an option that serves both practicality and function to screen capture restricted apps and other tricky sections of the screen, make sure to use AnyMP4 Screen Recorder by downloading it using the link provided below.
Secure Download
Secure Download
 Posted by Riley Mitchell to Screenshot
Related Articles
 How to Take a Screenshot on Samsung: 4 Unique Methods
This post will cover several ways to capture the Samsung screen! From buttons to gestures and voice commands, learn how to take a screenshot on Samsung easily.
 How to Take a Screenshot on a Motorola [4 Smooth Techniques]
If you want to learn how to take a screenshot on a Motorola, you’ve chosen the perfect location. Discover the several approaches in this instructional post.
 2 Ways to Take a Long Screenshot on iPhone
 Learn how to take a long screenshot on iPhone with this comprehensive guide. Discover the best methods to capture extensive content on your iPhone effortlessly.
 How to Screenshot on Dell Laptop/Desktop
How do you take a screenshot on a Dell laptop without PrtScn button? How to capture a screenshot with Windows 10? Here are 3 easy ways to screenshot on Dell.