4 Best Ways to Screen Capture on Mac Like a Pro
Capturing screenshots on a Mac is a skill that enables users to capture, document, and share moments from their digital experiences. The Mac operating system provides various tools and methods to take screenshots. From default keyboard combinations to tools like Screenshot Toolbar/Touch Bar and even third-party applications like AnyMP4 Screen Recorder for Mac, you have various options to capture your Mac screen. Let’s explore the techniques of how to screen capture on Mac, allowing you to capture, share, and store the visual essence of your digital experiences.

Part 1. How to Screenshot on Mac Via Hotkeys
Capturing screenshots on a Mac is a straightforward process. It provides convenient key bindings that offer several options for capturing screens. Whether you need to capture the entire screen, a selected area, or a specific window or menu, even crop a screenshot, the Mac screen capture hotkey has covered you! This section provides a table containing key bindings, descriptions, procedures, and paths for capturing and saving screenshots on your Mac. Mastering these key combinations will enhance your productivity. Also, it makes taking screenshots an integral part of your everyday computing experience.
| Key Binding |
Description |
Procedure |
Path |
|---|
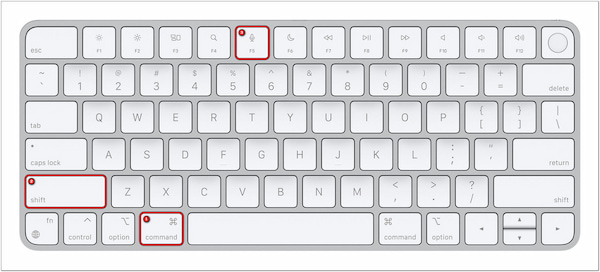
| Command + Shift + 3 |
Capture entire screen |
Press Command + Shift + 3 key bindings. You’ll hear a camera shutter sound. |
Desktop, Thumbnail, Photos App, and Recent Folder |
| Command + Shift + 4 |
Capture selected area |
Press Command + Shift + 4 key bindings. Drag to select the area you want to capture. Release the mouse button. |
Thumbnail, Photos App, and Recent Folder |
| Command + Shift + 4 + Spacebar |
Capture specific windows or menu |
Press Command + Shift + 4 + Spacebar key bindings. Click on the window you want to capture. |
Preview, Thumbnail, and Recent Folder |
Part 2. How to Screenshot on Mac With Screenshot Toolbar
In addition to Mac screenshot shortcuts, it provides a Screenshot Toolbar. Taking screenshots on your Mac is made even more convenient with the Screenshot Toolbar. This feature provides a user-friendly interface for capturing images through the key binding combinations Command + Shift + 5.
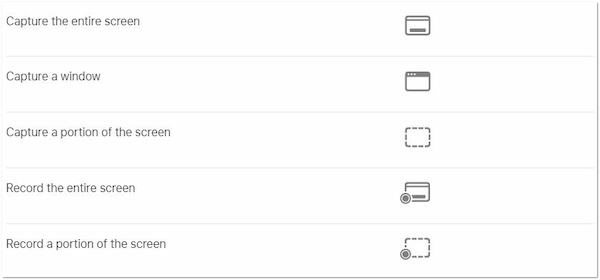
The Screenshot Toolbar was introduced in macOS Mojave and later versions. It offers various options for capturing your screen. That includes capturing the entire screen, a window, a portion of the screen, and even recording the entire/portion of the screen. This tool enhances the flexibility of capturing screenshots, making it a valuable feature for various needs.
| Capture Option |
Description |
|---|
| Capture Entire Screen |
Capture the entire contents of your screen. |
| Capture Selected Window |
Capture a specific application or window. |
| Capture Selected Portion |
Draw and capture a custom portion of the screen. |
| Record Entire Screen |
Record the activities happening on the entire screen. |
| Record Selected Portion |
Record activities within a custom-drawn portion. |
| Show Floating Thumbnail |
Display a thumbnail preview of the screenshot taken.
|
Here’s how to take a screenshot on Mac using Screenshot Toolbar:
1. Press Command + Shift + 5 key combinations to open the Screenshot Toolbar.
2. The toolbar will appear on your screen, presenting various capture options.
3. Click the respective icons depending on your preference.
- • For the entire/portion screen, click Capture.
- • For a window: Navigate the pointer to the window, then click it.
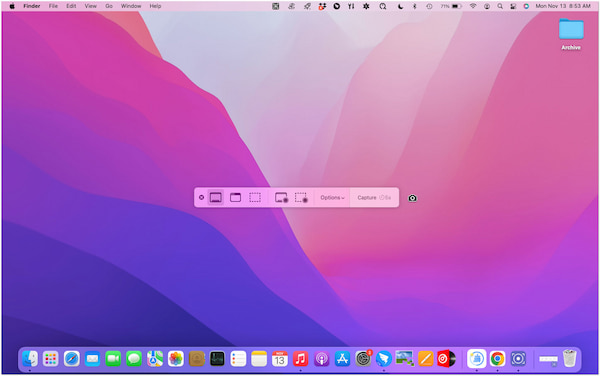
4. Once you are done selecting the capture type, customize your capture settings.
5. In the Screenshot Toolbar, click Options and select a path for saving the screenshot.
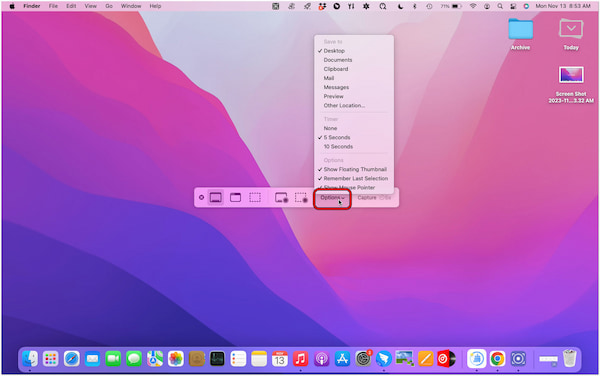
6. Click Capture to take the screenshot. It will be saved on the path you specified.
After capturing, the toolbar provides built-in annotation tools. It enables users to add text, shapes, and highlight sections to screenshots. However, if the default save location is set to the Desktop and frequent screenshots are taken, it may lead to a cluttered desktop, requiring additional effort to organize and manage files.
Also, if the screenshot cannot be saved on Mac, you can find the solutions here.
Part 3. How to Screenshot on Mac by Touch Bar
Touch Bar is another feature offered by Apple to screen capture Mac display activities. It is a unique feature found on certain MacBook Pro models. It is a multi-touch, Retina-quality display strip above the keyboard, replacing the traditional function keys. It provides a dynamic, context-sensitive interface that adapts to the active application or system function.
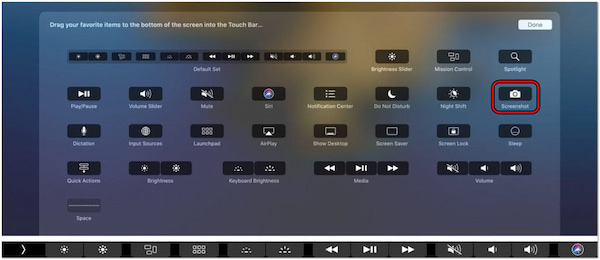
The Touch Bar features a screenshot control represented by a small camera icon. This control acts as a shortcut to various screenshot options, allowing you to choose between capturing the entire screen, specific windows, or custom portions. By tapping the corresponding option, you can interact with the Touch Bar to select the desired screenshot mode.
| Capture Option |
Description |
|---|
| Capture Entire Screen |
Capture the entire contents of your screen. |
| Capture Selected Window |
Capture a specific application or window. |
| Capture Selected Portion |
Draw and capture a custom portion of the screen.
|
Here’s how to take a screenshot with Mac Pro:
1. Look for the screenshot control on the Touch Bar, represented by a small Camera icon.
2. Tap the screenshot control to reveal capture options and tap it to select that option.
3. After taking the screenshot, tap it to open it in the preview window.
4. If satisfied, save it by clicking Done. You’ll be prompted to choose a safe location.
5. Select the path where you want to save the screenshot.
6. Click Save to confirm the save location and complete the screenshot process.
Many users who enjoy touch-based interactions find the Touch Bar more tactile. Also, it is an engaging way to capture screenshots compared to traditional keyboard shortcuts. ( Screenshot not working on Mac?)
However, the Touch Bar is exclusive to certain MacBook Pro models. Users with other MacBook models or external keyboards cannot access this feature.
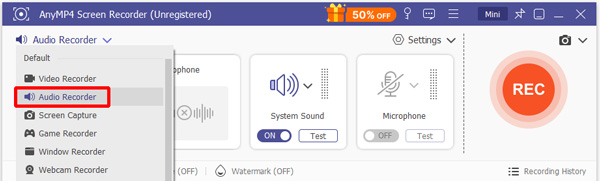
Part 4. How to Screen Capture on Mac with AnyMP4 Screen Recorder for Mac
If you want to add a touch of magic to your screen capture on Mac, say goodbye to the ordinary and go for the extraordinary with AnyMP4 Screen Recorder for Mac. It is a comprehensive software designed to capture screen activities with ease. Packed with various powerful features, including Screen Capture, Video Recorder, Webcam Recorder, and more.
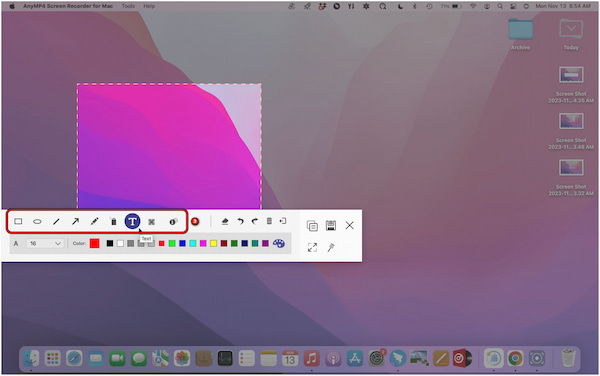
For good measures, it offers flexibility in choosing what to capture. You can capture the entire screen, a specific window, or a customized region. What’s more, it enables annotation after capturing. It lets you add boxes, ellipses, lines, arrows, texts, and callouts. On top of that, it enables real-time drawing using the Brush and Air Brush tools.
Here’s how to screenshot on Mac using AnyMP4 Screen Recorder for Mac:
1. Get started by clicking the Free Download to get the AnyMP4 Screen Recorder for Mac. Complete the necessary installation process and launch it with your Mac.
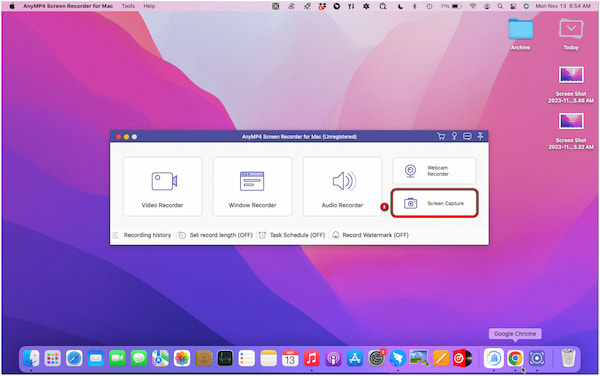
2. Within the AnyMP4 Screen Recorder for Mac interface, select the Screen Capture tab.
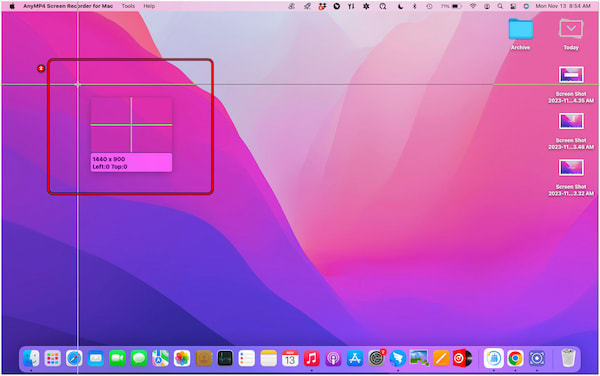
3. Navigate the pointer to the area you want to capture. As mentioned, you can capture the entire screen, a specific window, or a customized region.
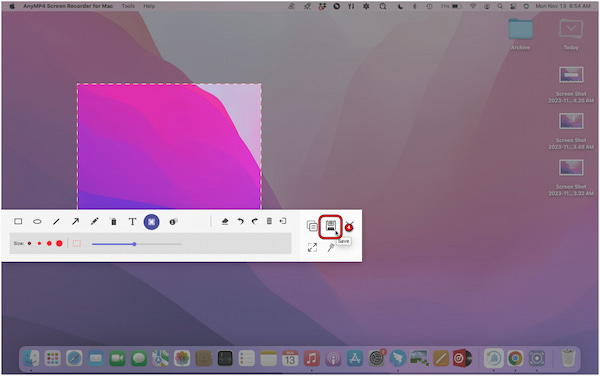
4. After capturing, you will be presented with the annotation tool. Use these tools to highlight, blur out, or draw with your screen capture.
5. Once done with annotating the screenshot, click Save. In the next window, give it a name, choose the path for your screenshot, and select the target output format.
AnyMP4 Screen Recorder for Mac is your go-to solution for quick screen-capturing tasks. Besides the Screen Capture feature, it provides video and audio recording functionalities. That includes Video Recorder, Window Recorder, Webcam Recorder, and Audio Recorder. Also, simultaneous screen, webcam, system sound, and microphone input recording are supported.
Part 5. Where Do Screenshots Go on Mac
Keyboard Combination
Where do screenshots go on Mac? By default, screenshots on a Mac are saved to the Desktop. When using the default keyboard shortcuts on a Mac, the screenshots are automatically saved to the Desktop. The filenames of the screenshots usually begin with a Screen Shot followed by the date and time of the capture.
Screenshot Toolbar
Meanwhile, if you use the Screenshot Toolbar, you have the option to choose the destination where the screenshots are saved. By default, they are saved to the Desktop, but you can customize this to locations like Documents, Clipboard, or a custom folder of your choice. The chosen location is applied to subsequent captures.
Touch Bar
On MacBook Pro models equipped with a Touch Bar, screenshots taken using the Touch Bar controls can be saved to a specified location. The default save location might be set to the Desktop, but users can customize this during the capture process. It provides a convenient and visually intuitive way to choose the capture option and review or edit the screenshots.
AnyMP4 Screen Recorder for Mac
Where does a Mac screenshot go using third-party software? AnyMP4 Screen Recorder for Mac provides flexibility in choosing the save location for your screen captures. You can define the desired location of your screenshot after screen capturing tasks. Also, it offers a Record History, making it easy for users to locate, manage, and organize their captured files effectively.
Part 6. FAQs about How to Screenshot on Mac
How do I copy a screenshot to the clipboard?
Use the keyboard shortcut Command + Control + Shift + 4 to copy a macOS screenshot to clipboard. This combination allows you to select an area for a screenshot, and the captured image is copied directly to your clipboard instead of being saved as a file. It is useful to paste the screenshot into an application or document quickly.
How do I open a screenshot on my Mac?
Locate the saved screenshot file on your Desktop. The filename usually begins with Screen Shot followed by the date and time. You can double-click on the file to open it with an image viewer like Preview.
Why is my screenshot shortcut not working?
There could be several reasons why your screenshot shortcut is not working on your Mac. Ensure that the keyboard keys are functioning correctly. Check your keyboard shortcuts in the System Preferences to confirm they are set correctly. If the macOS screenshot shortcut issue persists, consider using AnyMP4 Screen Recorder, which offers a Screen Capture feature.
How to crop a screenshot on a Mac?
To crop a screenshot on your Mac:
1. Open the screenshot in an image viewer app like Preview.
2. Select the Crop tool, represented by a square or cropping symbol.
3. Drag to select the area you want to keep.
4. Once selected, choose the Crop option to finalize the crop.
Conclusion
That’s how to screen capture on Mac using various tools! The default keyboard shortcuts provide quick and efficient ways to capture the screen, while the Screenshot Toolbar adds flexibility and customization. The Touch Bar on MacBook Pro models and third-party applications like AnyMP4 Screen Recorder for Mac further expand the collection of tools available. The ability to capture and share screens on a Mac ensures that you can convey ideas, document processes, and preserve moments precisely.