Speaking of iPhone Error 9, you should be aware that using iTunes to restore or update your iPhone is the cause of this issue. It is not a big deal, though. This article will show 5 of the best fixes for Error 9 on the iPhone 13 or 12 and other devices. The remedies we will include below are some of the best; they have been tried and adequately tested by many of our users with remarkable success. Let's define the iPhone Error 9 precisely in the first portion.

When you attempt to upgrade or restore your iOS device using iTunes, Error 9 is just one of the several iPhone faults that can appear. According to Apple's official explanation of the error, it might happen when there is a problem with the USB connection, resulting in an unexpected device disconnect during the update or restore.
Before the update or restoration process terminates, this issue may be followed by a notification that reads iPhone has a timeout. The following are only a few additional causes of this problem, aside from a bad USB connection;
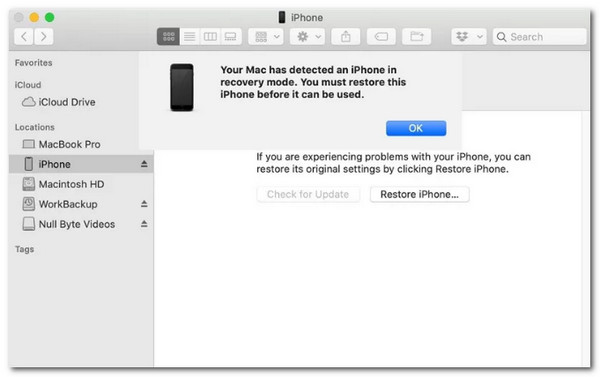
When you see one or more of the symptoms listed below, you will be aware that your iPhone is suffering Error 9:
When you see one of the problems above messages, try the following fixes first:
First, you should ensure the USB cable you are using is functioning correctly and that it is correctly attached to a USB port because a broken USB cable or connection frequently brings on this issue. To ensure that your USB connection is not the issue, perform the following checks:
You could want to force a restart if you find no issue with the USB port or USB cable you are using. This is frequently one of the most effective approaches to fixing any system faults that might be the root of the problem. Depending on the model, here is how to restart an iPhone by force.
This solution also works when iTunes error 14 appears.

You should put your iPhone in DFU mode if the techniques above don't work to fix the problem. The camera roll, contacts, calendar, messages, and app settings will all be deleted if you restart your iPhone in DFU mode, so keep that in mind. As a result, always create a backup of your iPhone before restoring it in DFU mode.
Once the backup procedure is finished, follow these instructions to enter DFU mode. Please be aware that the steps below only apply to iPhone 8 and subsequent devices;
1. Connect the iPhone to the PC using the USB connector. Then, please press and then let go of the Volume Up button. After that, hit the Volume Down button and then release it.
2. Proceeding with the process, kindly press and hold the Side button while holding it in place until the screen becomes completely dark.
3. In this movement, we need to press and hold the Volume Down button while holding the Side button. For at least 5 seconds, hold both buttons down.
4. Then, please let go of the Side Button, but keep holding the Volume Down button until iTunes recognizes the iPhone. After releasing the button, restore the iPhone to iTunes by following the prompts on the screen.
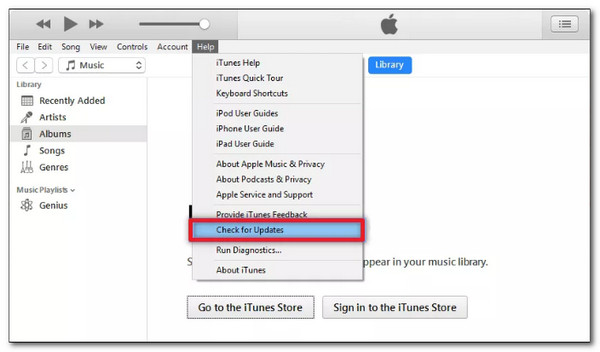
You may easily avoid this and other iTunes issues by making sure you are using the most recent version of iTunes. How to Update iTunes on a Mac or PC is outlined below; To use iTunes on a Mac, we can follow these straightforward steps below.
For Mac Device: Please launch iTunes on your Mac. Then we need to check for updates by picking iTunes from the menu bar, after that, we also need to follow the on-screen prompts. Please ensure to follow them correctly.
For Windows Device: If an update is available, open iTunes on your computer, from there, select Help as we find the Check for Updates among the options and then follow the instructions to update iTunes.
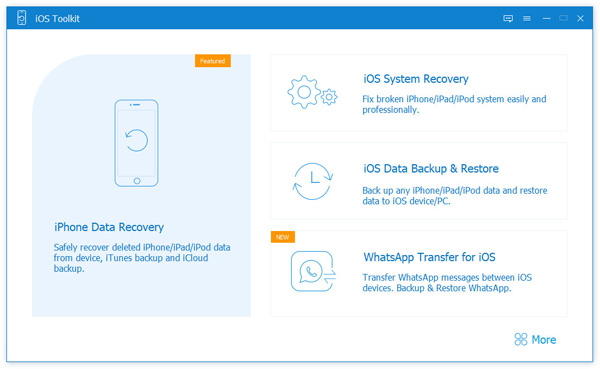
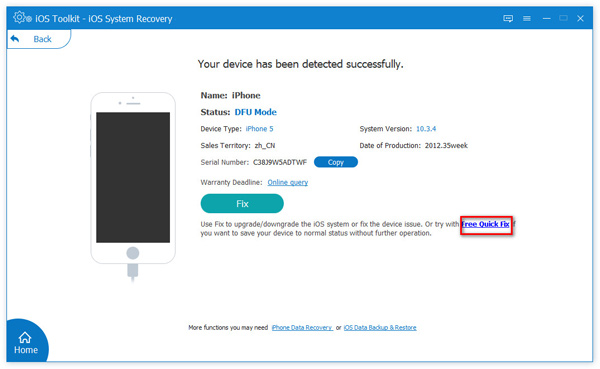
The first two solutions above may not effectively ease the problem of iPhone Error 9. But, with AnyMP4 iOS System Recovery, everything will be solved. This expert iOS system repair tool, AnyMP4 iOS System Recovery, can return an iOS device to default settings. You can use this program to upgrade or downgrade iOS and resolve challenging iOS problems. This feature is a great way to repair your iPhone as we remove the iPhone Error 9.
1. We need to get the incredible AnyMP4 iOS System Recovery for free on its official website. Then install it on your computer.
Secure Download
Secure Download
2. In the second step, please choose iOS System Recovery from the main menu of the software.
3. The pop-up window will display numerous iOS system errors. You should select the pertinent issue here. Then, click the Start button to proceed. After that, please ensure that your iOS device is connected to this computer via a USB cable.
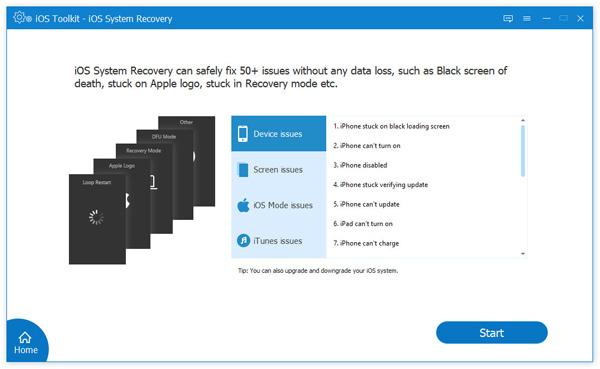
4. Use the Free Quick Fix option to reboot your iOS device to solve several straightforward and frequent problems before you enter repair mode.
1. Can iPhone Error 9 happen to iPad?
Yes. iPhone Error 9 is not only existing for the iPhone. This problem can also occur within your iPad device. That is because the iPhone and iPad most likely possess similarities. That means if we plan to have firmware updates or restore our iPhones or iPad, then this issue might appear.
2. Why does iTunes produce Error 9?
The majority of the time, this problem happens when you attempt to update your iOS version. This error is a specific kind of iPhone device issue. Although this error number is not frequently encountered, when it does, everything you try to accomplish stops abruptly.
3. Can iPhone Error 9 be caused by updating my iOS system?
No. That is because, during firmware updates or system recoveries on iPhones or iPads via iTunes, Error 9 is one of the error numbers that appear. That means Error 9 is an issue that hinders you from updating your iOS system.
The methods described in this article might not be effective for you. However, you can completely resolve the iPhone error 9 issue using AnyMP4 iOS System Recovery. That is because it is proven and tested software among many users. In addition, it became the go-to solution for numerous iPhone users because of its features. In that case, we should not be worried about the issue of our iPhone because we have solutions to make it at ease.
 Posted by John Malcolm to iOS Issues
More readings
 [Solved] Fixing iCloud Encountered An Error Connecting to The Server
These are the 3 easy methods you must follow when encountering an error connecting to the server on iCloud. See these guidelines and fix your problem quickly.
 3 Ways to Fix The iPhone Could Not Be Updated Error 4000
Alleviating Apple iPhone could not be updated error 4000 using these fantastic solutions. In addition, let us learn its definition and the reasons behind it.
 iTunes Error Code 9039 Issue: 3 Immediate Solutions
Understanding iTunes Errors 9039's reasons and solutions to ease the issue is simple as long as you read this post. Check these guidelines to know the details.
 3 Quick Fix for iTunes Error 4010: Easy tip
To experience an iTunes Error 4010 will be an unfortunate event for us. That is why check this post to ease the issue without complications.