
Key Takeaway:
“I recently dumped a massive batch of iPhone 15 video files into my local testing directory (C:\Users\Administrator\Desktop\video\video-H) on my Windows 11 rig. Half of them threw codec errors in my video editor, and the other half played back as black screens with stuttering audio.”
If you are dealing with MOV files, you feel a little annoyed. Apple loves the MOV format, but the rest of the digital world runs on MP4. However, the open-source VLC Media Player, can handle that easily with its built-in conversion feature to fix this issue.
This guide outlines exactly how to use VLC Media Player to convert MOV to MP4. You will learn the exact steps to change your file formats, how to retain your original video quality, and what to do when VLC inevitably throws a cryptic error or spits out a file with no sound.
Before clicking any buttons in VLC, we need to clarify what a video file actually is.
MOV and MP4 are not videos; they are "containers" (or wrappers). Inside that container sits a video stream (like H.264 or HEVC) and an audio stream (like AAC).
Sometimes, your video stream is already perfectly formatted, and you just need a new box to put it in. This is called Encapsulation (or Remuxing). Swapping the container from MOV to MP4 without touching the actual video data takes about two seconds and is 100% lossless.
Transcoding, on the other hand, means actively decoding the video and rewriting it from scratch into a new format. This takes heavy processing power, degrades quality slightly, and takes much longer. I always recommend attempting a container swap first.
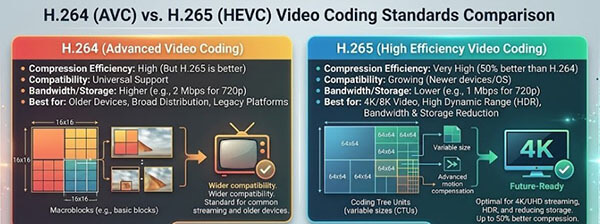
If you are trying to get iPhone MOV to MP4 on Windows 11, you are almost certainly dealing with HEVC (H.265) encoding. Modern iPhones use this to save storage space.
Many older media players literally do not know how to read HEVC data. If your goal is maximum compatibility, for example, sending a video to an older relative's Android phone or a five-year-old smart TV, you must ensure your output settings in VLC are set to transcode the video stream down to the older, universally accepted H.264 standard.
Check more details here to learn about H.264 vs. H.265.
For the steps of using VLC to transcode MOV, you can move the next part.
VLC’s conversion tool is hidden in plain sight. It is not the most intuitive interface, but it gets the job done for single files. Here is the exact workflow I use to ensure a clean output.
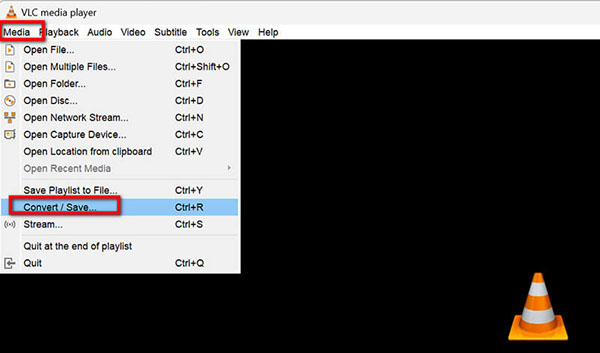
1. Access the Convert/Save Menu
Open VLC Media Player. Click on Media in the top-left corner of the menu bar, then select Convert / Save... from the dropdown menu. (Keyboard shortcut: Ctrl + R).
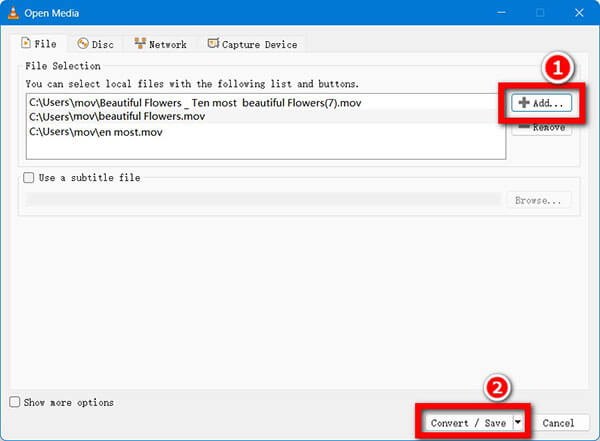
2. Load Your MOV File
In the Open Media window, you will see a File tab. Click the Add button. Browse your computer and select the MOV file you want to convert. Once added, click the Convert / Save button at the bottom of the window.
3. Select the Correct MP4 Output Profile
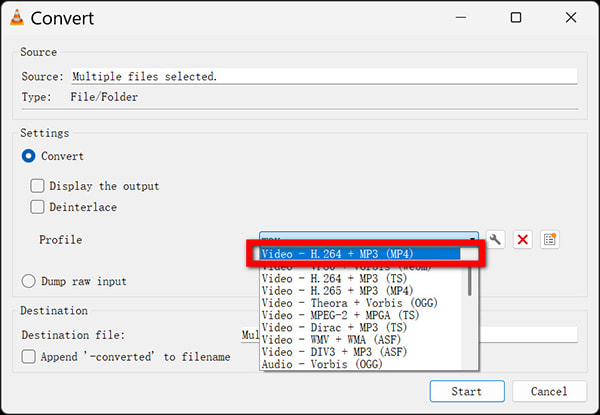
This is the most critical step. In the Convert window, look for the Profile dropdown menu.
Select Video - H.264 + MP3 (MP4).
This profile tells VLC to output an MP4 container housing H.264 video and MP3 audio, and it is the safest bet for web playback.
4. Adjust File Size and Quality (Optional but Recommended)
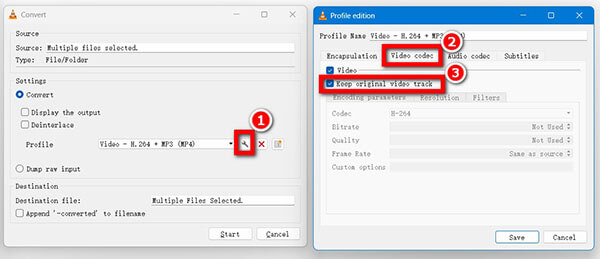
Click the small wrench icon (Edit selected profile) next to the dropdown menu.
• To Remux (Lossless): Go to the Video codec tab and check the box for Keep original video track. Do the same under the Audio codec tab. This swaps the container without quality loss.
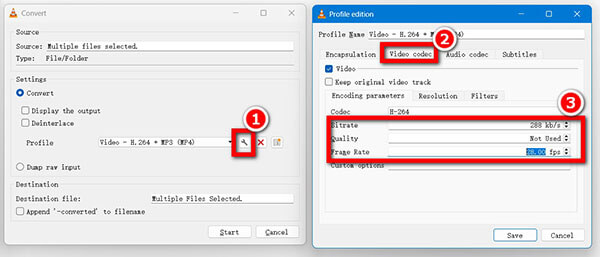
• To Compress (Reduce File Size): If your MP4 file ends up bigger than your MOV file, uncheck "Keep original video track". Under Encoding parameters, lower the Bitrate slightly or adjust the Frame Rate. A lower bitrate shrinks file size but can make the video look "blurry" if pushed too far.
5. Convert MOV to MP4 in VLC
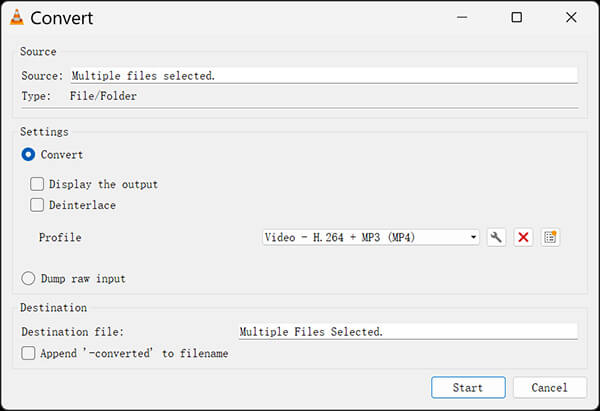
Under the Destination section, click Browse. Choose where you want to save the new file.
Warm tip: Always manually type .mp4 at the end of your new file name. VLC sometimes forgets to add the file extension automatically, which leaves you with a blank, unreadable file.
Click Start.
You will see VLC's playback progress bar moving at the bottom of the screen. Do not close the player until the bar reaches the end.
For power users managing heavy media directories, clicking through VLC's graphical interface for every single file is a massive waste of time. You can bypass the UI entirely.
Here is a simple VLC convert MOV to MP4 batch script you can run via Command Prompt to handle conversions silently. Just modify the file paths:
"C:\Program Files\VideoLAN\VLC\vlc.exe" -I dummy "C:\path\to\input.mov" :sout=#transcode{vcodec=h264,acodec=mpga,ab=128,channels=2,samplerate=44100}:std{access=file,mux=mp4,dst="C:\path\to\output.mp4"} vlc://quit
Another command line tool, FFmpeg, can also convert MOV to MP4. Which method is easier? You can check this guide firstly, and then give your answer.
VLC is notorious for glitching during encoding tasks. Based on my testing, here are the direct fixes to the three most common failures.
• Problem 1: Output File has No Sound (MOV to MP4 VLC no audio)
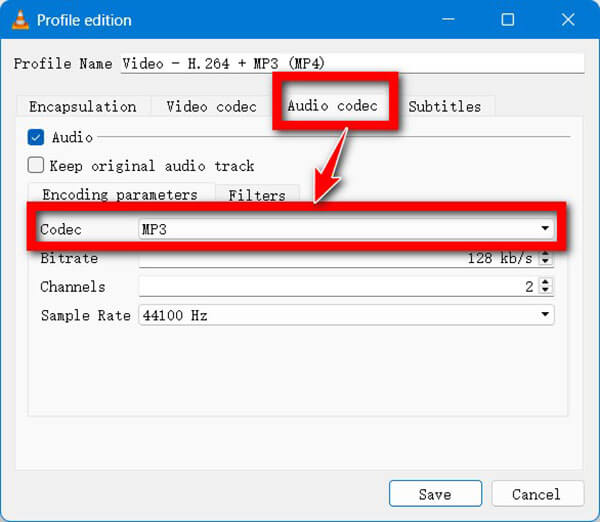
Solution: In the Profile Editor (the wrench icon), navigate to the Audio codec tab. The default audio encoder often fails. Change the codec explicitly to MP3 or AAC. Alternatively, simply check the "Keep original audio track" box to bypass audio processing entirely.
If your audio is delayed in VLC, find the solutions here.
• Problem 2: The Progress Bar Finished Instantly (0KB File / VLC conversion stuck at 0% fix)
Solution: A 0KB output means VLC immediately aborted the write process. This usually means VLC lacks administrator permissions to write to your chosen folder, or the file name is identical to the source. Save the output to your Desktop with a completely different name (e.g., final-video-v2.mp4).
• Problem 3: Video Flickering or "Blocky" Artifacts
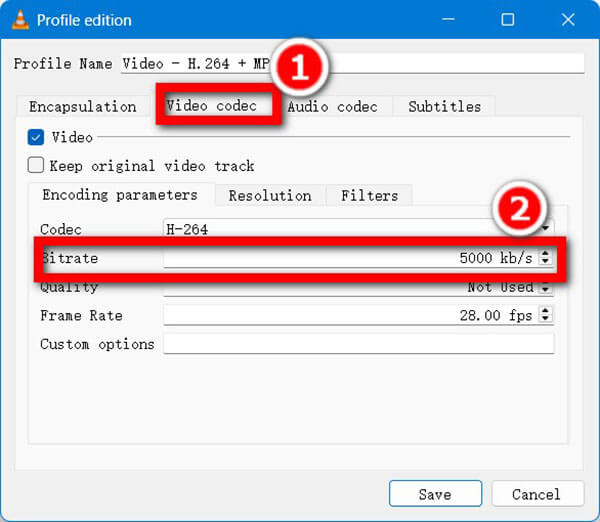
Solution: The preset bitrate in VLC is struggling to handle high-motion scenes. Return to the Profile Settings, go to the Video codec tab, and manually increase the bitrate to 5000 kb/s or higher. If this fails, the VLC media player convert greyed out fix usually involves reinstalling VLC or switching to dedicated encoding software.
While VLC is excellent for one-off tasks, it reveals its limitations quickly in a professional environment. It is slow, its batch processing is highly unstable, and relying on CPU-only rendering means a 4GB 4K file might take an hour to convert.
For users dealing with high-resolution footage, tight deadlines, or massive media libraries, AnyMP4 Video Converter Ultimate is the definitive upgrade.
Secure Download
Secure Download
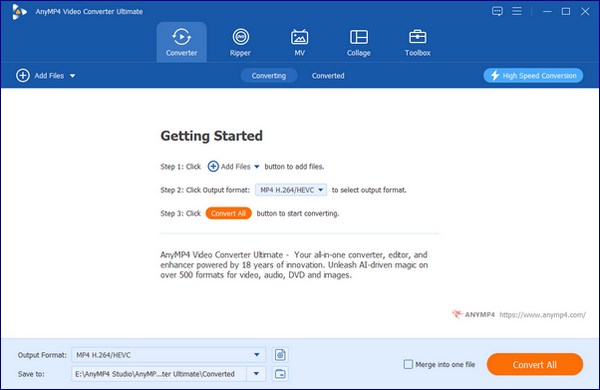
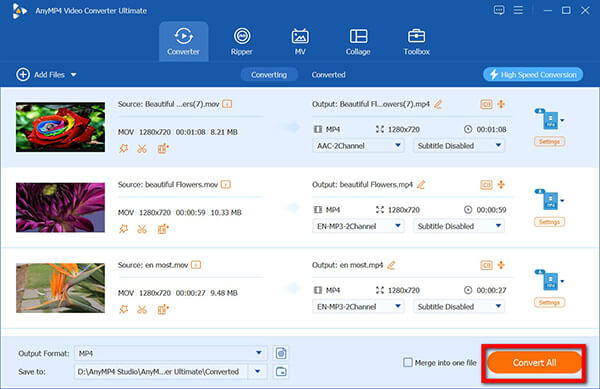
1. Load Files
Drag and drop your entire folder of MOV files directly into the AnyMP4 interface.
2. Select MP4 Output Format
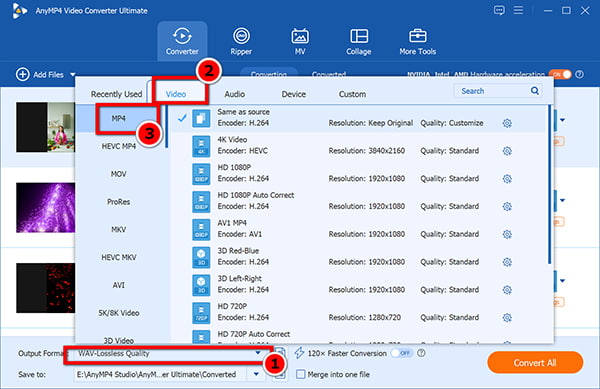
Click the Output Format dropdown. Select Video > MP4 and choose Same as Source to guarantee zero quality loss.
3. Convert MOV to MP4
Check that Hardware Acceleration is enabled (the lightning bolt icon at the bottom), choose your save folder, and click Convert All.
If you are converting high-resolution 4K footage for professional editing (like in Premiere Pro or DaVinci Resolve), avoid VLC. VLC is designed for playback, not production. A dedicated engine like AnyMP4 preserves the precise color space metadata and multi-track audio routing required for professional color grading.
Here is exactly how the two programs stack up in real-world testing.
| VLC Media Player | VS | AnyMP4 Video Converter Ultimate |
| Real-time (1x CPU only) | Conversion Speed | Up to 70x (Hardware HyperSpeed) |
| Hidden/Unstable | Batch Mode | Native / High Stability |
| Basic Clipping only | Video Editing | Full Suite (Trim, Crop, Filters) |
| 75% (Codec error prone) | Success Rate | 99.9% (Universal format support) |
| Variable (Compression loss) | Output Quality | Lossless (AI Enhanced) |
You shouldn't just convert to MP4 without knowing where the video is going. Here are the optimized settings you should dial in:
Does VLC lose quality when converting MOV to MP4?
Yes, a slight loss is inevitable in VLC due to its default re-encoding process. To avoid this entirely, use the ‘Keep original video track’ setting in VLC's profile editor, or use professional lossless software.
Can I convert multiple MOV files at once in VLC?
Technically yes, but the user interface makes it difficult and it is highly prone to crashing your system. For batch tasks, a dedicated tool like AnyMP4 Video Converter Ultimate is significantly more stable.
Is MOV better than MP4?
MOV is often higher quality straight out of an Apple camera, but it carries a larger file size and suffers from limited compatibility on Windows and web platforms. MP4 is the undisputed standard for streaming and mobile playback.
Converting MOV to MP4 shouldn't be a headache that eats up your afternoon. If you just need a quick, free fix for a single file, VLC Media Player is a reliable choice that most people already have installed on their machines.
However, if you value your time and want to ensure your videos look exactly as crisp as the originals, AnyMP4 Video Converter Ultimate is the superior investment. It eliminates codec errors, taps into your GPU for lightning-fast renders, and handles massive batches flawlessly.
Ready to upgrade your video workflow? Download AnyMP4 Video Converter Ultimate today and experience lossless conversion in seconds.
Secure Download
Secure Download
 Posted by Alice Thorne to Convert Video
More readings
 5 Best MOV to MP3 Converters (2026): Pro Quality & Speed Tested
Extract 320kbps MP3 from MOV files with our top 5 tested tools. Features detailed reviews, batch guides, and expert tips for lossless audio extraction.
 MOV to WebM: 4 Ways to Preserve Transparency & AV1 Quality
Convert MOV to WebM while preserving Alpha Channel transparency. We compare AnyMP4, HandBrake, FFmpeg, and CloudConvert for speed, AV1 support, and 4K quality.
 Best Way to Convert Blu-ray to MP4 in VLC Media Player
Want to digitize your Blu-ray collections? Read this post and learn how to convert Blu-ray to MP4 in VLC and learn tips for using VLC for Blu-ray conversion.
 How to Convert Video to MP4 with VLC [2026 Guide]
Learn how to convert VLC to MP4 using VLC Media Player. Covers VLC's built-in Convert/Save feature, troubleshooting tips, and AnyMP4 as an advanced alternative.
 Add your comments to join the discussion here