Are you looking for the easiest way to take screenshots on an iPhone? If so, this article guide is made for you since we will provide a detailed tutorial on how to use four methods to capture screenshots and help our readers learn how to screenshot on iPhone. We will explore all of these options and provide a detailed tutorial guide based on the iPhone model and the features available in it. We will also provide a short tip on the best uses of each screenshot's options. To learn how to take screenshots on your iPhone device, we suggest reading the full article below.

We will start this article guide by featuring the quickest and easiest way to capture screenshots on iPhone devices: the practical and reliable button combinations.
Since Apple is famous for its frequent iPhone releases, we will provide a total of three tutorials about button combinations to solve your inquiries about how do you take a screenshot on an iPhone, regardless of what iPhone model you are running.
Compatibility:
• iPhone X/XS/XR
• iPhone 11/11 Pro/11 Pro Max
• iPhone 12/12 Mini/12 Pro/12 Pro Max
• iPhone 13/13 Mini/13 Pro/13 Pro Max
• iPhone 14/14 Plus/14 Pro/14 Pro Max
• iPhone 15/15 Plus/15 Pro/15 Pro Max
• iPhone 16/16 Plus/16 Pro/16 Pro Max
• iPhone 17/Air/17 Pro/17 Pro Max
Best Used For: Taking high-quality screenshots of the high-definition screens of later iPhone models.
The first tutorial we will feature is the button combination required to take screenshots on an iPhone device with the Face ID feature. The Face ID feature was a key addition to the iPhone X, released in 2017, and has since become a staple of future iPhone versions.
Please refer to our guide below for a detailed list of iPhone devices with the Face ID feature and a tutorial on the button combination for the screenshot command on these devices.
1. Press and quickly release your iPhone’s Side + Volume Up button.
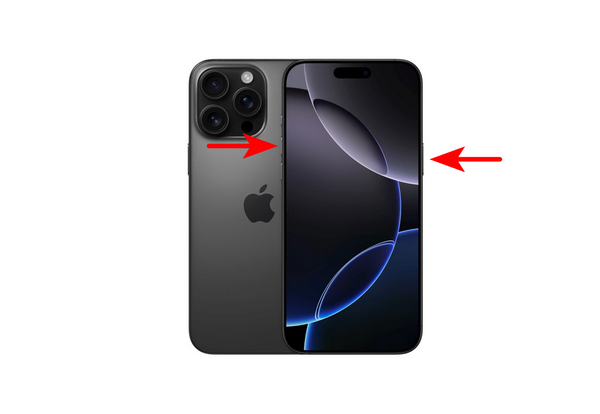
2. On your iPhone’s screen, check if a notification pops up and stays in the lower left corner. Tap on it to preview your screenshot.
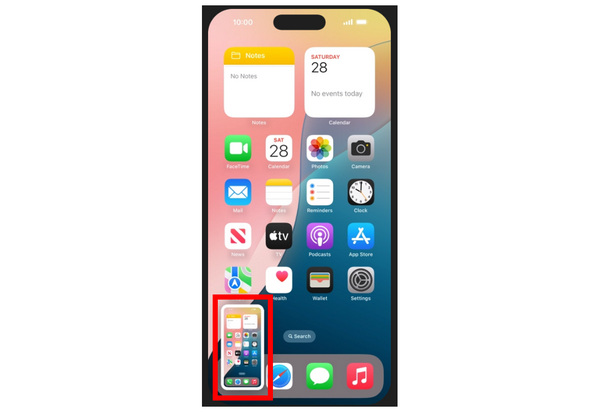
If you miss the notification of the screenshot, fear not, since you can always access the captured screenshot in your iPhone’s gallery. However, if you are looking for a program to secretly capture screenshots, it is unfortunate that the default screen capture option of the iPhone is not capable of that.
Compatibility:
• iPhone 6/6 Plus/6s/6s Plus
• iPhone 7/7 Plus
• iPhone 8/8 Plus
• iPhone SE - 2nd Gen (2020), iPhone SE - 3rd Gen (2022)
Best Used For: Capturing screenshots on older iPhone models and the budget variant of the iOS line, the iPhone SE.
The iPhone Touch ID is one of the most iconic feature and design of iPhone devices, the practical button in the lower middle section of these smartphones is capable improving the security measures of your device since it can scan your finger print and unlock your device without relying on manually encoding your security code in the screen.
Since Touch ID also has a button, it is part of the button combination required to capture screenshots on iPhone devices equipped with it, specifically from the iPhone 6 line all the way to the third generation of iPhone SE.
Learn how to take screenshots on iPhone by reading our guide below.
1. Press your iPhone’s Touch ID Button + Side Button to take a screenshot. It will immediately trigger your device to take a screen capture.
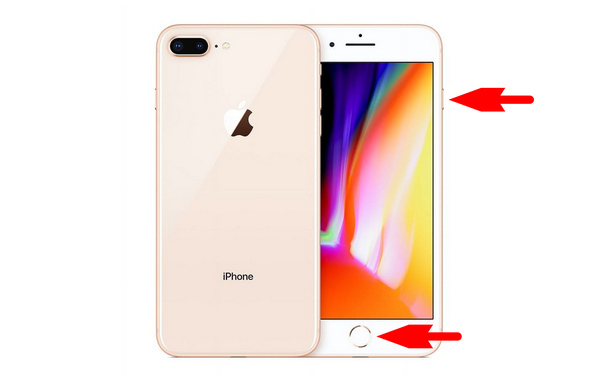
2. To confirm that you have successfully captured a screenshot, an Image Preview will appear on your screen.

Since the button combination of models equipped with Touch ID requires you to press the Touch ID button itself, this button combination requires a little hand adjustment to be used. This could be the reason why later iPhone releases removed the Touch ID feature.
Compatibility:
• Original Phone
• iPhone 3
• iPhone 4/4S
• iPhone 5/5C/5S
• iPhone SE - 1st Gen (2016)
Best Used For: Taking screen display images of classic iPhone models from the original release up to the first generation of the budget iPhone SE variant.
Finally, we can now proceed to the guide on taking screenshots on the oldest shells of iPhones with the hardware that features a button on top of the unit that functions as a Sleep/Wake button by default.
Before the Side Button was introduced, the main Power Button of iPhone devices was positioned on top of the unit. Since this option is one of the limited buttons in the hardware, taking screenshots in these models requires using both the Touch ID and the Top button of the smartphone.
To learn how, please proceed to our two-step guide below.
1. Quickly press and release your iPhone’s Touch ID and Home Buttons simultaneously. Be careful when using this button combination, as you must support your smartphone’s back to avoid dropping it.
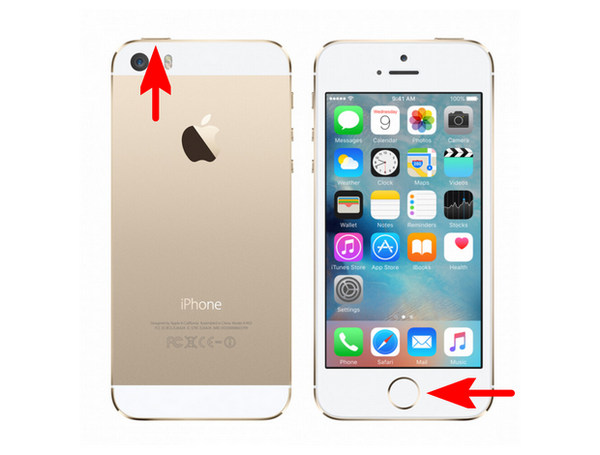
2. Similar to modern versions of iPhone, the screenshot notification on these older models also appears on the lower left region of the screen.

Since the first iPhone design placed the Power Button on top of the unit, taking screenshots on this hardware might be a bit challenging compared to the modern releases of the iPhone line, which have the Sleep/Wake button on the side.
Compatibility: All iPhone models.
Best Used For: Accessible screenshot capture since it does not involve interacting with the buttons in the iPhone hardware.
iPhone devices are known to be highly optimized for accessibility. One of the most popular accessibility features in these devices is the Assistive Feature. This highly customizable overlay can also be used to take a screenshot since it has a custom button that can be set to screenshot. For more advanced needs, you can also set Assistive Touch to set an option to record your iPhone screen.
To learn how to set up Assistive Touch as a screenshot option, please follow our setup guide below.
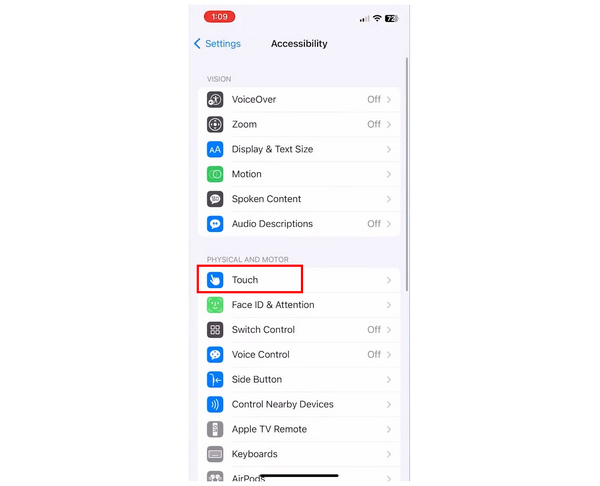
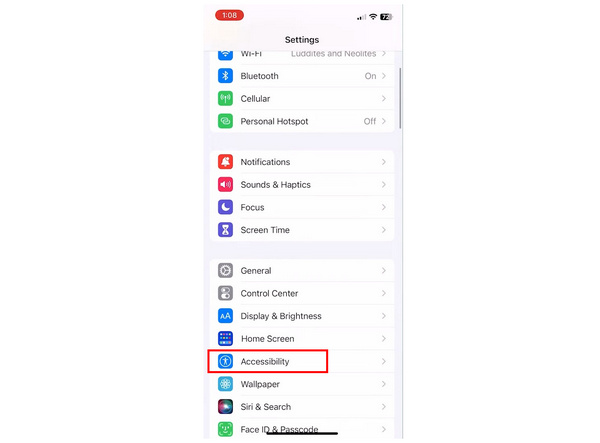
1. Open your iPhone’s Settings and then scroll down to find and select Accessibility.

2. In the Accessibility settings, select the Touch option under Physical and Motor.
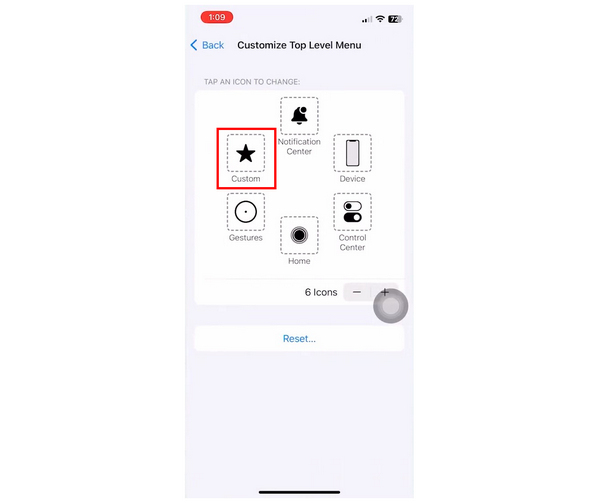
3. Inside the Touch section, you can now enable the Assistive Touch overlay. Then, tap on Customize Top Level Menu.

4. In the Customize Top Level Menu section, select the Custom function.
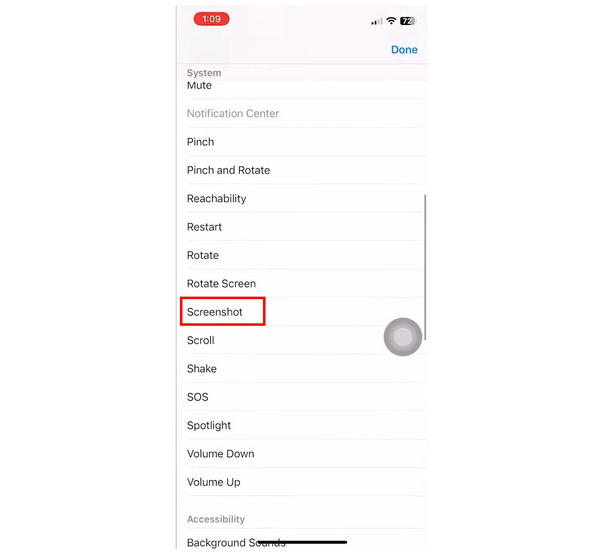
5. Scroll down in the Custom menu to find Screenshot. Tap it.
6. With the Screenshot now selected in your Assistive Touch, a Screenshot option will now become available in it.
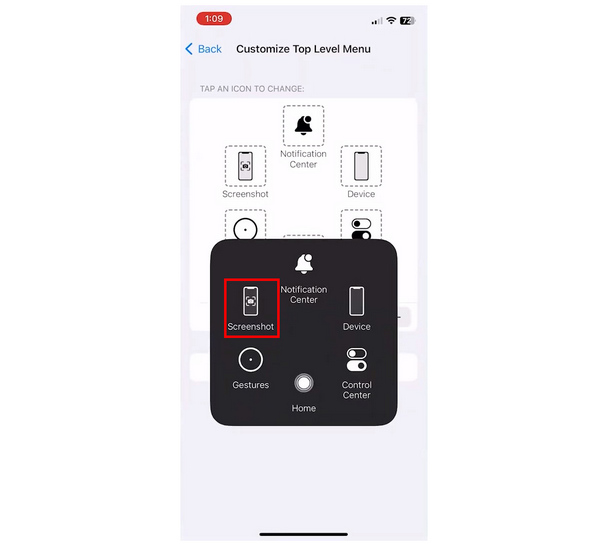
As its name suggests, the Screenshot function inside the Assistive Touch overlay will immediately capture a screenshot of your current display once it is selected. Since it is a universal feature, it can be used to answer problems about how to screenshot on iPhone 17/16/15.
Compatibility: iPhone 8 and later iPhone models.
Best Used For: Quickly capture screenshots without button combination or assistive touch support.
The Backtap feature is one of the latest additions to iPhone devices. This function basically allows users to either double-tap or triple-tap a region on the back of their device to perform certain functions, one of which is to take a screenshot.
To learn how to set this option, please read our setup guide below.
1. Open your iPhone’s Settings and then scroll down to find and select Accessibility.
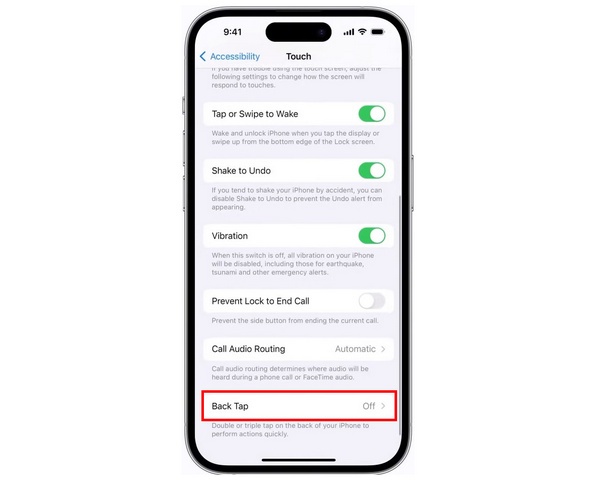
2. In the Accessibility settings, select the ,Touch option under Physical and Motor.
3. Scroll down in the Touch options to find and select Back Tap.
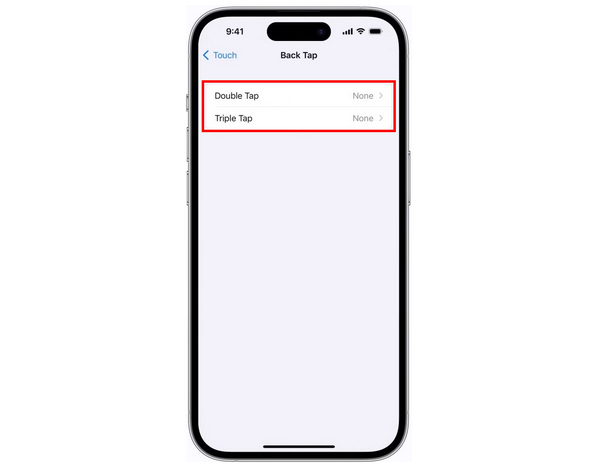
4. Choose whether to enable Back Tap with Double Tap or Triple Tap. Either of these will set the action that the gesture will trigger.
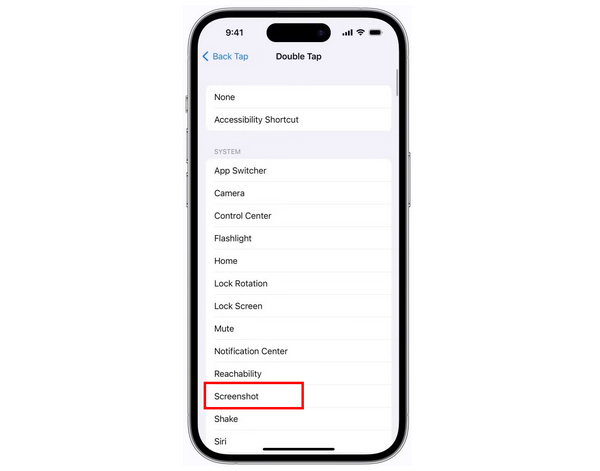
5. Select Screenshot in the tapping gesture that you selected.
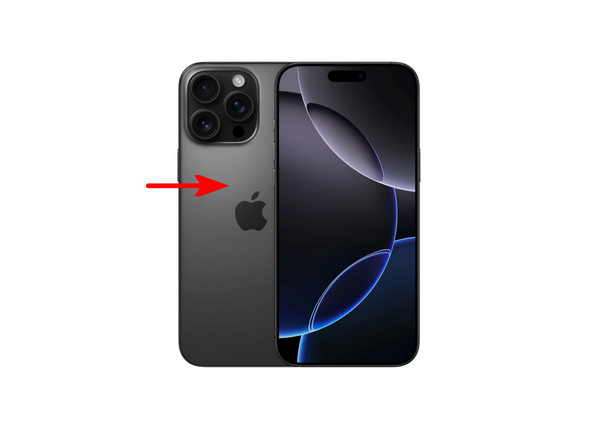
6. With the Back Tap gesture now activated, simply Double-Tap or Triple-Tap the region on the back of your iPhone surrounding the Apple logo to capture a screenshot.
Although not completely hands-free, this option might be considered the most practical, especially compared to the universal button combination or the Assistive Touch feature.
Compatibility: iPhone 4S and later iPhone models.
Best Used For: Hands-free screencapture using Siri’s voice command.
If you are looking for a completely hands-free screenshot capture method, the Siri voice command will always be functional. To use this, simply ask the iOS assistant Siri to capture a screenshot of your iPhone.
1. Enable Siri by using the voice command “Hey, Siri” near your smartphone’s microphone. Then, say something like “Take a screenshot” while Siri is listening.
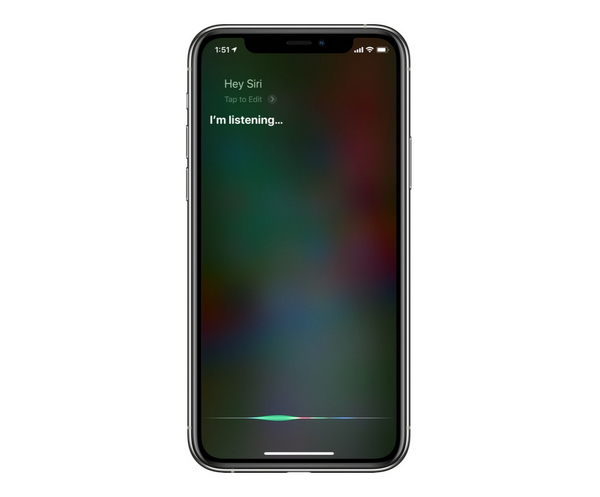
2. After Siri takes a screenshot of your display, the usual screenshot notification will also appear on your screen.
Although this option is a completely hands-free solution for taking screenshots, the use of voice commands adds too much variability to its functionality. For example, it might not be reliable for taking a screenshot in a noisy environment or a public place.
Compatibility: Windows 11/10/8/7, macOS 10.13 or later versions.
Best Used For: Recording iPhone displays internally to bypass apps with screen capture preventing measures.
Moving forward to the fourth option in this article, we will now highlight the third-party screen recorder software with AnyMP4 Screen Recorder. The computer-based screen recorder program is equipped with a dedicated Phone Recorder software that can mirror the iPhone screen to a computer running the program.
During phone mirroring, both screen recordings and screenshots may be taken, which can bypass applications that prohibit display captures, such as browser incognito modes or social media profiles. Additionally, this screenshot option prevents screenshot notifications from occurring on social media apps that notify of this action, such as Snapchat.
After capturing a screen recording or screenshot in the program, editing features are also readily available in the program after you are done capturing your iPhone’s display. Moreover, versatile output formats may also be chosen to allow you to choose how you want your image to be saved, from PNG, JPG/JPEG, BMP, GIF, or TIFF.
The display resolution and the output resolution of the Phone Recorder’s phone mirror are all adjustable to ensure the good quality of your screenshots.
If the practical features of AnyMP4 Screen Recorder’s Phone Recorder mode capture your interest, make sure to try using the tool for free with our provided download link below.
Afterward, you can use our step-by-step guide as a tutorial to learn how to take screenshots of your iPhone using the program.
Secure Download
Secure Download
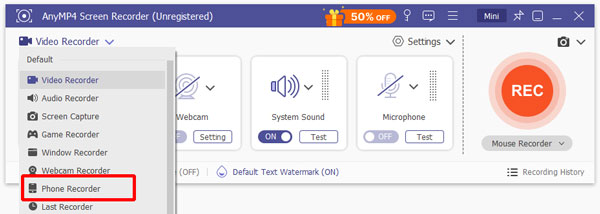
1. Start AnyMP4 Screen Recorder and open the mode selection menu beside the Video Recorder mode. Choose the Phone Recorder mode among the options. Then, select the iOS Recorder option in the platform selector menu.
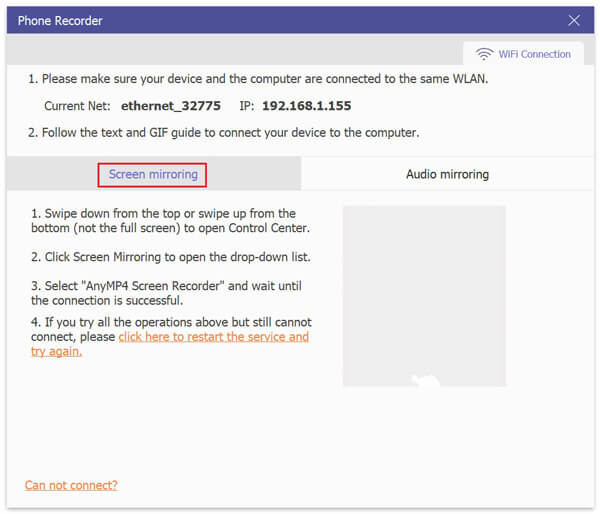
2. Connect your iPhone to AnyMP4 Screen Recorder using your home WiFi by connecting both the computer and the device to the same WiFi network. Afterward, follow the directions to enable both Screen Mirroring and Audio Mirroring on your iPhone to connect to the software.
3. Adjust the recording settings such as Resolution, Output Resolution, and Recording Content menu. Once satisfied with the settings, simply click the Snapshot button beside Record in the phone mirroring window to capture a screenshot.
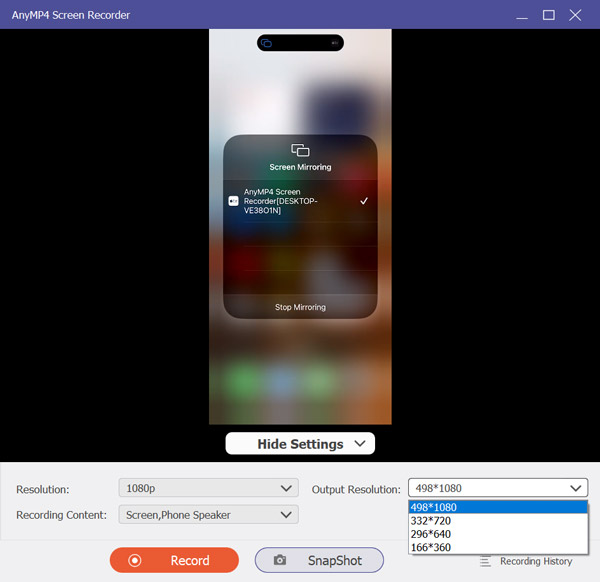
After following these three simple steps, you will be able to capture a screenshot of your iPhone display, regardless of what application you are running. The same mode may also be used to capture a screen recording of your mirrored device. AnyMP4 Screen Recorder's versatility makes it a convenient option as one of the best screen recording software programs on the market.
We hope that this article has helped you decide which screenshot option would work best based on your needs, the model of your iPhone, and your preferred accessibility measurements. In case you haven’t decided yet, we highly recommend using AnyMP4 Screen Recorder due to its top-notch practicality and convenience when compared to other screenshot options in this article.
Secure Download
Secure Download
 Posted by Riley Mitchell to Screenshot
Related Articles
 How to Take a Screenshot on Samsung: 4 Unique Methods
This post will cover several ways to capture the Samsung screen! From buttons to gestures and voice commands, learn how to take a screenshot on Samsung easily.
 How to Take a Screenshot on a Motorola [4 Smooth Techniques]
If you want to learn how to take a screenshot on a Motorola, you’ve chosen the perfect location. Discover the several approaches in this instructional post.
 How to Screenshot on Dell Laptop/Desktop
How do you take a screenshot on a Dell laptop without PrtScn button? How to capture a screenshot with Windows 10? Here are 3 easy ways to screenshot on Dell.
 3 Ways to Screenshot on HP Desktop and Laptop of Any Screen Size
This is the complete tutorial to screenshot on HP step by step. You can use both the tools to take a screenshot on all HP models and OS versions.