Trying to record the sound coming from your Mac can be surprisingly tricky. Whether you're looking to record audio from a video, capture streaming content, or save that awesome Zoom meeting, you may find that macOS doesn’t make this task straightforward. This is because Macs don't have a built-in feature for recording internal audio. The system prioritizes privacy and security, which results in blocking audio from apps and websites from direct recording.
But don’t worry, that doesn’t mean you’re out of luck! In this guide, we will share three ways to record internal audio on Mac, from completely free tools to user-friendly, paid options. Even if you're using an M1 Mac or an older model, there's a method here for you.
| BlackHole + QuickTime (Free & Modern) | AnyMP4 Screen Recorder (Easiest) | Physical Cable (Classic) | |
| macOS Supported Versions | macOS 10.10 (Yosemite) and newer | macOS 10.12 (Sierra) and above | All macOS versions with a physical audio input port (Varies by Mac model) |
| Best For | Tech-savvy users, free solution | Beginners, fast results | Offline setups, older Macs |
| Audio Quality | TGood (depends on setup) | Excellent | Can vary, potential for noise |
| Output Audio Formats | Varies by app (e.g., .m4a via QuickTime, .wav via OBS) | .mp3, .m4a, .wav, .flac, .aac, .wma | .m4a via QuickTime (default), others with third-party apps |
| Reliability | Generally reliable once set up | Very reliable | Reliable (hardware dependent) |
| User-Friendliness | Moderate (requires setup) | Very user-friendly | Easy to understand concept, but clunky |
| Flexibility | Audio routing | Screen & audio recording, editing, and phone recording | Basic audio routing |
| Privacy Respect | Generally good | Good | Excellent (no software involved) |
| Ease of Setup | More complex | Very easy | Simple hardware connection |
| Cost | Free | Paid (with free trial) | Low to moderate (for cables) |
| Limitations | Learning curve, no UI | Paid license needed for full use | Hardware-dependent, lower fidelity |
Apple takes privacy seriously, which is why macOS doesn’t support recording internal audio by default. It’s all about preventing apps from recording your conversations or audio without your knowledge. While this is a good security feature, it does make it trickier for users who want to record audio from websites, streaming services, or other apps.
Although this might seem inconvenient for those with legitimate reasons to record audio on a Mac without a microphone, it's a deliberate design choice. Thankfully, the resourceful Mac community and third-party developers have stepped in to provide solutions, which we'll explore now.
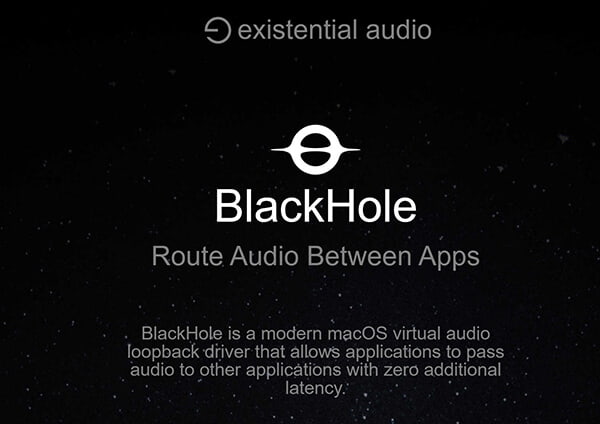
BlackHole is a modern virtual audio driver designed to help you route audio from one app to another. Essentially, it creates a bridge between your Mac system’s audio and the software you want to record with. It's a great alternative to Soundflower, another popular tool, but with more modern support and features.
BlackHole is generally considered more modern and easier to set up on newer macOS versions, especially for recording internal audio on M1 Mac and later.
1. Head over to the Existential Audio website (just Google BlackHole audio driver Mac). Follow their installation instructions carefully. You'll probably need to restart your Mac after installation.
2. Once BlackHole is installed, open the Audio MIDI Setup application (you can find it by searching in Spotlight).
3. In Audio MIDI Setup, click the + button in the bottom left corner and pick Create Multi-Output Device.
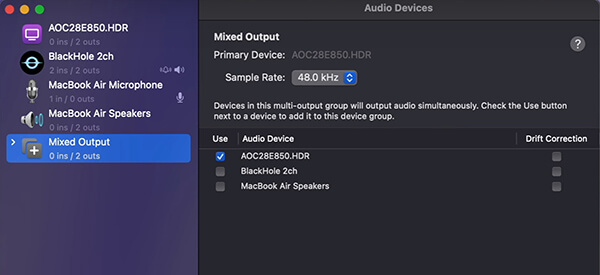
4. In the Multi-Output Device settings on the right, check the boxes next to both BlackHole 16ch (or however many channels you installed) and your built-in output (or your external speakers/headphones).
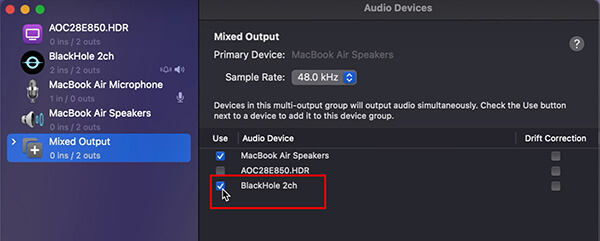
Make sure Built-in Output is the primary device by dragging it to the top of the list. Also, check the Drift Correction box for the BlackHole device.
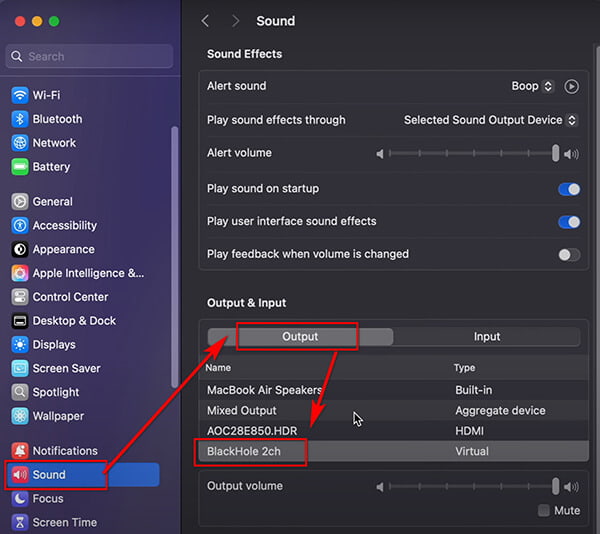
5. Now, in your Mac's System Preferences, go to Sound and then the Output tab. Select the Multi-Output Device you just created.
6. Open your preferred audio recording application (like QuickTime Player or GarageBand). Here we will take QuickTime Player as an example.
Just run QuickTime Player, choose File > New Audio Recording, from the drop-down options, select BlackHole 16ch as the input source.
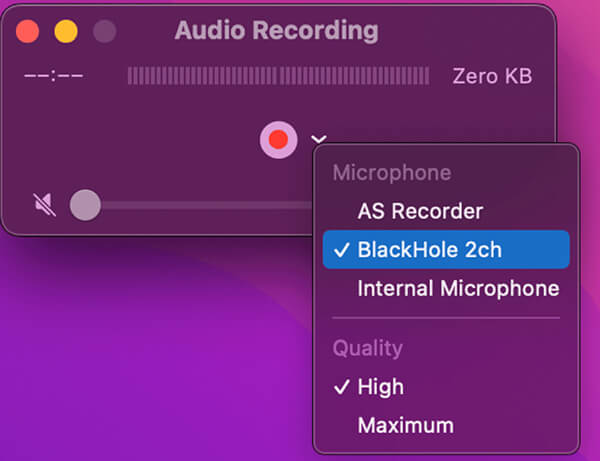
Note: QuickTime Player is not designed to record audio on Mac, and you can find more professional Mac audio recorder software here.
7. Now, when you play audio on your Mac, it will be routed through BlackHole and recorded by your chosen application.
It might take a couple of tries to get the hang of the audio routing. Don't be discouraged if it doesn't work perfectly the first time. Experiment with the settings!
What users like:
What users dislike:
If the thought of messing with audio drivers and settings makes your head spin, there's a much simpler approach: using dedicated and easier screen recording software like AnyMP4 Screen Recorder. Unlike free methods that rely on virtual audio drivers and manual routing, anyMP4 Screen Recorder is designed to handle Mac audio capture software seamlessly, often with just a single click. This is especially useful if you also want to record the Mac screen with internal audio simultaneously. If you're a beginner at capturing Mac internal audio, you will love this tool.
Besides, it provides more wonderful audio and screen recording features:
This makes it ideal for recording streaming audio on a Mac or capturing audio from a website on a Mac, along with the visuals.
Here are the easy steps of how it works with anyMP4 Screen Recorder:
1. Download and install the Mac system audio recorder on your computer. This tool works well on all Mac devices that support macOS 10.12 and later, like MacBook Air, iMac, Mac Mini, Mac Pro, etc.
Secure Download
Secure Download
Follow the installation instructions and launch the Mac internal audio recorder software.
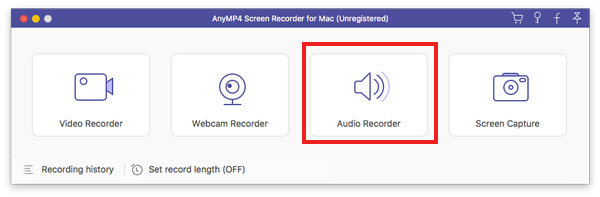
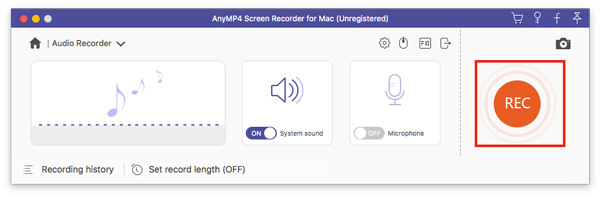
2. Once running it, it will go to the Video Recorder by default. You just need to switch to Audio Recorder from the drop-down list of Video Recorder at the top-left menu.
To record a Mac screen with internal audio, simply keep Video Recorder and follow the next steps.
3. You should see options for System Sound (internal audio) and Microphone. Simply enable the System Sound option and turn off the Microphone if you want to record audio playing on your Mac without using a microphone.
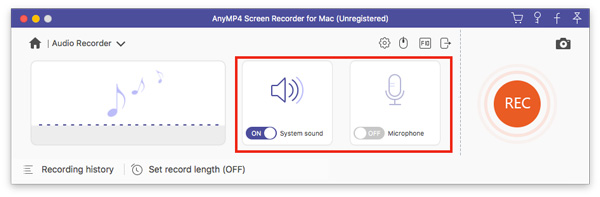
For voice recording, you can test your Mac system audio to select the different audio device by clicking the Test option near System Sound.
4. Click the REC button to begin recording Mac system audio.
Once you're done, click the Stop button. You'll usually be able to preview your recording and then save it to your desired location.
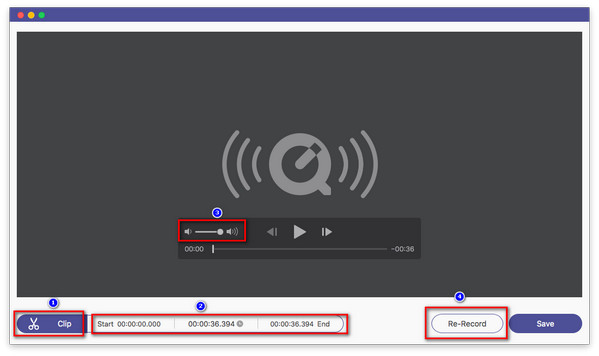
Now, you are done recording internal sound on your Mac device.
What users like:
What users dislike:
If you prefer to avoid software, recording internal audio with a physical cable is a classic but still effective method. While it requires a little more hardware setup, it’s perfect if you’re looking for a no-fuss solution.
What you’ll need:
• A 3.5mm audio cable to connect your Mac’s headphone output to the microphone input.
• A headphone splitter (with a microphone input). This splits your Mac's headphone output into two ports: one for your headphones/speakers and one that acts as a microphone input.
Check the following step-by-step guide:
1. Plug the headphone splitter into your Mac's headphone jack.
2. Plug one end of the 3.5mm audio cable into the headphone output port on the splitter. Connect the other end of the cable to your Mac's microphone input port (if your Mac has one).
If you want to hear the audio while you're recording, plug your headphones or speakers into the other output port on the splitter.

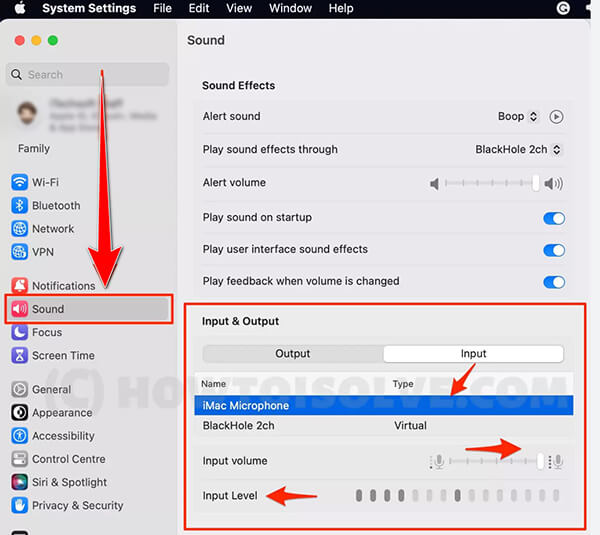
3. Open System Preferences on Mac, go to Sound, and then the Input tab. You should see your Mac's microphone input listed. Select it as your input device.
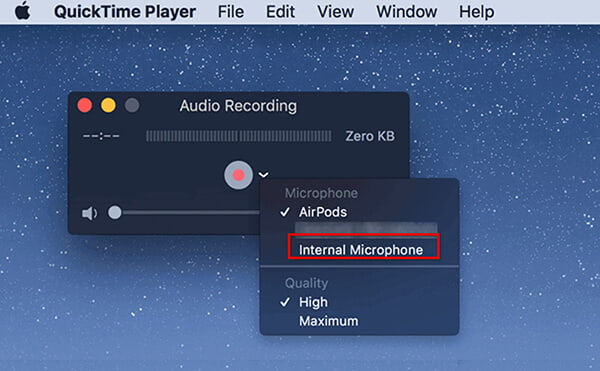
4. Run QuickTime Player on Mac and go to File > New Audio Recording.
Select Input Source in QuickTime: Click the little arrow next to the record button and ensure your Mac's microphone input is selected as the audio source.
Note: If you have other professional screen and audio recorder like OBS, ShareX, etc., you can run them as you wish.
5. Play the audio you want to capture on your Mac and click the Record button in QuickTime. The audio being outputted will be physically routed back into your Mac as a microphone input and recorded.
What users like:
What users dislike:
How do I record system sound on a Mac without a microphone?
The best method for recording system sound without a microphone is using BlackHole or anyMP4 Screen Recorder, both of which capture internal audio directly.
Can I use QuickTime to record internal audio on my Mac?
Yes! QuickTime can be used to record internal audio, but only when paired with a virtual audio driver like BlackHole.
Yes! QuickTime can be used to record internal audio, but only when paired with a virtual audio driver like BlackHole.
While both tools allow you to capture internal audio, BlackHole is newer, with better support for macOS updates, and is often seen as a more reliable option than Soundflower.
Can I record internal audio on M1 Macs?
Yes, BlackHole and other modern tools support M1 Macs for internal audio capture.
Is there a free internal audio recorder for Mac?
Yes, BlackHole is a free option for recording internal audio on your Mac.
Recording internal audio on a Mac doesn’t have to be a headache! Whether you want a free, open-source solution like BlackHole, a paid, user-friendly tool like AnyMP4 Screen Recorder, or a classic hardware-based approach, you have options that fit every need and budget. If you’re looking for simplicity and high-quality recordings, AnyMP4 Screen Recorder might be your best bet. For a free option, BlackHole offers flexibility with a bit more setup.
Now it's your turn! Have you tried any of these methods? Which one worked best for you? Share your experiences or any other skills you might have in the comments below, and we'd love to hear from you!
 Posted by Alice Thorne to Record Audio
Related Articles
 A Comprehensive Guide: How to Record Video on Mac
Learn how to record video on Mac computer using third-party and built-in tools. Capture screen activities, record yourself, and create engaging videos.
 Record Voice and Sound on Mac in 5+ Straightforward Solution
This guidepost will outline six ways how to record voice on Mac. We’ve curated the perfect toolkit for your internal and external audio recording needs.
 How to Record Mac Audio on Adobe Audition: Full Guide
Want to learn how to record with Adobe Audition? Discover how to use it to capture system and microphone audio on your Mac computer by reading this guide.
 3 Ways to Record/Capture Screen on Windows 11/10/8/7
Learn how to record screens on Windows with ease. Follow our comprehensive guide to capture screens using built-in features and third-party tools.