
Quick Summary:
Ever click on a guide, only to listen to someone talk about their breakfast for four minutes before showing you anything? It drives everyone nuts.
When people search for help, they want the fix right now. They don't want your life story. But when you sit down to make a tutorial video yourself, it is easy to get stuck wondering what mic to buy, how to record your screen, or why your recorded voice sounds so weird. Follow this guide to learn how to build a tutorial that gets to the point and keeps people watching.

Best For: Fast, clear software walk-throughs, website guides, and no-fluff tech demos where viewers need to see exactly where your mouse clicks.
If your goal is to record software tutorial AnyMP4 style, this is the most direct way to do it. You show the finished result in the first five seconds, then walk through each click to reach that result.
AnyMP4 Screen Recorder works great here because it records your desktop in HD 1080p, keeps clean mic audio, and draws rings around your mouse clicks. Besides, it has 7 separate recorder modes to record video tutorials for gameplay, window, webcam, phone, screen, and more. Its built-in editing features while and after recording, will enable you to generate a video without downloading extra software.
Secure Download
Secure Download
1. Set Up Your Clean Screen
Close all your personal browser tabs, hide your desktop mess, and mute Discord or Slack alerts.
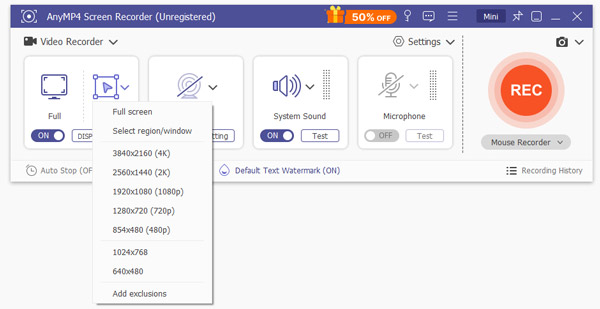
Open AnyMP4 Screen Recorder on your PC or Mac. On the main interface, choose Screen Recorder. Click Custom and select your target window, or choose Full if you plan to switch between two different apps during the lesson.
2. Configure Your Audio and Mic
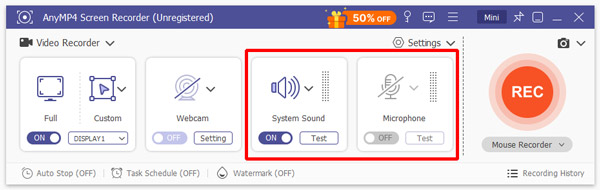
Look at the audio toggles.
3. Turn on Cursor and Click Effects
People lose track of mouse pointers on high-resolution screens.
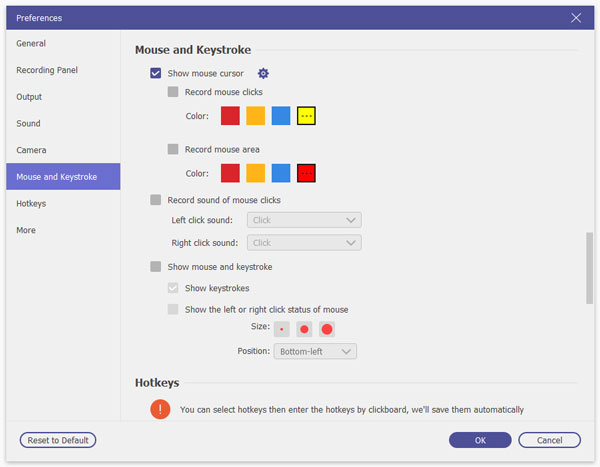
Go to the app's Preferences (the gear icon) and click the Mouse tab. Check the box for Show mouse cursor. Then check Record mouse clicks and pick a bright color like yellow or red. Now, every time you press your mouse button, a colored circle flashes on screen. This makes your tutorial video with cursor clicks much easier to follow on small phone screens.
4. Record the Steps
Click the big orange REC button. A three-second countdown will start.
Do not start with "Hey guys, welcome back to my channel." Instead, show the final result first.
Say: "In this video, you will learn how to turn this messy spreadsheet into this clean invoice."
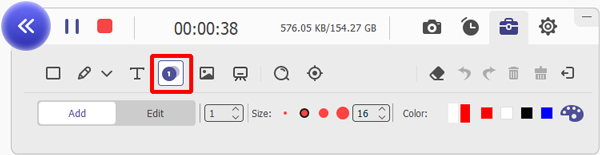
Then, open your app and perform each action slowly. If you make a mistake, stop talking for three seconds, leave the screen still, and repeat that single step. You can cut the bad take out later in ten seconds. Use the floating toolbar to draw arrows or add text annotations if you need to point out a small button.
5. Preview, Trim, and Export to MP4
When you finish, click the red square Stop button.
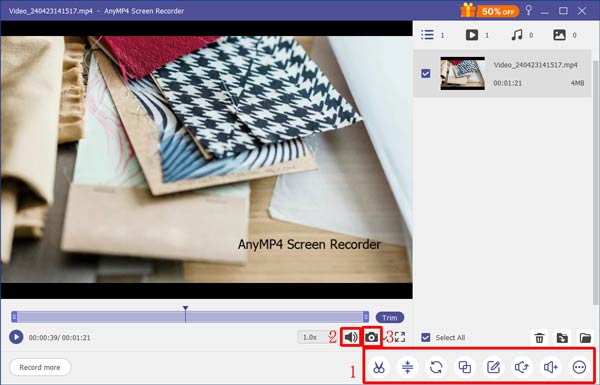
A preview window pops up right away. Drag the left and right slider bars at the bottom to chop off the dead air at the beginning and the end. Moreover, the editing tools at the bottom-right corner to compress, merge, and refine your tutorial recording file.
Once it looks tight, click Done. The app saves your file as an MP4 in 1080p, ready for YouTube or your company knowledge base.
Keep your mouse moving at an even pace. Jerking the mouse across the display makes viewers dizzy. When you need to click a button, move your pointer to it, pause for half a second, click, and then move on.
Best For: Training videos, online courses, and YouTube tutorials where showing your face in a corner webcam circle builds trust without blocking your desktop menus.
A hybrid screen recording tutorial uses two video sources: your webcam face and your desktop screen. Seeing your face for the first ten seconds proves there is a real human behind the voice. But staying full-screen on your face the whole time is annoying when people just want to see software settings.
The easiest fix is to record both at the same time. You do not need two separate cameras or complex video tracks. AnyMP4 Screen Recorder lets you place your live webcam right over your desktop, resize the window, and record everything into one finished file.
Secure Download
Secure Download
If you ever want to build custom title slides or step cards before recording your screen, an easy video maker and creator helps you assemble those intro graphics fast.
1. Set Up Your Camera and Room Lighting
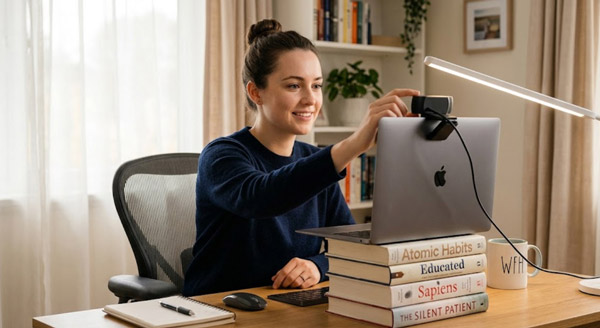
Place your webcam right at eye level. If you use a laptop camera, prop the laptop up on a stack of four or five thick books so you are not looking down into the lens.
Sit facing a window, or place a simple desk lamp behind your monitor so light hits your face directly. Do not sit with a bright window behind your back, or you will turn into a dark silhouette on camera.
2. Enable the Webcam Toggle in AnyMP4
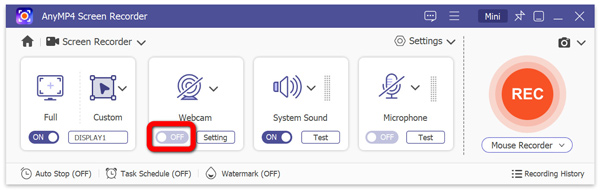
Open AnyMP4 Screen Recorder and choose Screen Recorder. Then toggle on the Webcam option. A live camera preview box will immediately pop up on your monitor.
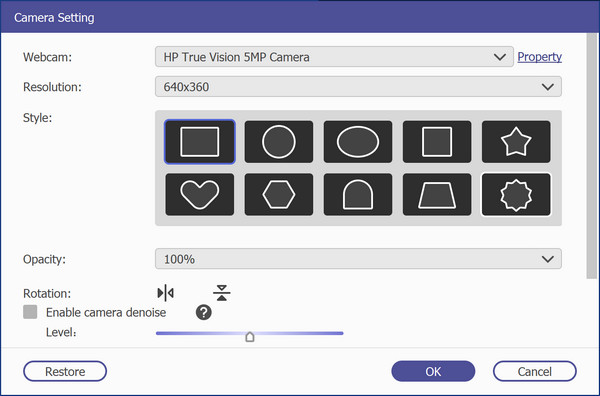
Click the small arrow next to the Webcam icon to pick your external webcam model and set the video resolution to 1080p.
You do not want your camera box covering the exact buttons you need to click in your tutorial.
Click and drag the live webcam window to a corner of your screen (usually the bottom-right or top-right works best). Grab the corner edges of the camera box to resize it so your face is clear, but small enough to leave 90% of your software interface visible. In the webcam settings bar, you can also pick a circular or square crop to keep the look clean.
3. Dial in Your Microphone Audio
Plug in your USB microphone and switch on the Microphone toggle in AnyMP4.
Speak in your normal talking voice and check the green volume bar. It should bounce around the middle or upper-green area (between -12 dB and -6 dB). If the meter hits the red zone, drag the volume slider to the left so your voice does not distort or crackle. If you have a noisy computer fan running, turn on Microphone noise cancellation under the mic dropdown menu.
If you also want to stitch together static photo slides or diagrams during your demo, an easy slideshow video maker lets you turn image sequences into clean video cards before you start recording.
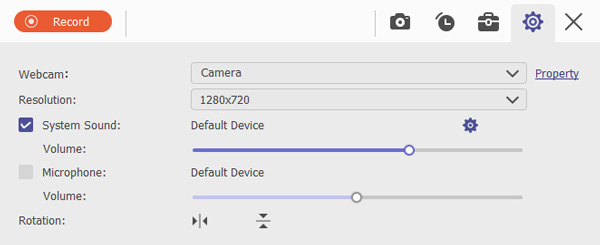
4. Record Your Tutorial Video with Camera
Click the orange REC button.
Click the red Stop button. Trim any awkward pauses at the start or finish in the preview window, and export your file as a ready-to-use 1080p MP4.
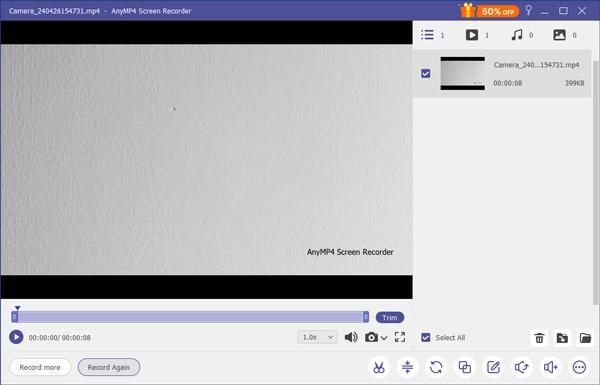
Wear a plain, solid-color shirt for your webcam recordings. Busy striped or checkered shirts create a weird shimmering wave effect on video called moiré.
Once you have your clips, you need to turn them into a clean video file. You do not need expensive software for this. If you are on a budget or working from a Chromebook, you can use an online video maker right in your browser to trim gaps and join clips.
1. Add Clear Text Annotations
When you click a small drop-down menu on a 4K or 1080p display, phone viewers cannot read the text.
Use a free online video editor to zoom in 150% on that specific corner of the screen for three seconds. Add a simple text box that shows keyboard shortcuts, like Ctrl + Shift + S or Cmd + Option + V, so viewers do not have to guess what you pressed.
2. Generate Burned-In or SRT Captions
Over 60% of people watch online videos on mobile with the sound muted, especially while on trains or at work.
Use an auto-caption tool or YouTube's built-in subtitle editor to generate English captions. Check the generated text to make sure brand names and software menus are spelled correctly. You can also add the subtitles to MP4 while you edit the recording file in step 2.
3. Write Your YouTube Chapters
Chapters break your video timeline into clean parts so people can jump right to the part they need. You can start your description like this:
YouTube requires your first timestamp to start at 0:00. You need at least three timestamps in total, and each section must run for at least ten seconds for the chapter bar to work.
4. Craft the 'How to X' Title and Thumbnail
Your title and thumbnail decide whether anyone wants to click your video.
If you make product walk-throughs for your business, an explainer video maker has built-in callout boxes made just for this.
How long should a tutorial video be?
Your tutorial video should be as short as possible while clearly solving the problem. Most simple software fixes should run between two and six minutes. If your guide takes more than ten minutes, you are likely covering too many separate topics. Break big projects down into a series of shorter videos instead.
How do I start a tutorial video to keep viewers watching?
Skip intros, long hellos, and logos. In the first five seconds, show the finished result or state the exact fix. Then jump straight to step one. Giving answers right away keeps people from clicking away.
How do I add chapters to a tutorial video?
Add timestamps to your video description box in plain text. Your first timestamp must start at 0:00 (for example, 0:00 Intro). Add at least three timestamps in chronological order, with each section running at least ten seconds. YouTube will automatically turn these lines into clickable chapters on your playback bar.
What makes a tutorial video rank on YouTube?
YouTube ranks how-to videos on keyword matches and watch time. Use a clear "How to [Task]" title that matches search terms. Keep your intro fast so people stay past the 30-second mark. Videos that solve problems quickly get higher watch time, which pushes your video to the top of the search results.
Making a great tutorial video is really easy. You don't need a fancy camera or days of editing. Pick one problem, show the result right away, record your screen clearly, and cut out the dead air. When you give fast answers without the fluff, people will watch to the end, subscribe, and come back for more.
 Updated by Riley Mitchell to Record Video
More readings
 Gaming Intro Maker | Elevate Video & Create Epic Intro Now
Stand out from the crowd! Discover the five gaming intro makers to create professional-looking intros for your channel. Find the best intro maker for you today.
 16 Best Free Video Makers Online/PC/Android/iOS to Make Video Files
When you need to make some video clips for free, you can learn more about the 16 best free video makers online/PC/Android/iOS device from the article.
 Top 10 Birthday Video Maker for All Platforms
Looking for a program to make a Birthday video for your loved ones? We have listed the best programs to help you produce unique Birthday videos here.
 5 Best AI Video Makers for YouTube: Which One is the Best
Do you want to learn what the best AI video maker for YouTube is? Read this article to know which is the best based on features, pros, cons, and best uses.
 Add your comments to join the discussion here