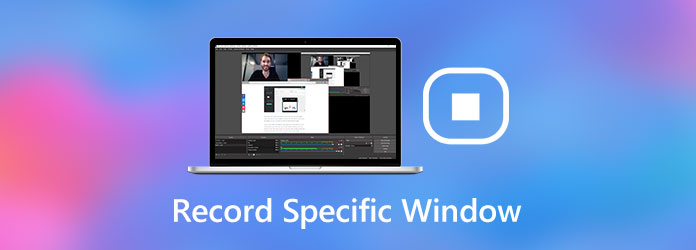
If you want to make a tutorial video of how to use a certain program, recording an active window is a better choice. There is no need to record full screen desktop video. Just select which software you want to record. Later, all activities will be recorded into a digital video.
Both Windows and Mac have the default screen recording functions. You can capture your screen for a presentation, how-to video, online courses and more with the default screen recorders. However, lacking advanced recording features is the main drawback of built-in screen recorders. If you want to add your voice, face and on-screen drawing tools into this recording video, a third-party screen video recorder is required.
Luckily, you can get 3 different ways to record a specific window on your Windows and Mac computer here. All installed programs and browsers are supported. You can record your screen of any app with sound and webcam. Just read and get more details.
To record a specific window on a low end computer, AnyMP4 Screen Recorder is your best choice. You can record what's going on without delay or hassle. It is highly recommended to record gameplay window. Because the desktop screen recorder minimizes the CPU, GPU and RAM usages. Your computer's running speed will not be influenced. Meanwhile, you can add real-time drawing effects on your screen recording video.
Secure Download
Secure Download
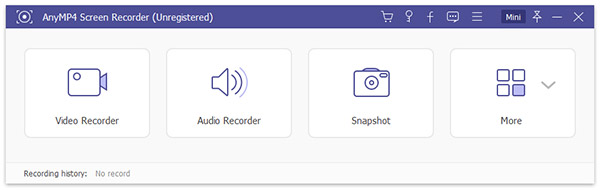
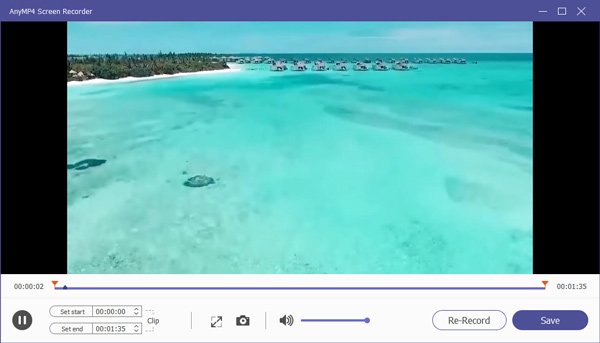
Step 1: Free download, install and launch AnyMP4 Screen Recorder. To record a specific screen video, choose Video Recorder in the main interface.
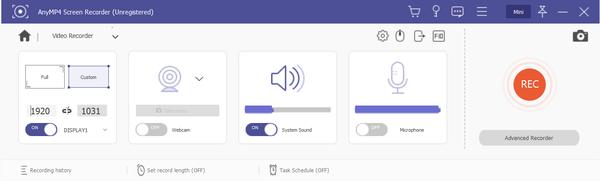
Step 2: Hover your mouse above the active window, then click it to set the recording area. Turn on System Sound to record a specific window with sound. If you want to add your voiceover, you can turn on Microphone as well. To record yourself in this video, you can turn on Webcam too.
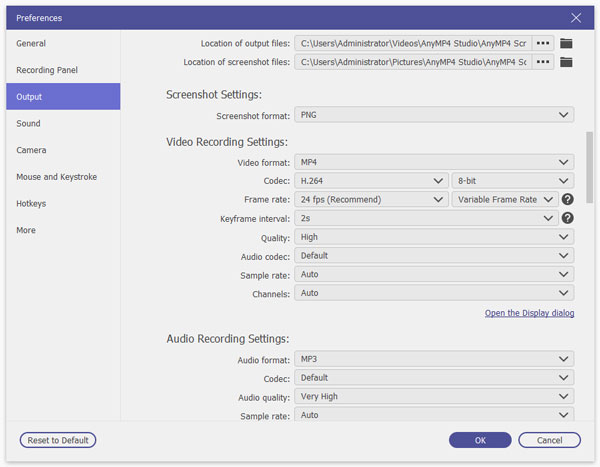
Step 3: The default output video format is MP4. You can click Settings to get the Preferences window. Here you can customize output video settings and make other changes. Click OK to confirm and move on.
Step 4: Click REC to start recording a specific window. You can pause and resume recording video freely. When you want to finish the screen recording, you can click the Stop button. In the Preview window, preview and trim the video file if necessary. At last, click Save to save your screen video recording.
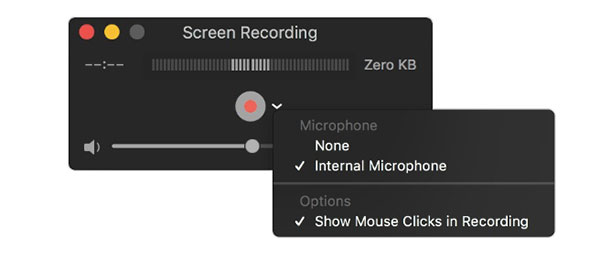
QuickTime Player is a free screen recorder for all Mac users. If you use macOS Mojave and later and later versions, you can get one more choice. By pressing Shift, Command and 5 keys on your keyboard, you can record the entire screen or selected portion on Mac for free as well. After that, you can trim, share or save the recorded video within Mac. Considering not all Mac users update to the latest Mac OS version, this article will show you how to use QuickTime to record a specific window on Mac.
Step 1: Open QuickTime Player. Choose New Screen Recording from the File menu bar.
Step 2: Draw around the active window. Unfold the arrow next to the Record button to adjust recording settings and set input audio source.
Step 3: Click REC to start recording with QuickTime. You can click the same button to stop Mac screen recording.
Step 4: When the QuickTime recording process ends, you can play, edit or share the recording file.
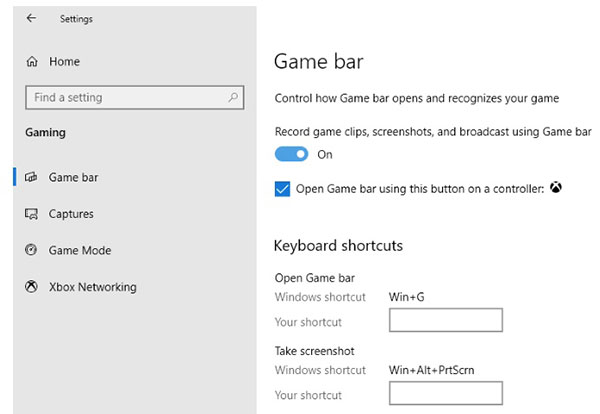
Xbox Game Bar is the default screen recording tool for Windows 10. You can record a video of your active window on Windows 10 for free. Game Bar is pre-installed on all Windows 10 computers. Thus, you can start recording a specific window on Windows 10 PC directly.
Step 1: Open Settings followed by Gaming and Game Bar. You can set hotkeys and other preferences or Game Bar recording.
Step 2: Navigate to the target active window. Press Windows and G keys to activate it.
Step 3: Press Windows, Alt and R keys to start recording an active window on Windows 10 quickly.
Step 4: Once the Windows 10 screen recording process ends, you can see it in the Screenshots folder.
Check how to record Xbox One gameplay
Can you record any program with Windows 10 Game Bar?
No. You cannot record File Manage or other apps from the Windows Store/desktop apps with Game Bar on Windows 10.
How long can you record on your computer?
It depends on the free storage space mainly. As for Windows 10 Game Bar, the maximum recording length is 10 minutes.
How to record a specific window with OBS Studio?
Open OBS Studio. Click Settings on the lower right corner. Select the input audio source in the Audio section. Click + under Sources. Choose Window Capture and then select OK. You can see your display window appearing in the OBS dashboard. Later, you can use OBS to record a specific window for free.
That's all to record a specific window on Mac and Windows. You can use 3 different tools to record any window on your computer with ease. If you still have questions about screen recording, you can feel free to contact us.
 Posted by Riley Mitchell to Record Video
Related Articles
 How to Record Video and Audio in Windows Media Player with No Quality Loss
Looking for the way to record video or audio playback in Windows Media Player? You are lucky since this guide tells you three ways to do the job efficiently.
 How to Download Videos from YouTube Using VLC Media Player
Looking for the way to record video or audio playback in Windows Media Player? You are lucky since this guide tells you three ways to do the job efficiently.
 Trim a Video on Windows 10/8/7 – Here is the Ultimate Guide You Should Know
When you want to crop the unwanted parts of a video clip, you can learn more about the 2 effective and easy ways to crop and trim a video on Windows 10/8/7.
 Get Your Best XviD Recorder to Screen Record on Windows and Mac
Here're 2 powerful XviD recorders for Windows and Mac users. You can record screen video with audio as XviD format on your computer without quality loss.