
Today, people are increasingly unable to leave their mobile phones, listen to music with smartphone, watch movies on smartphone, take photos by mobile phone, etc. In result, limited internal storage becomes a big challenge for iPhone users. When clear these media files and free up space, one category of them is often overlooked, voice memos.
In this tutorial, you can learn about how to delete voice memos on iPhone 17/16/15/14/13/12/11/XS/XS Max/XR/X/8/8 Plus/7/7 Plus/6. The Voice Memos app is convenient to create digital recordings of notes; however, they take up a lot of space on your iPhone, especially if you use the app frequently. Following our guides to delete voice memos can help you free up memory for storing more files.
Deleting voice memos is able to free up space and make your iPhone performing better, but we suggest you back up important voice memos to iCloud or iTunes first. In this part, you can get the common methods to delete voice memos in different situations.
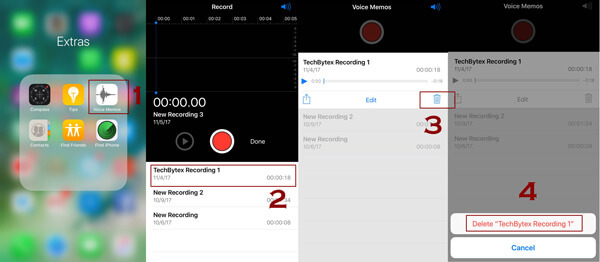
Step 1. Open the "Voice Memos" app on iPhone or iPad home screen, and tap the list icon at bottom to display all saved voice memos on your device.
Step 2. Select the voice memo that you want to remove from your iPhone and open it in player screen. Here you are presented three options, "Share", "Edit" and "Delete".
Step 3. Tap on the "Trash" icon to delete it. If prompted, tap "Delete" to confirm it.
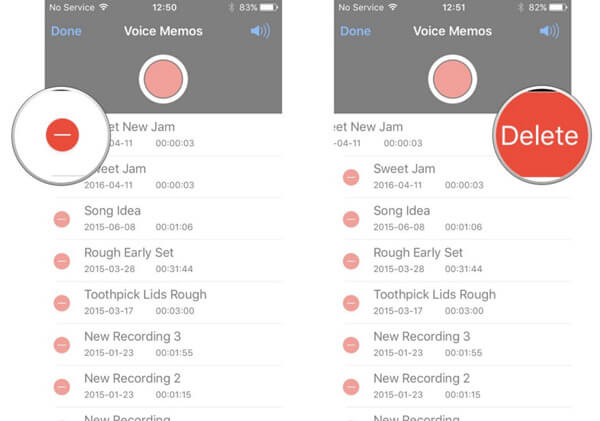
Step 1. To delete voice memos at the same time, also start the Voice Memos app and go to the saved memos list tab. Tap on "Edit" at upper left corner to switch into the edit mode.
Step 2. Hit the minus icon in front of an unwanted voice memo and tap on the "Delete" button.
Step 3. Repeat step 2 on other voice memos to delete from your device.
Voice Memos is a useful feature on iPhone, but iCloud does not sync voice memos separately. On the other hand, Apple creates a Voice Memos playlist in iTunes to help users better manage their memos. If you want to protect your privacy and delete voice memos completely, you can follow the steps below.
Step 1. Connect your iPhone to your computer using the Lightning cord and open your iTunes. Wait for iTunes to detect your device.
Step 2. Click "Music" under "On My Devices", go to the "Playlist" on top ribbon and select "Voice Memos" on left side.
Step 3. Press the Ctrl key on Windows or Cmd key on Mac and highlight the voice memos to remove. Hit the "Delete" key on your keyboard to delete voice memos in iTunes.
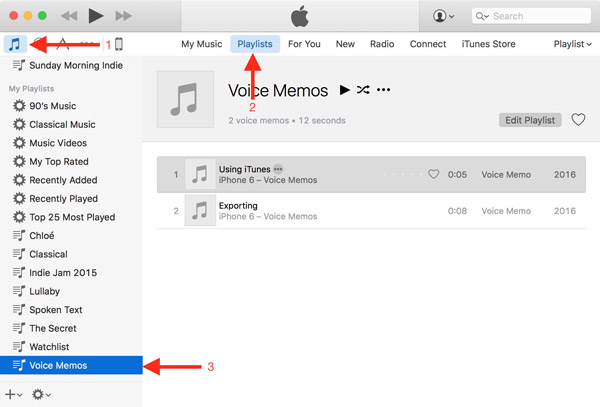
Step 4. To stop sync voice memos to iTunes, click the "Device" icon, click "Music" on left sidebar and uncheck the "Include Voice memos" option.

The voice memo is convenient, especially when you do something else with our hands. But audio files are apparently larger than text notes. When you want to delete voice memos, you'd better back up your voice memos on iPhone or iPad. AnyMP4 iPhone Transfer is a good option. Its key features include:
1. It has the capacity to recognize and organize all voice memos on your iPhone automatically.
2. Before you delete voice memos on your device, iPhone Transfer allows you to backup them in one click.
3. Besides voice memos, this program works on a wider range of data types, such as contacts, call history, photos, music, videos, app data and more.
4. This iPhone transfer application supports iPhone 17/16/15/14/13/12/11/XS/XS Max/XR/X/8/7/6/6s/5/SE/4, iPad Pro/Air/Mini or earlier, and iPod Touch.
Secure Download
Secure Download
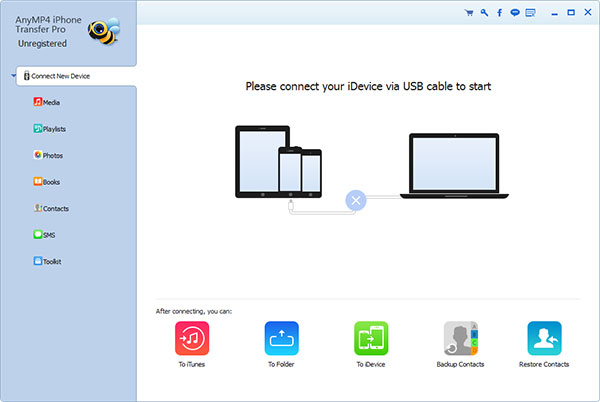
Step 1: Install the best voice memos manager on your computer
Download and install AnyMP4 iPhone Transfer to your computer. It offers a version for Windows PCs and another one for Mac computers. Hook up your iPhone 7 to your computer via the Lightning cord, which you use to your iPhone 7 and charger adapter. Launch iPhone Transfer to let it recognize your iPhone 7.
Step 2: Preview voice memos on iPhone before deleting
Press the name of your iPhone 7 at upper left corner of the home interface; select the Media option on left sidebar to open the detail window, and go to Voice Memos tab on top ribbon to display all voice memos on your iPhone 7.
Step 3: Delete voice memos from iPhone
If you want to back up the voice memos before deleting, select the voice memos and click Export to PC in the Export to menu to back up them first. Any time when want to get back the deleted voice memos, you can restore them from computer to iPhone using iPhone Transfer.
Like its name implies, the built-in Voice Memos app on iPhone and iPad allows you to record anything in audio and save them to your device, like a lecture, sound of a video, an interview, etc. Unfortunately, the limited space cannot save too many multimedia files, so you have to delete voice memos to free up space. We have shared the common methods to do it. But if you are looking for the all-in-one solution to back up voice memos, we will recommend AnyMP4 iPhone Transfer. It could help you do what you want simply and back up your voice memos before cleaning up them from your device.
 Posted by Ted Klarso to iOS Tips
Related Articles
 How to Backup Text Messages on iPhone
Do you know how to backup iPhone text messages? Here we recommend 5 ways to do it.
 Best Ways to Backup Text Messages on Android
Worry about your text messages got lost? You just need to backup text messages on Android timely.
 Top 6 Programs to Backup SMS on Android
Do you know how to backup SMS on Android? The article explains 6 excellent ways to backup SMS.
 How to Retrieve Voicemail on iPhone
AnyMP4 iPhone Voicemail Recovery offers the best solution to retrieve Voicemail from iPhone.