Adobe Photoshop, mainly known as Photoshop, is one of the world's known and number one choices in photo editing software. It is one of the most complex software for editing photos. It requires a high skill but offers a high reward for those willing to learn to use this program. In this blog, we offer amateur editors a free tutorial to make 3D effects in Photoshop. If you are a starting editor and want to expand your skills in this field, you came to the right place! It is a challenging task to create realistic images, especially on such sophisticated software. But we are here to make the process of learning much quicker and easier to understand. Please continue scrolling below for you to learn how to make 3D letters in Photoshop.
What is a 3D text? Like any 3D element, a 3D text is a three-dimensional text or caption. Conceptually, it has three-dimensional properties: width, height, and depth.
Another way to explain this is, essentially, an object on a screen will have physical-like proportions that make it "solid," so to speak. With 3D modifications, anything can look realistic, even texts.
Nonetheless, this tutorial will teach you how to make your text look real and solid. This effect is relevant because of our eyes' ability to perceive spaces and depth. We will now jump in and discuss how to make 3D fonts in Photoshop.
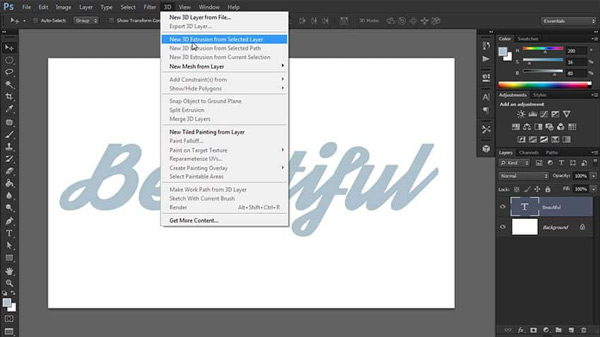
1.Launch your Adobe Photoshop and create a New Project to start editing. Proceed with creating your Text. Select that text, then click on the 3D on the selection on the top. Afterward, select the New 3D Extension From Selected Layer.
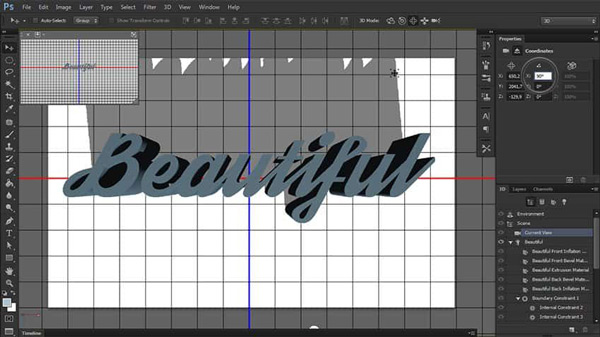
2.Your text will now turn into a 3D object. Click on the 3D object, then click on Properties to set a scene. After that, click on the Coordinates to angle your viewpoint. Click on the x- coordinate and set it to 90 degrees. The camera will now face down on the text.
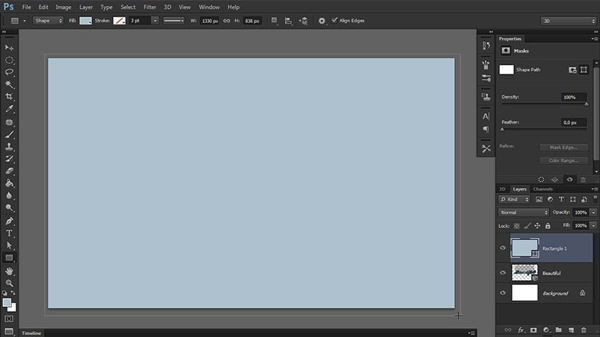
3.At this time, you can now add your background for your 3D text. Create a square with Shape Tool. Afterward, we will make this Shape into a 3D asset.
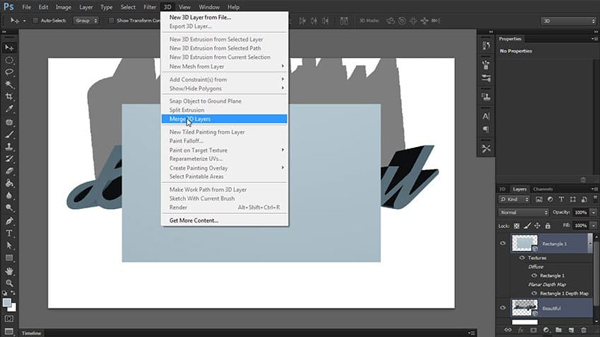
4.Click on 3D, then select New Mesh from Layer > Depth Map to > Plane. After that, click on both Layers. Click on 3D again to select Merge 3D Layer. The background and the 3D are now combined.
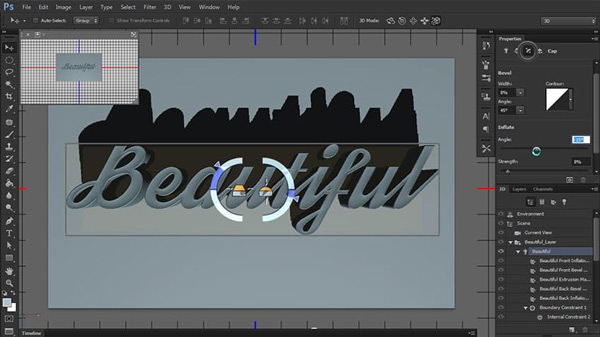
5.To add texture to the 3D Text, click on the first Properties tab, then select Shape Presets. Select your preferred preset, then click on the Cap at the tab selection of Properties to adjust the Angle and Strength.
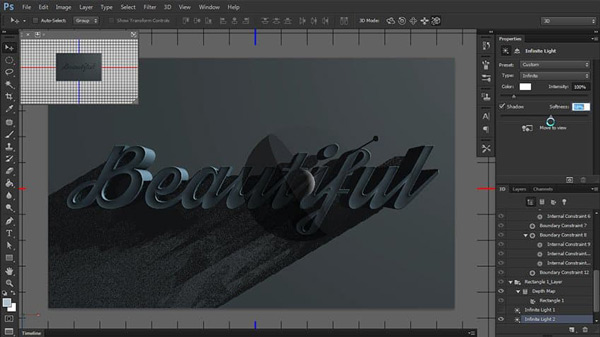
6.Add depth and shadows by utilizing Infinite Light by selecting the 3D on the left side. Improve the lighting by adding another Infinite Light, making it much more realistic. Click on the white card to add another Infinite Light.
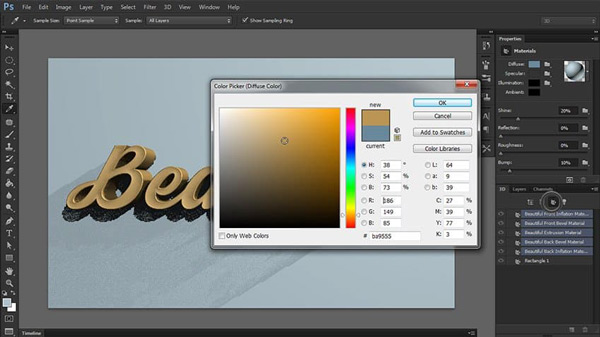
7.Go to the Material tab, select your added effects, then open Properties to put color on the with Diffuse, the primary color of the object. Specular, the highlights and shine of the setting, and Ambient, the object's depth and shadow.
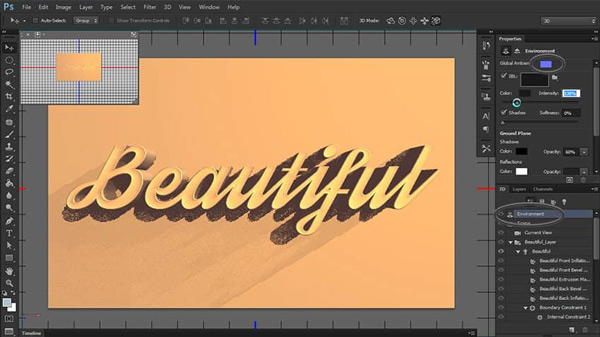
8.Add color to the background. Click on New Material. Click on the property setting icon to add the material to the Rectangle on the list. Click the Environment on the 3D list and adjust the Global Ambient to brighten the color and emphasize shadows.
9.Lastly, render the image. Then if you are satisfied with the picture, go on and export it. This is how you create a 3D text effect in photoshop; we hope you learned something today!

Now that you know how to add 3D effects to your text, we will show you a new technique, this is a tutorial on how to add 3D effects to your photos.
Continue to improve your photo editing skills by investing time in exploring Photoshop.
Familiarize yourself with the settings by learning new things every day. That way, you are earning knowledge on each task you perform. Continue on the tutorial below on how to make your 3D/retro-themed photos with this 3D photo editor.
1.Add the image you want to have the 3D/retro effect, then look at the Layers panel, and the image will be in the Background. In the same panel, Duplicate the layer by clicking on the square with the addition sign on it.
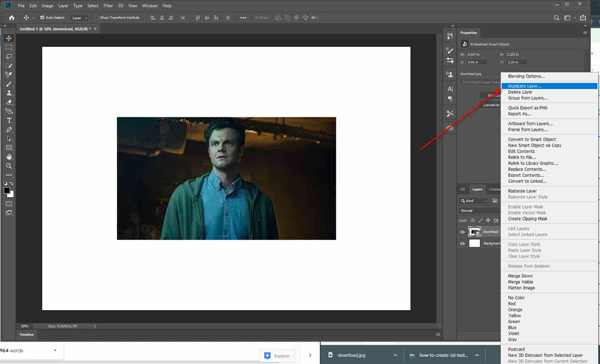
2.After duplicating the image, select it and click the fx icon right at the bottom of the Layers panel. A menu will appear. Click on Blending Options then a pop-up will appear. You will see a pop-up, look at Channels, and de-select the G & B button.
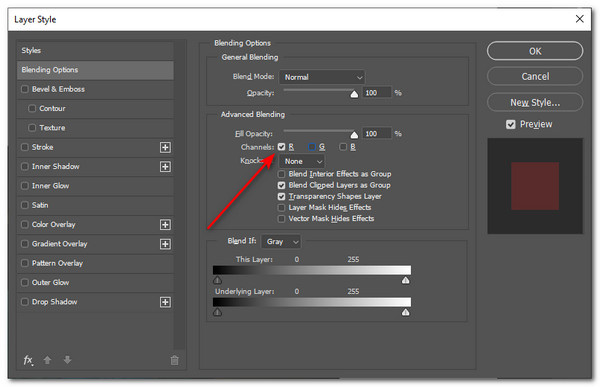
The R, G, and B selections stand for Red, Green, and Blue. In this case, the image will appear red because the Red box is the only one selected.
3.To see the result of the change we did on the Blending Options, look at the Layers panel again. Each layer has an eye icon; this is the Visibility Icon. Click on this to reveal the color of the edited layer.
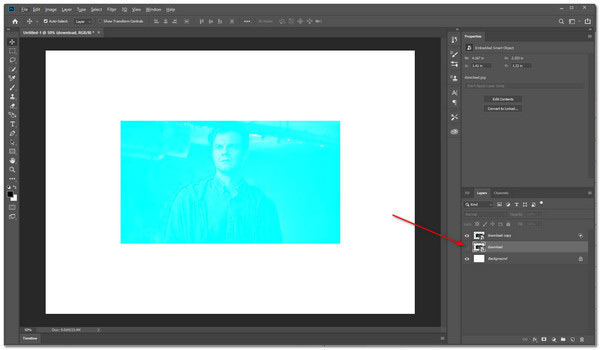
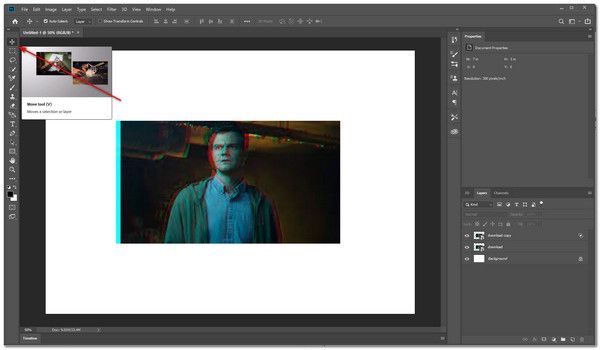
4.As you can see, this layer is filled in plain color. You should first put the edited layer on the top so it will be the one you select. Once on the top, click on the Move tool to move the top layer. Move it to the left, and there you go, a 3D effect on Photoshop.
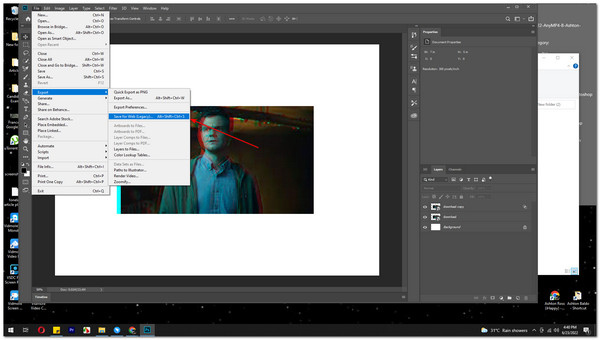
5.If you are satisfied with the results, you can go on now and export the image by selecting the File, then click on Export > Export As, then choose which folder you want to save this image. I hope you learned how to put a 3D effect in your picture!
The previous parts are about the complex steps to putting 3D effects on Photoshop. As a bonus, we are about to introduce a software that will help you add 3D effects to your videos and movies. We present to you AnyMP4 Video Converter Ultimate.
As you can see, this is a video converter software, but because of its imaginative developers, It can do more than convert videos! This program will help you give 3D effects to your movies and videos. All this is a simple process, so let us get started!
1.Download AnyMP4 Video Converter Ultimate. Click on the Free Download. Then you're good to go.
Secure Download
Secure Download
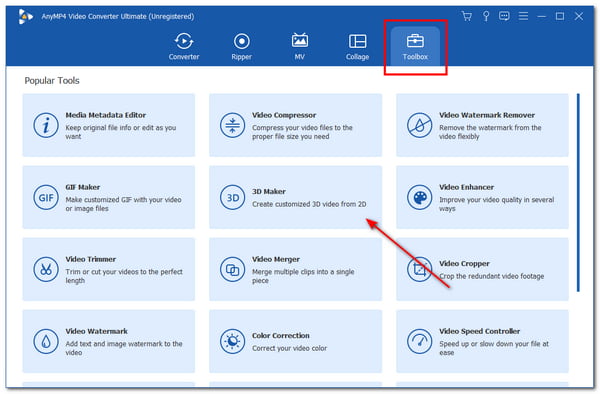
2.Launch AnyMP4 Video Converter Ultimate. Then at the start interface, you will see a selection at the top. Click on the Toolbox, then select 3D Maker to get started.
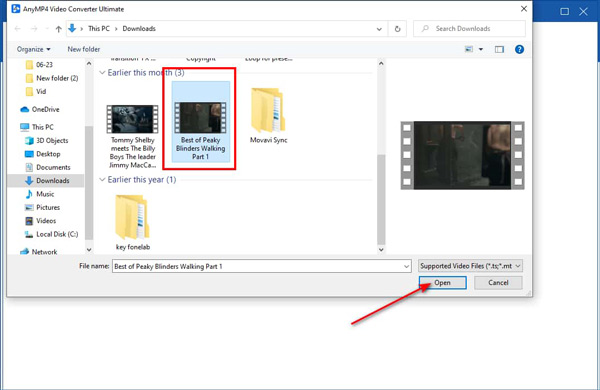
3.Immediately after selecting the 3D Maker, a pop-up will appear that will prompt you to Add a Video to 3D Maker. Afterward, a window will open to let you choose the video you want to have a 3D effect. Once you select a video, click on Open.
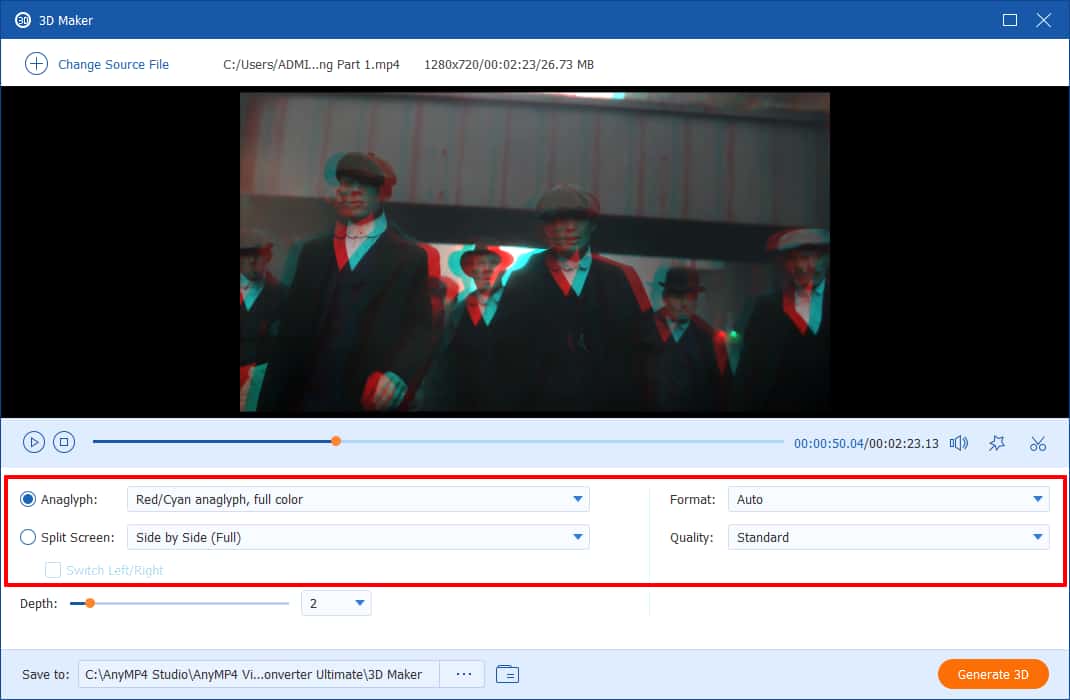
4.It will take you to the 3D maker page. You can make changes to the settings, whether you want to change the color of the Anaglyph, opt for split-screen scenes, change the file format, and enhance the quality of the video.
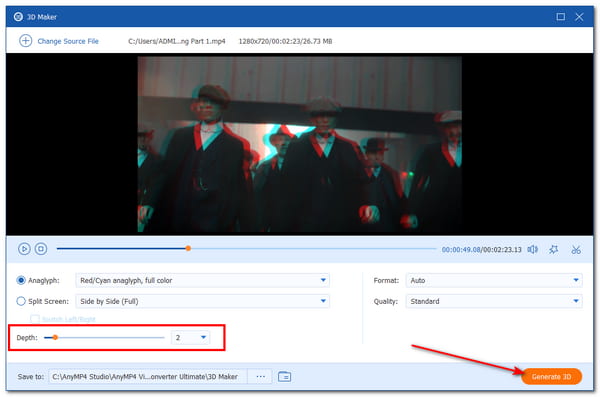
5.Lastly, adjust how much depth you want the anaglyph effect to be. After making changes, if you are satisfied, click on Generate 3D. That will be it! I hope you learned a lot of techniques in this article!
Where is the 3D effect in Photoshop
The 3D menu is located at the top portion of the interface. Right beside View and Filter.
Is 3D discontinued in Photoshop?
Photoshop's 3D feature has been discontinued since Photoshop 22.5 update in August 2021.
What are the disadvantages of using Photoshop?
It is a paid software, and it is expensive.
It is not beginner-friendly.
Performance problem, the software can be sometimes slow.
Adobe Photoshop is effective software that will help you produce every possible photo with every effect available. However, it is very complex and challenging to use. Most importantly, it is paid software. We are glad we can teach you some basic procedures for creating 3D effects using Photoshop. In addition to this tutorial, we presented AnyMP4 Video Converter Ultimate to help you make your videos 3D. Yes, it is a video converter with an accessible interface and fast-speed conversion, compated with Photoshop.
We are glad that you reached this part of the article. We sure hope that we have helped you with this tutorial. We would appreciate it if you could share this article with your friends and family. Please visit our website for more articles like this one.
 Posted by Angelica Liwanag to Edit Video
Related Articles
 How to Do the 3D Effect on TikTok and Its Best Alternative
If you need to animate the photo with 3D trends on TikTok, here is the detailed process and the best alternative you should know.
 Step-by-step Tutorial to Crop a Video in Adobe Photoshop Properly
This is a step-by-step guide to crop a video file in Adobe Photoshop correctly available to both beginners and tech savvy.
 Can You Watch 3D Movies Using VLC VLC Media Player
Viewing 3D movies on the next experience level is possible with VLC Media Player. This article will guide you through a tutorial on how VLC can play 3D movies on your PC.
 Top 5 3D Movie Makers Available to Windows 11/10/8/7 and Mac OS X
The following are some of the best 3D video makers you seeking for. You can read our review to discover an appropriate tool for your machine.