The main purpose of this tutorial is to help you to make stunning story by just adding audio to pictures in no time. Even though you have no prior technical skill, you can master the procedure. A static or animated picture may be worth a thousand words, but it would be nice to throw a few more in yourself, such as adding a soundtrack to your photos. That is why you should read this guide carefully.

AnyMP4 Video Converter Ultimate is geared towards simplicity with an intuitive interface. It enables you to add pictures to the storyboard, edit them, and then make an engaging story with sound and voice.
Main Features of the Best Movie Maker
Secure Download
Secure Download
Step 1: Open pictures
Firstly, download and install the best movie maker on your PC. There is another version for Mac users. When you need to add audio to pictures, launch it and switch to the MV window from the top of the interface. Click the Add menu above the storyboard and open all the images that you want to use. Then they will appear on the storyboard. Select one picture and click the Forward or Backward buttons to adjust the order. You can also go to the Theme panel from the left side, and apply your favorite theme to the movie.
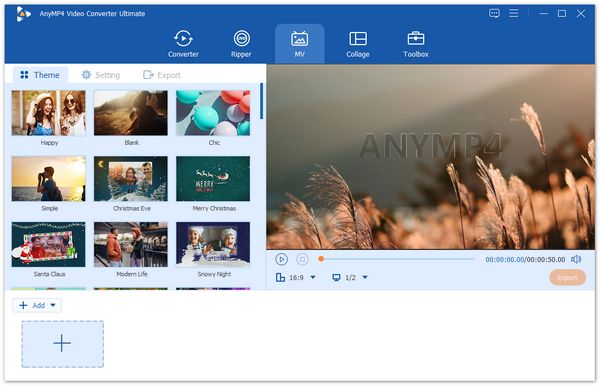
Tip: The movie maker does not have any limit about the number of pictures or the image formats.
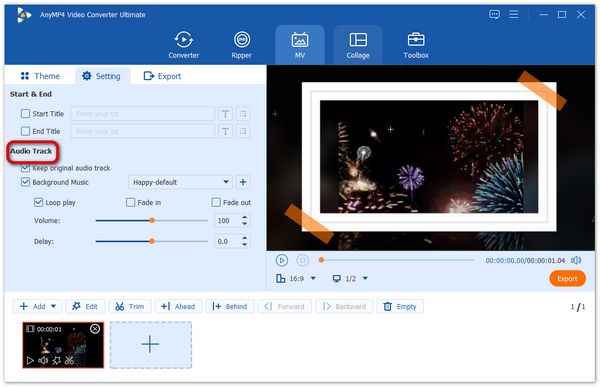
Step 2: Add audio
Head to the Setting panel on the left side and locate the Audio Track section. Make sure to check the box next to the Background Music option. Now, you have two options to add audio to pictures:
Use the built-in music library. Pull down the menu and choose a proper song from the library.
Use your music. Click the + button next to the drop-down menu and open the desired music on your hard drive.
Preview the movie with the built-in media player on the right side and adjust the volume slider until the sound is proper. If you do not want to play the audio track from the beginning, adjust it with the Delay option. Optionally, check boxes next to Fade in and Fade out to apply the effect.
Step 3: Export movie
As long as you are satisfied with the movie, pull down the profile menu under the media player, and select the right output format. Head to the Export panel, click the Folder button and set a specific folder to save the story. At last, click on the Export button to output the pictures with audio track.

Note: The movie maker will save the pictures with audio in a video file format, such as MP4, AVI, FLV, etc.
Related:
There are web-based apps, such as Clideo, Kapwing, Veed, and more, that help you to add an audio track to an image series. If you do not like to install desktop software on your hard disk, they are an alternative solution. However, the free edition usually has some kind of limit, like a watermark. For beginners, they are a nice choice to view the effect after adding audio to your photos. We use Clideo as the example to show you how to add audio to images online.
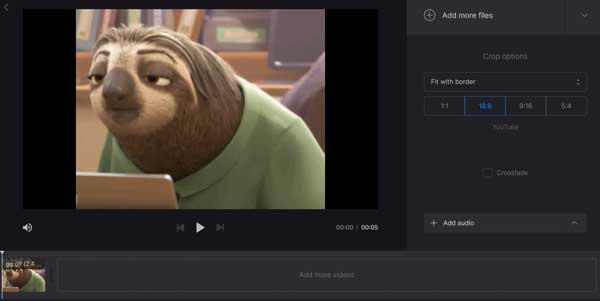
Step 1: Visit the online movie maker app in a browser. Click the Choose files button and upload the photos from your computer. You can upload photos from Google Drive or Dropbox too. It supports the popular image formats.

Step 2: Arrange the pictures on the storyboard. Next, click the Add audio button at the bottom right side, and upload the audio track from your computer.
Step 3: Trim the audio track according to the duration of your pictures, and set the aspect ratio and audio volume.
Step 4: Click on the Export button to initiate adding the audio track to the pictures. Preview the movie and click the Download button to get it to your computer if you are satisfied.
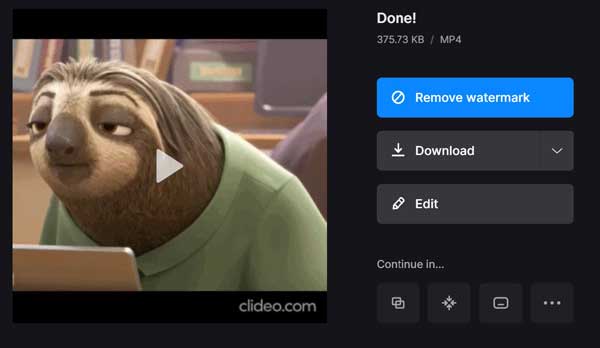
Note: The only way to remove the watermark from your movie is to purchase a plan, which costs at least $9 per month.
Can I add audio to pictures on Windows 10?
Microsoft added a lot of utilities into Windows 10 including the Photos app. It allows you to create a video project, and add audio to a video file. Unfortunately, there is no feature available to add audio to pictures on Windows 10. You can only do it with a third-party movie maker program.
How do I put a voice memo on a photo?
A photo is a static content, which cannot take any audio, such as voice memo. The alternative solution to put a voice memo to a photo is to save the combination as a video file.
How to record my voice over a picture?
With the screen recording software, you can record your voice over a picture. Firstly, open the desired picture on your desktop, run the software, and begin recording your voice. After recording, save it as a video file. That is the only way to get the effect.
This tutorial has explained how to add audio to images and pictures on your desktop or online. If you just start the job, online movie maker apps are a good choice to view the effect. However, AnyMP4 Video Converter Ultimate is the best option to do the job. It includes almost all features for movie making. Moreover, all features are easy to use. If you still have questions related to add audio to pictures, leave a message below this post and we will reply to you as soon as possible.
 Posted by Riley Mitchell to Edit Video
Related Articles
 How to Add Audio to GIF Images and Create Engaging Content
Boring about the mute GIFs? Here is a comprehensive guide to explain how to add audio tracks to animated GIF images without technical skills.
 8 Best Audio Trimmers for Windows, Mac, iPhone and Android Users
Looking for the best audio trimmer for your Windows, Mac, Android or iPhone device? Here we list top 8 options, so that you can make the best decision.
 3 Best Online Audio Cutters to Trim MP3 Songs Free
What is the best online audio cutter? How to trim an MP3 song online free? This post lists 3 online MP3 audio splitters and a professional audio cutter for you.
 6 Best Video and Audio Mixers Software You Should Not Miss
Looking for the best audio and video mixer software? You can learn a top list from this article as well as how to mix video and audio together easily.