Screenshots are useful for sharing what’s on your screen. However, sometimes a single screenshot isn’t enough when the content extends beyond the visible area. Think of long web pages, lengthy documents, or spreadsheets; you need more than what fits in one window. This is where Snagit scrolling capture comes in. It allows you to grab an entire page or window in one image. It’s an efficient way to ensure you don’t miss any important details hidden beyond the visible frame. In this post, we’ll teach you how to capture a scrolling window using Snagit. Our aim is to help you utilize both automatic and manual methods to capture full-length content using this feature.
Snagit offers two methods for capturing scrolling content: Automatic Scrolling Capture and Manual Scrolling Capture. The Automatic Scrolling Capture automatically detects and captures scrollable areas in a single shot. Meanwhile, the Manual Scrolling Capture requires you to manually scroll while Snagit records the movement. Both methods save you from stitching multiple screenshots together.
This method is faster and easier, provided Snagit supports the app or web page you’re working with. It detects scrollable areas and captures them automatically, eliminating the need for manual scrolling.
Here’s how to capture a scrolling screenshot in Snagit automatically:
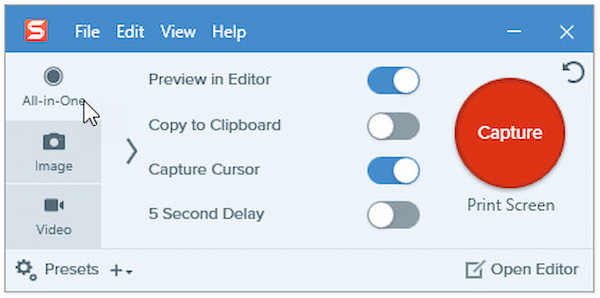
1. Open the app, document, or web page you want to capture. In the Capture Window, select the All-in-One tab and click the Capture button.
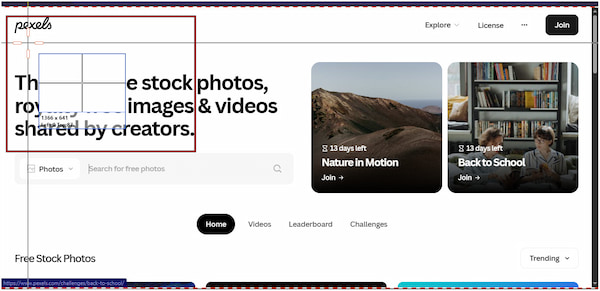
2. The orange crosshairs appear. Hover your cursor over the window. If it detects scrollable content, scrolling arrows will appear around the edges of the window.
3. Use your mouse wheel to scroll the content or click the appropriate scrolling arrow:
• Down Arrow: Full vertical scroll capture.
• Right Arrow: Full horizontal scroll capture.
• Crossed Arrows: Entire scrolling area (both directions).
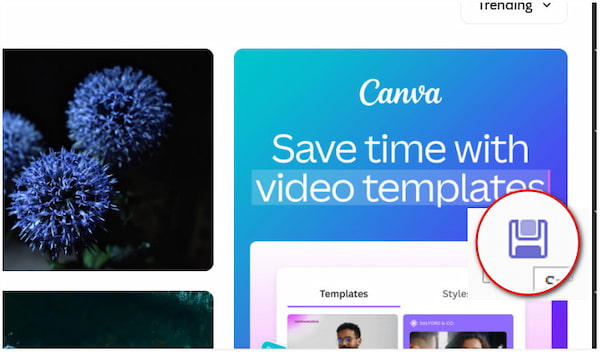
Snagit automatically scrolls and stitches the content into a single capture. Afterward, click Done to end the scrolling capture.
Important Note: If Snagit scrolling arrows don’t appear, the application or website may not support automatic capture. In that case, use Manual Scrolling Capture.
Manual scrolling capture gives you more control over what is included in the screenshot. This method is useful when automatic capture doesn’t work well with certain apps or websites.
Here’s how to take a Snagit scrolling screen capture manually:
1. Prepare the content you need to capture, like a web page, document, or spreadsheet. Select the All-in-One tab and press Print Screen (Windows) or Cmd+Shift+C (Mac).
2. When the orange crosshairs appear, click and drag to select the area you want to capture. Once you select the area, click the Scrolling Capture button.

3. Use the scroll bars or mouse wheel to move the content:
• Scroll up or down for vertical captures.
• Scroll side to side for wide spreadsheets or images.
When you’ve captured the entire area, click the Done button on the Scrolling Capture toolbar.

Creative Tip: Resize the window before capturing to make content easier to scroll through. Use scroll bars instead of the mouse wheel to avoid hover states.
Window Size & Cleanup
Before you start, resize the browser or application window to a larger size. This makes scrolling smoother and helps Snagit stitch captures cleanly.
One-Direction Scrolling
When capturing manually, scroll steadily to prevent gaps or overlap. Stick to one direction only and avoid zigzagging, as this disrupts the alignment of snippets in the final image.
Hide Snagit Controls
Enable the setting to hide Snagit’s UI during capture. This prevents toolbars or the preview window from sneaking into your screenshot.
Automatic Scrolling Isn't Detected
If Snagit scrolling capture is not working, it could be due to unsupported apps or browser conflicts. Try switching to the Panoramic Scroll option, which may work more reliably.
Third-Party Software Conflicts
Security tools can interfere with Snagit’s ability to detect scrollable areas. In some cases, exiting these programs entirely resolves the issue.
Excel Capture Issues
Snagit may fail on Excel’s Print Preview, Page Layout view, or chart sheets that lack scrollbars. Use Panoramic Capture, copy to clipboard, or switch views to Portrait for better results.
Snagit scrolling capture is undeniably great. It quickly grabs long web pages, documents, or spreadsheets. However, it is not the only option available. A reliable alternative is AnyMP4 Screen Recorder, which features a dedicated Scrolling Screenshot function. This tool is fully compatible with Windows 7 or later and macOS 10.12 or above.
For good measure, it supports multiple screenshot modes: Custom Capture, Scrolling Screenshot, Popup Menu Capture, and Full-Window Capture. Its Scrolling Screenshot tool lets you capture entire web pages or long documents. Your screenshots can be saved in PNG, JPG/JPEG, BMP, GIF, and TIFF formats. You can even assign custom hotkeys for quick captures. To enhance results, it also includes real-time editing tools like text, focus effects, and whiteboard annotations.
Here’s how to capture a scrolling window in Snagit alternatives:
1. Start by downloading the AnyMP4 Screen Recorder for free. Install the scrolling window screen capture tool and allow the installation process to finish. Once completed, run the software to begin the scrolling window capturing.
Secure Download
Secure Download
2. As soon as it launches, it will automatically enter Screen Recorder mode by default. Look for the Camera button, click the pulldown menu, and select Scrolling Screenshot. Alternatively, press the Alt+L keys to quickly activate this mode.

3. Move and resize the Screen Selector to align with the content you want to capture. Once it is in place, use the Mouse Wheel or the Space key to scroll through the page. Optionally, use the left click to automatically capture the screen to the bottom.
4. Once you’ve reached the end of the content, simply press the Esc key. The scrolling screenshot will automatically be processed and saved. Click Save in the lower-right navigation to save the scrolling screenshot to your local drive.
AnyMP4 Screen Recorder is a top-notch Snagit alternative, providing an efficient and customizable solution for capturing scrolling screenshots. This software works across various windows and programs, providing you with greater flexibility. It can also save snaps in multiple formats, assign hotkeys, and apply real-time annotations.
Snagit’s Scrolling Capture is a powerful feature that makes it easy to capture entire web pages or lengthy documents. It ensures you won’t miss important details hidden beyond the visible screen. However, if you’re looking for a more comprehensive screen-capturing solution with additional features and multiple capture modes, we recommend trying AnyMP4 Screen Recorder. It can handle scrolling screenshots effortlessly. Additionally, it offers a flexible, all-in-one solution for capturing, editing, and saving your content.
 Posted by Alice Thorne to Screenshot
More readings
 Top 7 GIF Screen Capturing Apps for Windows, Mac, iPhone and Android
This article shows you 7 of the best GIF screen capturing programs that you can try to turn your screen recording videos to animated GIF images for sharing.
 5 Best Screen Recording Capture Extension for Chrome
Looking for the top Chrome screen recording capture extension? Explore our post to determine which tool offers the best performance, features, and usability.
 Tutorial to Screen Capture on macOS Mojave with or without Keyboard
This tutorial to take a screenshot on macOS Mojave and later with Shift + Command + 5 keys or third-party screen capture software with ease.
 Top 3 Methods to Screenshot Google Maps on PC, iPhone and Android
People often need to screenshot Google Maps to help each other find some places. Here are 3 methods to do the job on your computer, iPhone and Android.