Online tutorials shot on smartphone devices are quickly rising in popularity today. Due to the rapid improvement of the iPhone and the iOS platform, tutorials involving the operating system are one of the most common topics that involve tutorials online. Unfortunately, screen recordings on iOS devices have no screen tap feedback for security reasons. This proves inconvenient for some since screen tap visual offers information when shooting tutorial videos. In this article, we will provide three ways that can be used to show taps on the iPhone screen when recording. This tutorial will use multiple options, such as one readily available on the iPhone, a third-party recorder, and an external recorder on a computer.
Best Used For: Easy-access recording, general use, etc.
Output Quality: 1080p at 30 FPS
Other Functions: Full-screen recording, system audio recorder, basic editing tool access
We will start this guide by featuring the easiest option to learn how to show where you're tapping on iPhone recording. This option involves using the assistive touch feature, readily available on your iOS device.
Since this method involves tinkering with your device’s settings, following our provided guide below will be enough to enable the tapping feedback to show when recording your iPhone screen. Simply follow the complete guide below to learn how to enable this function.
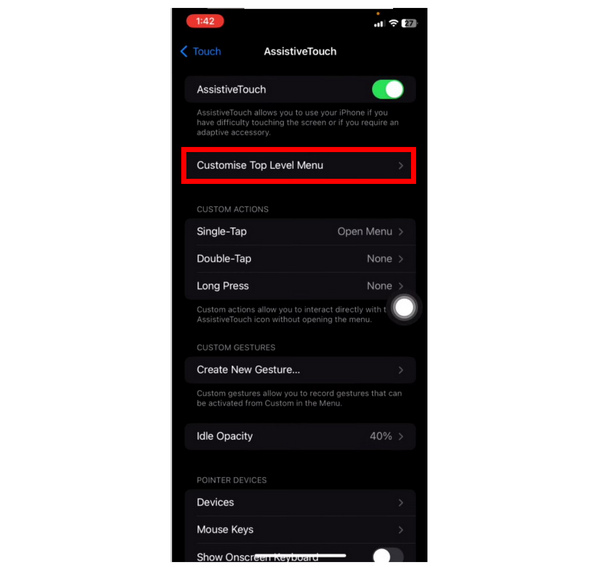
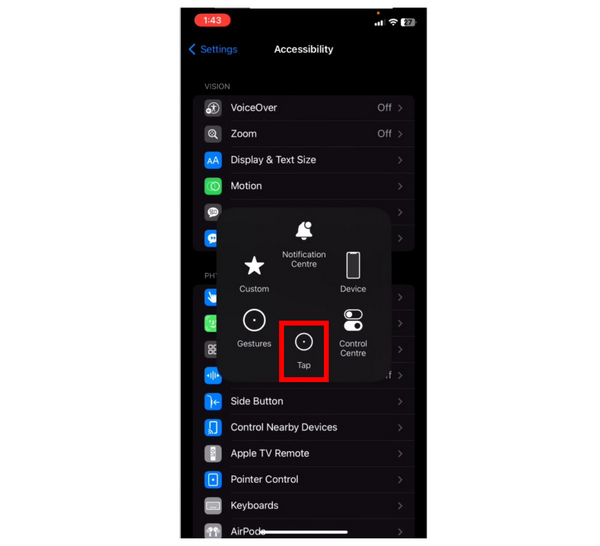
1.Open the iPhone’s settings and head to the Assistive Touch menu. It can be found on Settings > Accessibility > Touch. Then, tap on the Customize Top Level Menu.
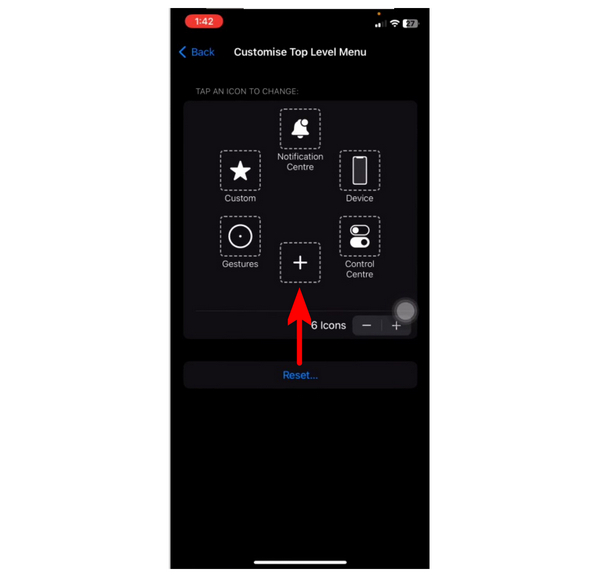
2.In the Customize Top Level Menu window, tap on the Plus icon of your Assistive Touch settings. This option will allow you to add additional buttons that can be assessed in the Assistive Touch overlay.
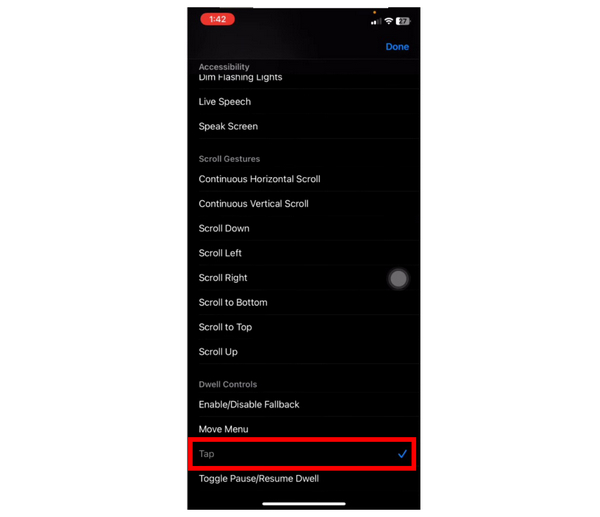
3.Scroll down to the available functions until you can find the Tap option under Dwell Control. Select it to add the Tap option in the Assistive Touch menu. Since a real-time touch display is absent in the iPhone, the Tap overlay is the closest option to show a touch display.
4.With the option now added to your Assistive Touch menu, click Tap before using your iPhone's built-in screen recording option.
5.Now that the Tap option is active, your device will show a faint circle on your screen to indicate the last part of the screen that you tapped. This function remains active while recording screen footage using the iPhone’s default recorder or a third-party app.

Now that you have enabled the setting to show tap feedback, you can record your iPhone screen while showing more effective tutorial information. Although available by default, the Tap function on the assistive touch menu of iPhone devices does not work in real-time. The touch feedback only appears per single touch and does not provide a display when using a swiping motion. This makes the option suboptimal if the goal is to add clear information on recordings.
Best Used For: Recording browser games, instantly sharing recordings, etc.
Output Quality: 1080p at 30 FPS
Other Functions: Simple controls, instant recording sharing, bookmark support for easier recording
For users looking for an alternative option or those facing problems such as iOS screen recording not working, using Web Recorder as a third-party screen recorder application may be a good pick. This software is specially designed to record browser-based activities on your iOS device. It supports Safari, Chrome, Firefox, and other popular mobile browsers.
The device is also designed to make video sharing highly convenient since it has a built-in sharing option through email and messaging apps. A quick guide to learning how to use the tool is provided below.
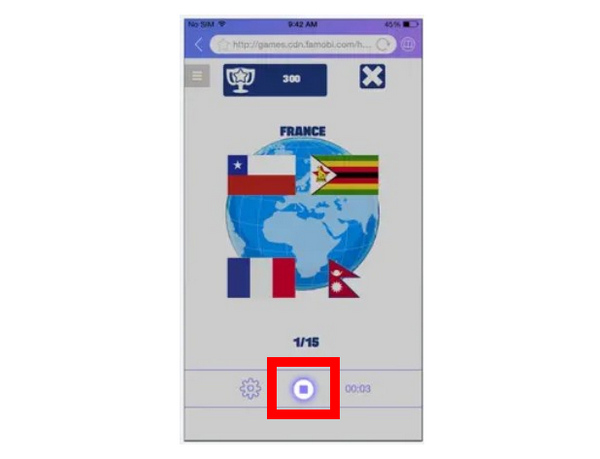
1.Download the Web Recorder app on the AppStore and finish its initial setup before using it. Then, start the Web Recorder app before opening your browser. Once inside the browser, click on the Record icon to start recording.

2.Simply do what you want to accomplish on your browser while the app is actively recording. Once the activity on your browser is done, tap on the Record button again to stop the recording process.
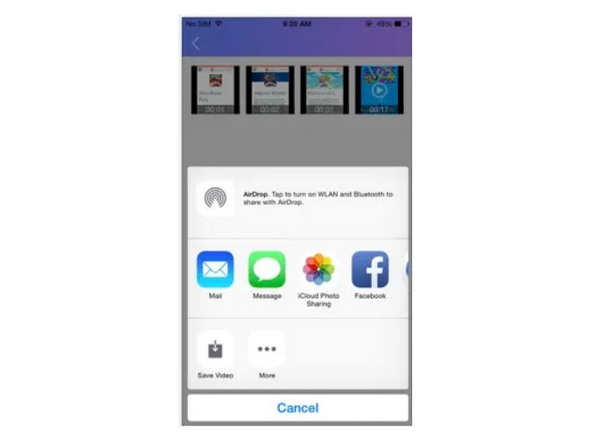
3.Finally, if you want to use the built-in sharing function of the app, a pop-up menu will appear once the recording is finished. You can now select the messaging app you want to use to share the recording clip.
Since Web Recorder does not have a tap visual aid, the Tap option provided on the Assistive Touch solution can still be used in this third-party software. As its name suggests, Web Recorder is only viable if you want to record your screen while using your smartphone’s browser. It will not work outside the app, making it a lousy option for general screen recording needs.
Best Used For: Phone mirroring, third-party device recording, bypassing app security
Output Quality: 480p, 720p, 1080p, at 24 - 120 FPS
Other Functions: Equipped with seven recording modes, multiple output format options, and a built-in recording editor
If you are looking for software that can provide real-time touch visuals on your screen recordings, the most viable option is a phone mirror recorder operating from a computer. With that in mind, AnyMP4 Screen Recorder’s Phone Recorder mode is the best option.
As its name suggests, the Phone Recorder mode of the screen recorder software works by mirroring your iPhone device to the computer where it is connected. Since the recording is being done on a computer, the mouse cursor will also be captured in the screen recording, which results in real-time feedback of where you are tapping on your iOS device.
Using a third-party device to record your iOS tutorials will make the information your screen recordings can provide much more precise and easier to understand.
To learn how to use this option, we have provided a complete tutorial on setting up the software below.
Secure Download
Secure Download
First, download the software to follow each step more easily.
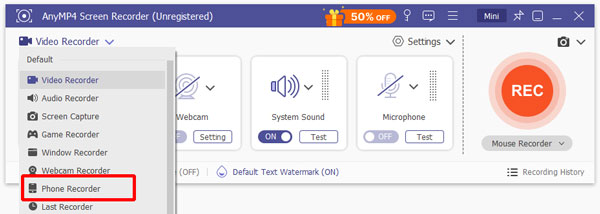
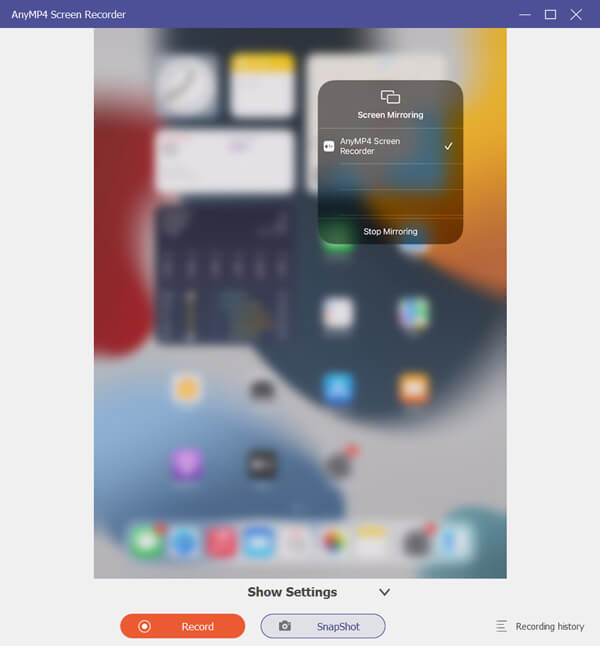
1.Open AnyMP4 Screen Recorder and select the icon beside the Video Recorder mode. Then, a drop-down menu will appear where the Phone Recorder mode can be selected. After choosing Phone Recorder, a platform selector menu will pop up; click on the iOS Recorder to start using its option to record iPhone screens.
2.When your iPhone is connected to AnyMP4 Screen Recorder, click the Screen Mirroring option. Before beginning the recording, you can adjust the recording settings, including the Resolution, Output Resolution, and Recording Content settings.
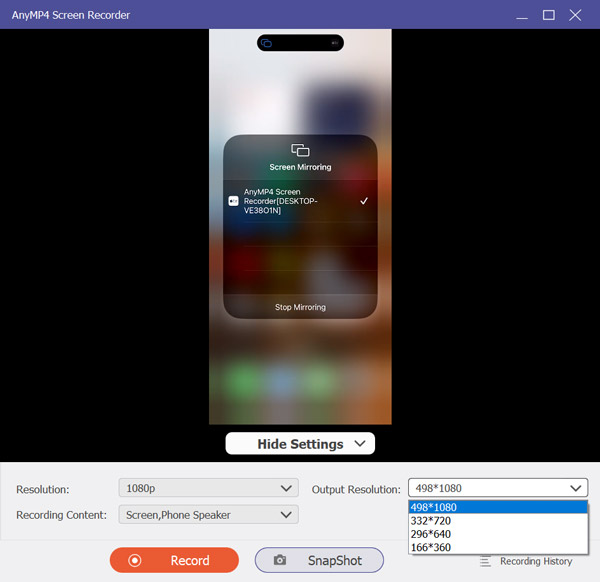
3.Once satisfied with the recording settings, tap on Record to start the phone mirror recording. Since the recording will be captured on your computer, your mouse cursor will also be recorded, which can provide a real-time touch indicator visual.
Now that your iPhone has been connected to your mirroring software, you can record your screen with real-time touch feedback. This was made possible by the convenient and highly flexible tool AnyMP4 Screen Recorder, also the best screen recorder for Mac computers.
Now that we have provided you with three options to record iPhone touch feedback, this article has helped you decide which screen recorder option to use. For a comprehensive and dedicated screen recorder tool, AnyMP4 Screen Recorder remains the best option among the three. To test the software, you can always download the tool by clicking on the link in the article's third section.
Please share this article online to help other users looking for reliable screen recorder software for iPhone and iOS devices.
 Posted by Riley Mitchell to Record Video
Related Articles
 Easy Ways of How to Record Screen on iPhone Without Effort
Have you ever been very frustrated because you don't know how to record screen on iPhone? Want to master this technique easily? Just read this guide to learn!
 5 Easy Methods to Record a Phone Call on iPhone XR/X/8/7
How to record a phone call on iPhone since there is no built-in method? The article shares 5 best methods to record some important phone calls on iPhone.
 5+ Voice Recorder Apps to Record Voice and Music on iPhone and iPad
A good voice recorder app can make your iPhone as a digital recorder. It is hard to tell which one can be the best. You can find your answer here.
 Record Audio on iPhone (Music, Call, Voice, Live Stream, Meeting…)
This is the complete tutorial to record audio on iPhone from all sources, including app, browser, microphone and more. You can secretly record audio on iPhone.